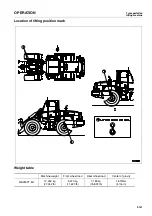


OPERATION
Troubleshooting
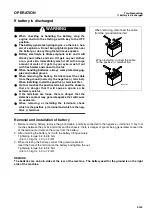
If battery is discharged
3-111
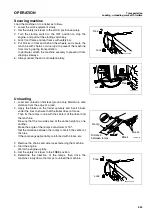
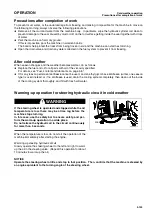
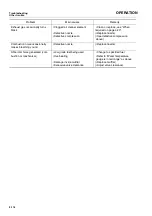
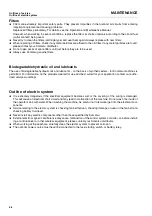
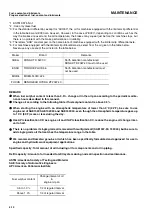
Connecting the booster cable
0.
Keep the starting switch of the normal machine and problem machine at the OFF position.
Connect the booster cable as follows, in the order of the numbers marked in the diagram.
1. Connect one clip of booster cable (A) to the positive (+) ter-
minal of the problem machine.
2. Connect the other clip of booster cable (A) to the positive
(+) terminal of the normal machine.
3. Connect one clip of booster cable (B) to the negative (-) ter-
minal of the normal machine.
4. Connect the other clip of booster cable (B) to the engine
block of the problem machine.
Starting engine
0.
WARNING
Always check that the safety lock lever is set to the LOCK position, regardless of whether the machine is
working normally or has failed. Check also that all the control levers are at the HOLD or neutral position.
1. Make sure the clips are firmly connected to the battery terminals.
2. Start the engine of the normal machine and keep it to run at high idling speed.
3. Turn the starting switch of the problem machine to the START position and start the engine.
If the engine doesn't start at first, wait for at least 2 minutes before trying again.
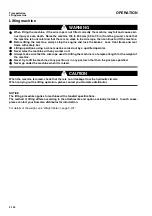
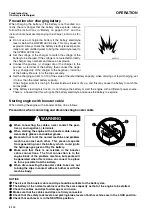
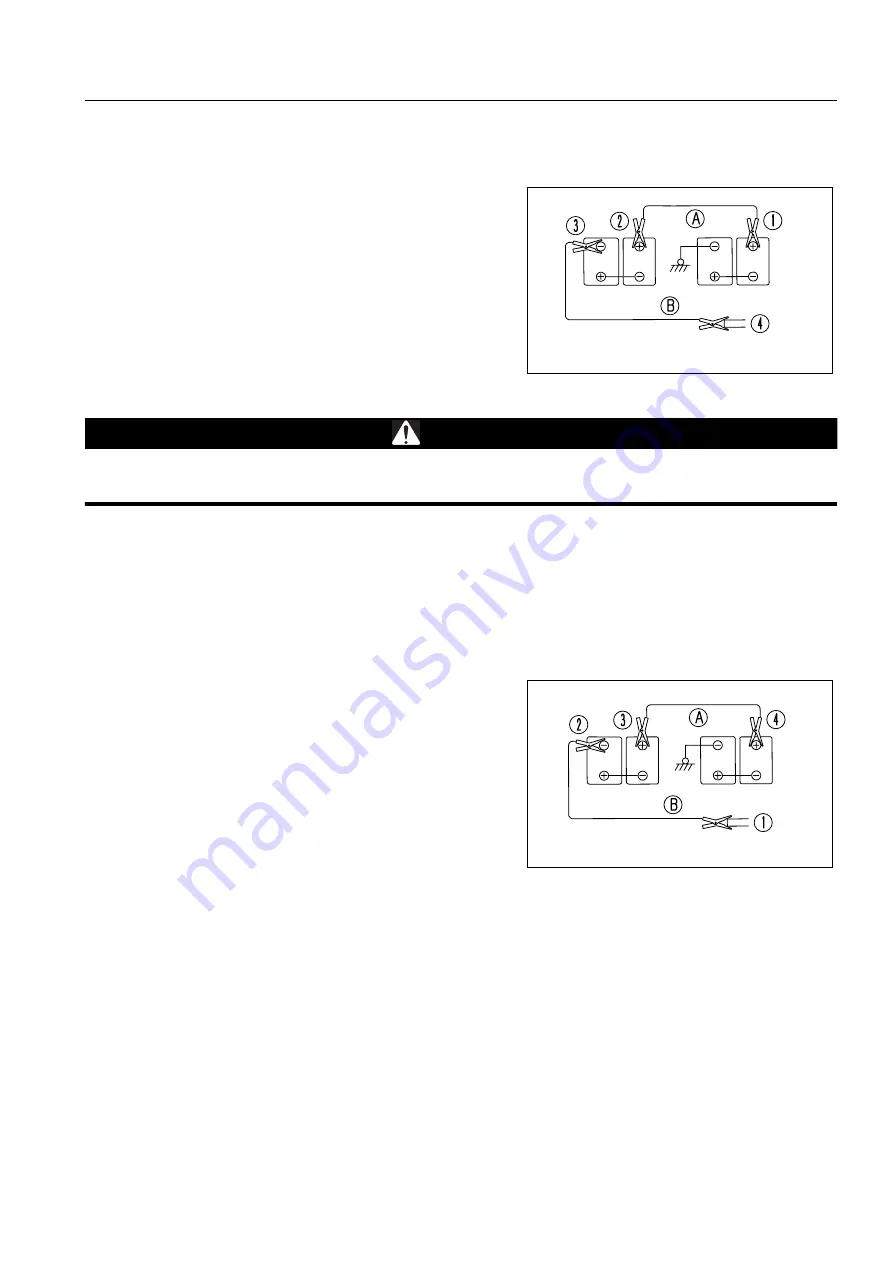
Disconnecting the booster cable
0.
After the engine has started, disconnect the booster cables in the reverse of the order in which they were con-
nected.
1. Remove one clip of booster cable (B) from the engine block
of the problem machine.
2. Remove the other clip of booster cable (B) from the nega-
tive (-) terminal of the normal machine.
3. Remove one clip of booster cable (A) from the positive (+)
terminal of the normal machine.
4. Remove the other clip of booster cable (A) from the positive
(+) terminal of the problem machine.
AW35758B-A
Battery of the
normal machine
Battery of the
problem machine
the problem machine
Engine block of
A35786B-A
Battery of the
normal machine
Battery of the
problem machine
the problem machine
Engine block of
Summary of Contents for WA250PT-5H
Page 2: ......
Page 3: ...FOREWORD 11...
Page 16: ...Contents FOREWORD 1 14...
Page 24: ...SAFETY 2 2...
Page 58: ...Precautions with tires SAFETY Precautions when storing tires 2 36...
Page 60: ...OPERATION 3 2...
Page 233: ...TECHNICAL DATA 45...
Page 235: ...TECHNICAL DATA Technical data 5 3...
Page 250: ...Central lubrication system ATTACHMENTS OPTIONS 6 14...
Page 251: ...INDEX 67...
Page 252: ...INDEX 7 2...
Page 255: ...Index 7 5...


