MAINTENANCE EVERY 1000 OPERATING HOURS
3-42
AXLES, OIL CHANGE
The oil change procedure for the front and the rear axle is identical.
WARNING
•
Frequent skin contact with used oil may cause skin damages
and other injuries!
Carry rubber gloves for exchanging the filter. Wash any oil
carefully from your skin.
•
Danger of being burnt by hot transmission oil!
Wear rubber gloves and hold the oil trough under the
discharge hole in such a way that you cannot come into
contact with the extruding oil.
NOTE
Drain oil immediately after a longer driving period so that any
particles of dirt are still circulating and will be flushed out with the
oil.
Have a collecting container of sufficient capacity ready when carrying
out this work.
DANGER
Severe accidents may happen, if you perform maintenance
operations on machines which are not properly parked and
secured!
Park the machine on firm and level ground and secure it, before
starting maintenance operations.
1.
Park and secure the machine as described in chapter "Preparing
the Machine for Maintenance".
2.
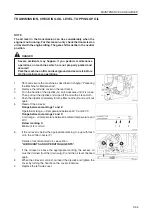
Move the machine until the control bore holes (1) of both planetary
transmissions of an axle are at their lowest point.
3.
Place the collecting container below the oil discharge opening.
4.
Remove the screw plugs of the control holes (1 and 2) and the
drain plug (3). Drain oil into collecting container.
5.
Clean the drain plug (3) and re-insert it with a new O-ring.
6.
Now move the machine until the oil level markings on both planetary
transmissions are horizontal.
7.
Pour oil slowly into all control holes (1 and 2) until the oil reaches
the lower rim of the control holes.
8.
Wait a few minutes then recheck and top up, if necessary, until
the oil level remains constant at the lower rim of the control holes.
9.
Replace the control screws with new O-rings.
10.
Repeat the process on the other axle.
11.
Check for leaks after driving for approx. 5 minutes.
Summary of Contents for WA270-3H
Page 2: ......
Page 10: ...0 8 Contents ...
Page 11: ...INFORMATION ON THESE OPERATING INSTRUCTIONS ...
Page 12: ...0 1 0 Information on these Operating Instructions ...
Page 22: ...0 2 0 Information on these Operating Instructions ...
Page 23: ...0 2 1 Loading and Transporting the Machine LOADING AND TRANSPORTING THE MACHINE ...
Page 24: ...0 2 2 Loading and Transporting the Machine ...
Page 30: ...0 2 8 Loading and Transporting the Machine ...
Page 56: ...SAFETY LABELS 1 26 ...
Page 58: ...SAFETY LABELS 1 28 ...
Page 59: ...2 1 Operating and Control Elements OPERATING AND CONTROL ELEMENTS ...
Page 72: ...2 14 Operating and Control Elements SWITCHES ...
Page 91: ...2 33 Operation OPERATION ...
Page 123: ...2 65 Troubleshooting TROUBLESHOOTING ...
Page 137: ...3 1 MAINTENANCE ...
Page 138: ...3 2 MAINTENANCE BASICS ...
Page 152: ...3 16 LUBRICANTS AND OPERATING AGENTS ...
Page 195: ...Technical details 4 1 TECHNICAL DETAILS ...
Page 198: ...Technical details 4 4 NOTES ...
Page 199: ...Special equipment auxiliary equipment 5 1 SPECIAL EQUIPMENT AUXILIARY EQUIPMENT ...
Page 202: ...Special equipment auxiliary equipment 5 4 ...
Page 203: ... 2001 Komatsu Hanomag Aktiengesellschaft All Rights Reserved Printed in Europe 02 2001 ...


