1.
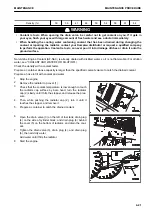
Raise the bucket to a suitable height, then put a block (A)
under the bucket to prevent the bucket from lowering.
Raise the bucket to make its bottom surface level.
2.
Remove the bolts and nuts (1) and (2), and remove bucket
teeth (3).
3.
Clean the mounting surface of bucket teeth (3).
4.
Install a new teeth to the bucket.
Eliminate the clearance between the teeth and top face of
the bucket by inserting shims.
Continue the adjustment with shims until the insertion of
0.5 mm thick of shim becomes impossible.
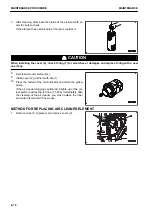
If the wear extends to the mounting surface, repair the mounting surface before installing the cutting edge.
5.
In order to eliminate the clearance between the bucket teeth and the top end of the bucket, tighten bolts
and nuts (1) and (2) lightly, then tap the teeth ends using a hammer.
Tightening torque of mounting bolt
(1): 588 to 647 Nm {60 to 66 kgm}
(2): 863 to 941 Nm {88 to 96 kgm}
6.
After operating for several hours, retighten the mounting bolts.
METHOD FOR REPLACING KMAX TEETH
(if equipped)
Replace the tooth before the wear reaches to the adapter.
Items to be prepared
Socket wrench with 11 mm of width across flats and torque wrench
REMARK
The wear will become uniform by rotating the mounting position of the tooth. This will extend the service life of
the tooth and reduce the frequency of replacement.
1.
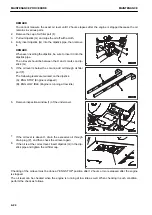
Raise the bucket to a suitable height, then put a block (A)
under the bucket to prevent the bucket from lowering.
Set the bottom of bucket to be level, and put a block under
the bucket at the center.
2.
Lower the bucket on the block and stabilized it.
3.
Stop the engine.
4.
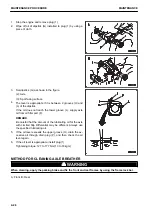
Fit the socket wrench to the shaft of pin (1), and turn it
counterclockwise by 90 ° to unlock the pin.
MAINTENANCE
MAINTENANCE PROCEDURE
4-31
Summary of Contents for WA480-8
Page 2: ......
Page 19: ...Distributor name Address Phone Fax Service personnel FOREWORD PRODUCT INFORMATION 1 17...
Page 29: ...LOCATION OF SAFETY LABELS SAFETY SAFETY LABELS 2 3...
Page 159: ...SWITCHES 1 ECSS switch 2 Front working lamp switch OPERATION EXPLANATION OF COMPONENTS 3 91...
Page 302: ...Securing position Fixing angle A 61 B 53 C 33 D 38 TRANSPORTATION OPERATION 3 234...
Page 324: ......
Page 397: ...Viewed from the rear side of the machine MAINTENANCE MAINTENANCE PROCEDURE 4 73...
Page 402: ......
Page 403: ...SPECIFICATIONS 5 1...
Page 406: ......
Page 422: ......
Page 423: ...REPLACEMENT PARTS 7 1...
Page 439: ......


