FOREWORD
MAINTENANCE STANDARD TERMS
WA500-6
00-11
MAINTENANCE STANDARD TERMS
00
The
Structure, Function and Maintenance
section explains the criteria for replacing or reusing products and parts in the
machine maintenance work. The following terms are used to explain the criteria.
Standard Size and Tolerance
•
To be accurate, the finishing size of parts is a little different from one to another.
•
To specify a finishing size of a part, a temporary standard size is set and an allowable difference from that size is
indicated.
•
The temporary size set is called the
standard size
and the range of difference from the standard size is called the
tolerance
.
•
Tolerance with the symbols (+) or (-) is indicated on the right
side of the standard size as shown in this table.
★
Tolerance may be indicated in the text and a table as [standard
size (upper limit of tolerance/lower limit of tolerance)].
Example: 120 (-0.022/-0.126)
•
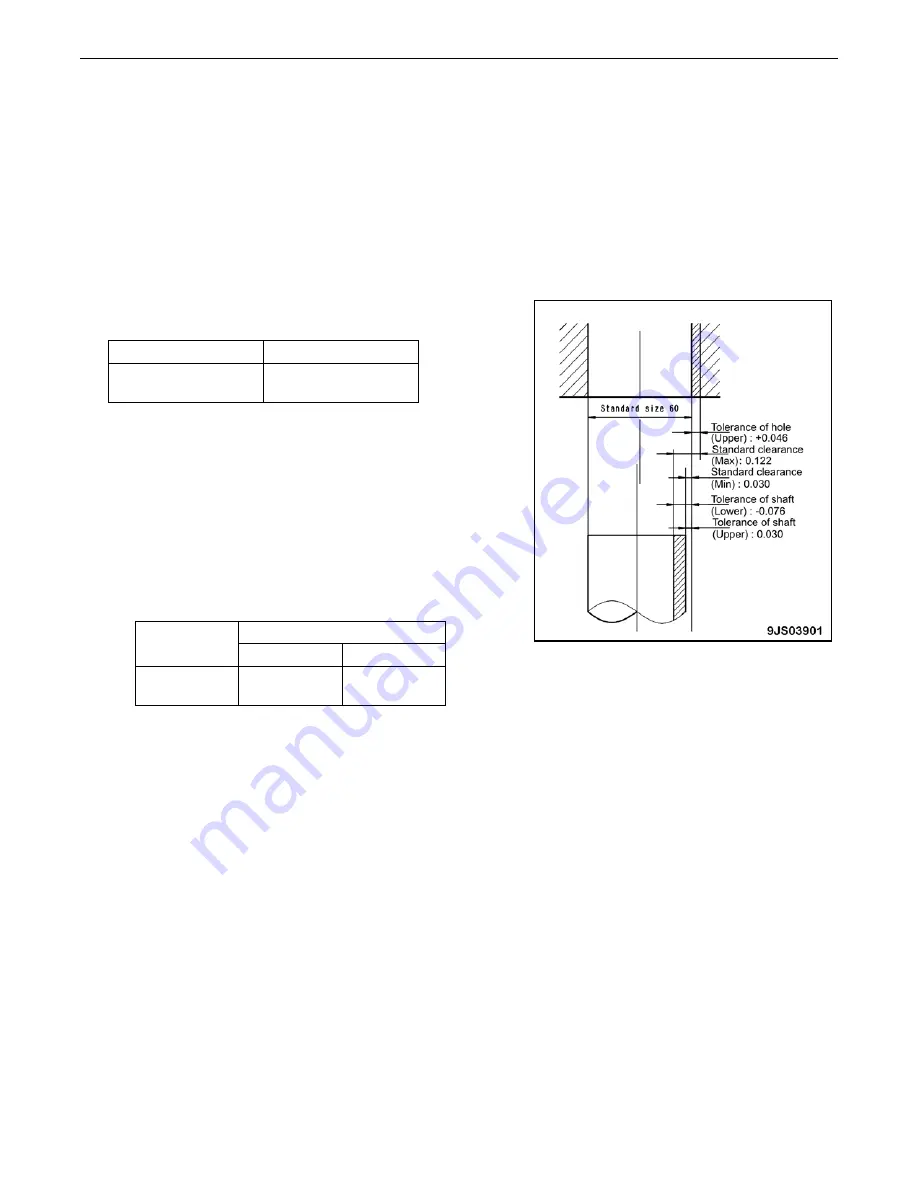
Usually, the size of a hole and the size of the shaft to be fitted
to that hole are indicated by the same standard size and
different tolerances of the hole and shaft. The tightness of fit is
decided by the tolerance.
•
Indication of size of rotating shaft and hole and their
relationship is shown in the graphic and this table.
Standard Clearance and Standard Value
•
The clearance made when new parts are assembled is called the
standard clearance
, which is indicated by the range from
the minimum clearance to the maximum clearance.
•
When some parts are repaired, the clearance is generally adjusted to the standard clearance.
•
A value of performance and function of new products or equivalent is called the
standard value
, which is indicated by a
range or a target value.
•
When some parts are repaired, the value of performance/function is set to the standard value.
Standard Interference
•
When the diameter of a hole of a part shown in the given standard size and tolerance table is smaller than that of the
mating shaft, the difference between those diameters is called the
interference
.
•
The range (A – B) from the difference (A) between the minimum size of the shaft and the maximum size of the hole to the
difference (B) between the maximum size of the shaft and the minimum size of the hole is the
standard interference
.
•
After repairing or replacing some parts, measure the size of their hole and shaft and check that the interference is in the
standard range.
Standard Size
Tolerance
120
-0.022
-0.126
Standard Size
Tolerance
Shaft
Hole
60
-0.030
-0.076
+0.046
+
0


