background image

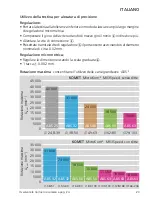
45 000
40 000
35 000
30 000
25 000
20 000
15 000
10 000

5000

0

x

 24,8-39

x

 38-50

x

 49-63

x

62-80

x

79-103

35 000
30 000
25 000
20 000
15 000
10 000

5000

0

x

 38-51

x

 50-63

x

 62-83

x

 82-103

x

100-130

x

128-168

x

166-206

11

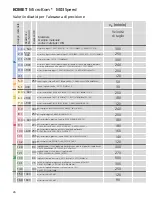
40 000

aBS 25

31 000

aBS 32

24 000

aBS 40

18 500

aBS 50

15 000

aBS 63

31 000

aBS 32

24 000

aBS 32

18 500

aBS 50

15 000

aBS 50

11 500

aBS 63

10 000

aBS 63

8 000

aBS 63

EnglISh

handling the precision boring head

coarse adjustment:

• Set adjustment scale 

6

 as far as stop in the minus direction to obtain as large 

a micro-adjustment range as possible.

• To compensate for reverse play, adjust the adjustment scale 

6

 by half a turn in 

the plus direction.

• Loosen the holding screw 

4

.

• With the differential screw 

5

 preset to the nominal dimension within about 

0.02 mm.

Fine adjustment:

• Set to dimension using the adjustment scale 

6

.

• 1 graduation 

 0.002 mm. 

permissible

 spindle

 speed


U

B.zul.

 (min

–1

)

KOMET  

MicroKom®  M03Speed  with replaceable bridge

permissible

 spindle

 speed


U

B.zul.

 (min

–1

)

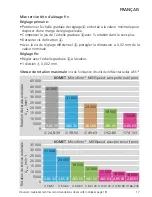
Maximum spindle speed when using different  aBS® sizes

KOMET  

MicroKom®  M03Speed  without replaceable bridge

Please see notes on safety (page 12)

Summary of Contents for MicroKom M03Speed

Page 1: ...Bedienungsanleitung Operating Instructions Mode d emploi Istruzioni per l uso Manual de instrucciones 操作说明 KOMET MicroKom M03Speed ...

Page 2: ...on boring head 10 Calculation for reverse machining 10 Dynamic weight balance 10 Handling the precision boring head 11 Maximum spindle speed 11 Mounting the insert holder 12 13 Guide values for precision drilling 14 15 Français Sommaire Page Construction de la tête d alésage fin 16 Calcul pour un usinage en tirant 16 Équilibre dynamique de la force 16 Mise service tête d alésage fin 17 Vitesse de ...

Page 3: ...to 24 25 Valori indicativi per l alesatura di precisione 26 27 Español Contenido Página Montaje cabezal de mandrinado de precisión 28 Cálculo para un mecanizado inverso 28 Equilibrado dinámico del peso 28 Manejo cabezal de mandrinado de precisión 29 Velocidad máxima de rotación 29 Montaje del soporte de plaquitas de corte 30 31 Valores orientativos para el mandrinado de precisión 32 33 中文 索引 页码 精镗...

Page 4: ...nzialschraube für Grobverstellung des Halters 6 Verstellskala problemlose Einstellung bzw Ablesbarkeit ohne Nonius 7 Ausgleichsschieber 8 Kühlmittelaustritt 9 ABS Anbindung Patentanmeldungen im In und Ausland Berechnung für Rückwärtsbearbeitung Bohrungs x D1 D1 Bohrungs x D2 Flugkreis x D Bearbeitungs x allgemein Flugkreis x D2 Dynamischer Wuchtausgleich imSchiebergarantiertinjederPositionoptimale...

Page 5: ... 6 bis auf Anschlag ins Minus stellen um größtmöglichen Feinver stellbereich zu erhalten Zur Kompensation des Umkehrspiels Verstellskala 6 Umdrehung in Plusrich tung zustellen Befestigungsschraube 4 lösen MitDifferenzialschraube5Maßbisaufca 0 02mmzumNennmaßvoreinstellen Feinverstellung mit Verstellskala 6 auf Maß einstellen 1 Teilstrich 0 002 mm zulässige Betriebsdrehzahl U B zul min 1 zulässige B...

Page 6: ...se DieimanwendungstechnischenHinweisgenanntenEinsatz datensindabhängigvondenUmgebungs undEinsatz bedingungen wiez B Maschine Umgebungs temperatur Schmier Kühlmitteleinsatzund angestrebtes Bearbeitungs ergebnis sie setzen sachgerechte Einsatz bedingungen sachgerechten Einsatz und Beachtung der angegebenen Grenzdrehzahlen der Werkzeuge voraus Zur Vemeidung von Schäden an der Maschine und am Werkzeug...

Page 7: ...enträgers 1 X 38 103 mm Montage des Schneidenträgers 1 X 38 206 mm Befestigungsschraube 3 lösen Schneidenträger 1 wechseln Bei Montage des Schneidenträgers auf Schneiden Orientierung achten Montage der Brücke j Klemmschrauben k für Wechselbrücke so weit ausdrehen dass Wechselbrücke abgezogen werden kann Darauf achten dass O Ring l nicht beschädigt wird Montage des Schneidenträgers ...

Page 8: ...341 6CrMo15 5 1 2601 X165CrMoV12 HSS Sonderlegierung Inconel 2 4631 Nimonic 80A 2 4668 NiuCr19Fe19Nb5Mo3 Titan Titanlegierungen 3 7115 TiAl5Sn2 5 rostfreie Stähle 1 4306 X2CrNi19 11 1 4401 X5CrNiMo17 12 2 rostfreie Stähle 1 4511 X3CrNb17 1 4571 X10CrNiMoTi17 12 2 rostfreie hitzebeständige Stähle 1 4713 X10CrAlSi7 1 4862 X8NiCrSi38 18 Grauguss 0 6025 EN GJL 250 0 6035 EN GJL 350 Grauguss legiert 0 ...

Page 9: ...10 0 06 0 10 0 15 0 20 0 15 0 20 0 15 0 20 0 15 0 20 0 10 0 15 0 10 0 15 0 10 0 15 0 10 0 15 0 10 0 15 0 10 0 15 0 10 0 15 0 10 0 15 0 10 0 15 0 10 0 15 0 10 0 15 0 10 0 15 0 10 0 15 0 10 0 15 0 08 0 12 0 08 0 12 0 10 0 15 0 10 0 15 0 10 0 15 0 10 0 15 0 08 0 08 0 08 0 08 0 06 0 08 0 06 0 08 max Vorschub fmax mm U ohne Wechselbrücke mit Wechselbrücke Bitte sicherheitsrelevante Hinweise Seite 6 unb...

Page 10: ...screw for coarse adjustment of insert holder 6 Adjustment scale high resolution gives easy read off without vernier 7 Slide with weight compensation 8 Coolant outlet 9 ABS connection Patent applied for inside and outside Germany Calculation for reverse machining Drilling dia D1 D1 Drilling dia D2 Rotating dia D Machining dia generally Rotating dia D2 Dynamic weight balance on the slide guarantees ...

Page 11: ...scale 6 as far as stop in the minus direction to obtain as large a micro adjustment range as possible To compensate for reverse play adjust the adjustment scale 6 by half a turn in the plus direction Loosen the holding screw 4 With the differential screw 5 preset to the nominal dimension within about 0 02 mm Fine adjustment Set to dimension using the adjustment scale 6 1 graduation 0 002 mm permis...

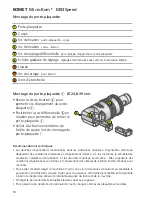
Page 12: ...r replaceable bridge L O ring Safety notes The technical notes provided in the application details depend on the environmental and application conditions such as machine environmental temperature lubrication coolant used and desired machining results these are based on proper application conditions use and compliance with the spindle speed limits given for the tools To prevent damage to machine an...

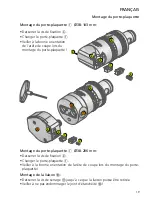
Page 13: ...r 1 X 38 103 mm Mounting the insert holder 1 X 38 206 mm Release the holding screw 3 Replace the insert holder 1 When fitting the insert holder check the orientation of the cutting edge Mounting the replaceable bridge j Unscrew clamping screw k for the replaceable bridge to allow the replaceable bridge to be removed In doing so check that the O ring l is not damaged Mounting the insert holder ...

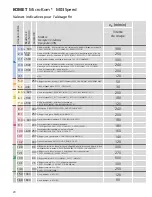
Page 14: ...19Nb5Mo3 titanium titanium alloys 3 7115 TiAl5Sn2 5 stainless steels 1 4306 X2CrNi19 11 1 4401 X5CrNiMo17 12 2 stainless steels 1 4511 X3CrNb17 1 4571 X10CrNiMoTi17 12 2 stainless fireproof steels 1 4713 X10CrAlSi7 1 4862 X8NiCrSi38 18 gray cast iron 0 6025 EN GJL 250 0 6035 EN GJL 350 alloyed gray cast iron 0 6660 GGL NiCr20 2 spheroidal graphite cast iron ferritic 0 7040 EN GJS 400 15 spheroidal...

Page 15: ...06 0 10 0 06 0 10 0 15 0 20 0 15 0 20 0 15 0 20 0 15 0 20 0 10 0 15 0 10 0 15 0 10 0 15 0 10 0 15 0 10 0 15 0 10 0 15 0 10 0 15 0 10 0 15 0 10 0 15 0 10 0 15 0 10 0 15 0 10 0 15 0 10 0 15 0 10 0 15 0 08 0 12 0 08 0 12 0 10 0 15 0 10 0 15 0 10 0 15 0 10 0 15 0 08 0 08 0 08 0 08 0 06 0 08 0 06 0 08 Englisch Guide values for precision drilling max feed fmax mm rev without replaceable bridge with repl...

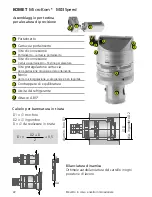
Page 16: ...age d approche du porte plaquette 6 Echelle graduée de réglage réglage et lecture aisés avec vernier à résolution élevée 7 Coulisseau de compensation 8 Sortie du lubrifiant réfrigérant 9 Raccordement ABS Brevet déposé en Allemagne et à l étranger Calcul pour un usinage en tirant x de perçage D1 D1 x de perçage D2 x de l outil D x usiné x de l outil D2 Équilibre dynamique de la force Le vernier gar...

Page 17: ...our disposer d une marge de réglage élevée Compenser le jeu de l échelle graduée 6 avec rotation dans le sens plus Desserrer vis de fixation 4 Avec la vis de réglage différentiel 5 prérégler la dimension à 0 02 mm de la valeur nominale Réglage fin Régler avec l échelle graduée 6 à la valeur 1 division 0 002 mm Mise service tête d alésage fin Rotation de service autorisée U B zul min 1 KOMET MicroK...

Page 18: ...mandations techniques Les données d applications mentionnées dans les indications relatives à l application technique dépendent des conditions ambiantes et d applications telles p ex les machines la température ambiante l utilisation de lubrifiant et les résultats d usinage escomptés elles supposent des conditions d applications conformes et l observation des vitesses de rotation limites données p...

Page 19: ...laquette 1 X 38 103 mm Français Montage du porte plaquette 1 X 38 206 mm Desserrer la vis de fixation 3 Changer le porte plaquette 1 Veiller à la bonne orientation de l arête de coupe lors du montage du porte plaquette Montage de la liaison j Desserrer la vis de serrage k jusqu à ce que la liaison puisse être retirée Veiller à ne pas endommager le joint d étanchéité l Montage du porte plaquette ...

Page 20: ...tils 1 2341 6CrMo15 5 1 2601 X165CrMoV12 HSS Alliages spéciaux Inconel 2 4631 Nimonic 80A 2 4668 NiuCr19Fe19Nb5Mo3 Titane alliages titane 3 7115 TiAl5Sn2 5 Aciers inoxydables 1 4306 X2CrNi19 11 1 4401 X5CrNiMo17 12 2 Aciers inoxydables 1 4511 X3CrNb17 1 4571 X10CrNiMoTi17 12 2 Aciers inoxydables à résistance thermique 1 4713 X10CrAlSi7 1 4862 X8NiCrSi38 18 Fonte grise 0 6025 EN GJL 250 0 6035 EN G...

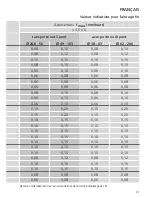
Page 21: ...15 0 20 0 15 0 20 0 15 0 20 0 15 0 20 0 10 0 15 0 10 0 15 0 10 0 15 0 10 0 15 0 10 0 15 0 10 0 15 0 10 0 15 0 10 0 15 0 10 0 15 0 10 0 15 0 10 0 15 0 10 0 15 0 10 0 15 0 10 0 15 0 08 0 12 0 08 0 12 0 10 0 15 0 10 0 15 0 10 0 15 0 10 0 15 0 08 0 08 0 08 0 08 0 06 0 08 0 06 0 08 Français Valeurs indicatives pour l alésage fin Avance maxi fmax mm tours sans porte outil pont avec porte outil pont Obse...

Page 22: ... per alesatura 5 Vite preregolazione cartuccia per registrazione grossolana del portainserto 6 Nonio per la microregolazione scala grande e ben leggibile 7 Contrappeso di equilibratura 8 Uscita del refrigerante 9 Attacco ABS Brevetto in corso a livello internazionale Calcolo per barenatura in tirata dia min foro D1 D1 x min foro D2 x ingombro D x da realizzare in tirata dia ingombro D2 Bilanciatur...

Page 23: ...ciareunpiùlargomargine di regolazione micrometrica Compensare il gioco della vite ruotando di mezzo giro il nonio 6 in direzione più Allentare la vite di connessione 4 Presettaretramitelavitediregolazione5ilportainsertoavvicinandosialdiametro nominale di circa 0 02mm Regolazione micrometrica Regolare la dimensione usando la scala graduata 6 1 tacca 0 002 mm Utilizzo della testina per alesatura di ...

Page 24: ...io per slitta intercambiabile L O ring Informazioni per la sicurezza Nota I dettagli delle applicazioni mostrati dipendono dalle caratteristiche dell ambiente e dalle condizione di applicazione p es macchina utensile temperatura ambiente uso di lubrificante o refrigerante e dai risultati richiesti Questi sono soggetti a corrette condizioni di lavoro corretta applicazione e dipendenti dai limiti de...

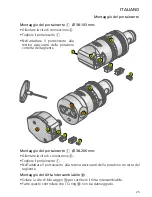
Page 25: ... X 38 103 mm Italiano Montaggio del portainserto 1 X 38 206 mm Allentare la vite di connessione 3 Togliere il portainserto 1 Nell adattare il portainserto alla testina assicurarsi della posizione corretta del tagliente Montaggio del slitta intercambiabile j Svitare la vite di bloccaggio k per sostituire il slitta intercambiabile Fatto questo controllare che l O ring l non sia danneggiato Montaggio...

Page 26: ...2 4668 NiuCr19Fe19Nb5Mo3 titanio leghe di titanio 3 7115 TiAl5Sn2 5 acciai inossidabili 1 4306 X2CrNi19 11 1 4401 X5CrNiMo17 12 2 acciai inossidabili 1 4511 X3CrNb17 1 4571 X10CrNiMoTi17 12 2 acciai inossidabili 1 4713 X10CrAlSi7 1 4862 X8NiCrSi38 18 ghisa grigia 0 6025 EN GJL 250 0 6035 EN GJL 350 ghisa grigia legata 0 6660 GGL NiCr20 2 ghisa sferoidale grafitica ferritica 0 7040 EN GJS 400 15 gh...

Page 27: ...06 0 10 0 06 0 10 0 15 0 20 0 15 0 20 0 15 0 20 0 15 0 20 0 10 0 15 0 10 0 15 0 10 0 15 0 10 0 15 0 10 0 15 0 10 0 15 0 10 0 15 0 10 0 15 0 10 0 15 0 10 0 15 0 10 0 15 0 10 0 15 0 10 0 15 0 10 0 15 0 08 0 12 0 08 0 12 0 10 0 15 0 10 0 15 0 10 0 15 0 10 0 15 0 08 0 08 0 08 0 08 0 06 0 08 0 06 0 08 Italiano Valori indicativi per l alesatura di precisione max avanzamento fmax mm giro senza slitte con...

Page 28: ...glaje para el ajuste de aproximación del porta placas 6 Escala de ajuste Regulación y lectura con vernier de alta resolución 7 Guía de compensación 8 Salida de líquido refrigerante 9 Conexión ABS Solicitudes de patente en y fuera de Alemania Cálculo para un mecanizado inverso x de taladrado D1 D1 x de taladrado D2 x de la herramienta D x usiné x del útil D2 Equilibrado dinámico del peso En la guía...

Page 29: ...onseguir el mayor margen posible de ajuste preciso Para compensar el juego de retroceso ajustar la escala 6 vuelta en dirección más Aflojar el tornillo de fijación 4 Coneltornillodereglaje5preajustaraaprox 0 02mmdeladimensiónnominal Ajuste preciso Ajustar a la dimensión con la escala de ajuste 6 1 graduación de la escala 0 002 mm Manejo cabezal de mandrinado de precisión Rotación de servicio autor...

Page 30: ... K Tornillo de apriete para puente intercambiable L Junta tórica Recomendaciones técnicas Los datos técnicos recogidos en los detalles de aplicación dependen de las condiciones del entorno tales como máquinas temperatura ambiente uso del lubricante y de los resultados deseados en el mecanizado ello supone unas condiciones de aplicación conforme a los datos de velocidades de rotación máximos dados ...

Page 31: ...1 X 38 103 mm Español Montaje del soporte de plaquitas 1 X 38 206 mm Aflojar el tornillo de fijación 3 Cambiar el soporte de plaquitas 1 Observar la orientación de las plaquitas al montar el soporte Montaje del puente intercambiable j Girar los tornillos de apriete k del puente intercambiable hasta que pueda extraerse Tener cuidado de no dañar la junta tórica l Montaje del soporte de plaquitas de ...

Page 32: ...eaciones de titanio 3 7115 TiAl5Sn2 5 Aceros inoxidables 1 4306 X2CrNi19 11 1 4401 X5CrNiMo17 12 2 Aceros inoxidables 1 4511 X3CrNb17 1 4571 X10CrNiMoTi17 12 2 Aceros inoxidables aceros resistentes al calor 1 4713 X10CrAlSi7 1 4862 X8NiCrSi38 18 Fundición gris 0 6025 EN GJL 250 0 6035 EN GJL 350 Aleaciones de fundición gris 0 6660 GGL NiCr20 2 Fundición esferoidal con grafito ferrítica 0 7040 EN G...

Page 33: ... 0 10 0 15 0 20 0 15 0 20 0 15 0 20 0 15 0 20 0 10 0 15 0 10 0 15 0 10 0 15 0 10 0 15 0 10 0 15 0 10 0 15 0 10 0 15 0 10 0 15 0 10 0 15 0 10 0 15 0 10 0 15 0 10 0 15 0 10 0 15 0 10 0 15 0 08 0 12 0 08 0 12 0 10 0 15 0 10 0 15 0 10 0 15 0 10 0 15 0 08 0 08 0 08 0 08 0 06 0 08 0 06 0 08 Español Valores orientativos para el mandrinado de precisión Avance max fmax mm rev sin útiles puente con útiles p...

Page 34: ...4 1 2 3 6 8 7 1 2 4 5 9 x D D2 D 2 D1 0 5 微调精镗头结构 1 刀夹 2 刀架 3 紧固螺钉 刀夹 刀架 4 紧固螺钉 刀架 精镗头 5 双头螺钉 用于刀夹的粗调 6 调整环 高分辨率 即使无游标也易于读取 7 配重补偿滑块 8 内冷孔 9 ABS 接口 德国及其它国家已申请专利 背镗计算 钻孔直径 D1 D1 钻孔直径 D2 旋转直径 D 加工直径 旋转直径 D2 滑块上的动态配重平衡 确保在任何位置都能达到最佳平衡 ...

Page 35: ...5 31 000 ABS 32 24 000 ABS 40 18 500 ABS 50 15 000 ABS 63 31 000 ABS 32 24 000 ABS 32 18 500 ABS 50 15 000 ABS 50 11 500 ABS 63 10 000 ABS 63 8 000 ABS 63 中文 精镗头安装 粗调 调整环6 使用之前尽量往负方向旋转 以保证精调时有尽可能大的直径 调整范围 为了消除反向间隙 将调整环6向正方向旋转半圈 松开紧固螺钉4 双头螺钉5 预先调整到标准尺寸正负0 02mm左右 精调 使用调整环6来调整尺寸 1个刻度 0 002mm 允许主轴转速 U B zul min 1 KOMET MicroKom M03Speed 带可替换镗桥 允许主轴转速 U B zul min 1 KOMET MicroKom M03Speed 不带可替换镗桥 最大主轴转...

Page 36: ... 39 mm 1 刀夹 2 刀架 3 紧固螺钉 刀夹 刀架 4 紧固螺钉 刀架 可替换镗桥 5 双头螺钉 用于刀夹的粗调 6 调整环 高分辨率 即使无游标也易于读取 J 可替换镗桥 K 压紧螺钉 用于可替换镗桥 L O型环 安全事项 所有具体应用中的技术参数取决于环境和应用条件 例如 机床 环境 温度 使用 的润滑 冷却液 以及加工要求 这些还基于正确的操作条 件 使用并遵从主轴速度限制 为了防止对机床和刀具的损坏 我们建议您提前计算好机床功率 机床 功率在机床制造商的主轴转速 性能表中已标示 为防止飞屑造成人员伤害 请提前做好安全防护措施 为确保刀具的最长使用寿命 请及时替换刀片 安装刀夹 ...

Page 37: ...37 5 3 4 6 1 2 3 4 6 1 2 K L J 中文 松开紧固螺钉 3 更换刀夹1 当固定刀夹时请仔细确认切削 刃的方向 安装刀夹 1 X 38 103 mm 安装刀夹1 X 38 206 mm 松开紧固螺钉 3 更换刀夹 1 当安装刀夹时请仔细确认切削刃的方向 安装可替换镗桥 j 松开压紧螺钉 k 使可替换镗桥能够装入镗刀刀体 检查 O 型环 l 确保其完好无损 安装刀夹 ...

Page 38: ...0E 高合金钢 1 2341 6CrMo15 5 1 2601 X165CrMoV12 高速钢 特殊合金 Inconel 2 4631 Nimonic 80A 2 4668 NiuCr19Fe19Nb5Mo3 钛 钛合金 3 7115 TiAl5Sn2 5 不锈钢 1 4306 X2CrNi19 11 1 4401 X5CrNiMo17 12 2 不锈钢 1 4511 X3CrNb17 1 4571 X10CrNiMoTi17 12 2 不锈钢 耐火钢 1 4713 X10CrAlSi7 1 4862 X8NiCrSi38 18 灰铸铁 0 6025 EN GJL 250 0 6035 EN GJL 350 合金灰铸铁 0 6660 GGL NiCr20 2 球墨铸铁 铁素体 0 7040 EN GJS 400 15 球墨铸铁 铁素体 珠光体 0 7050 EN GJS 500 7 0 7...

Page 39: ... 0 08 0 08 0 10 0 08 0 10 0 06 0 10 0 06 0 10 0 06 0 10 0 06 0 10 0 15 0 20 0 15 0 20 0 15 0 20 0 15 0 20 0 10 0 15 0 10 0 15 0 10 0 15 0 10 0 15 0 10 0 15 0 10 0 15 0 10 0 15 0 10 0 15 0 10 0 15 0 10 0 15 0 10 0 15 0 10 0 15 0 10 0 15 0 10 0 15 0 08 0 12 0 08 0 12 0 10 0 15 0 10 0 15 0 10 0 15 0 10 0 15 0 08 0 08 0 08 0 08 0 06 0 08 0 06 0 08 中文 加工参数推荐 最大进给 fmax mm rev 不带可替换镗桥 带可替换镗桥 请参考安全事项 页码 3...

Page 40: ...aciones debidas al desarrollo técnico 我们保留修改权 Die aktuell gültige Version der Bedienungsanleitung steht auf der Homepage der KOMET Deutschland GmbH zur Verfügung The currently applicable version of the operating instructions is available on the KOMET Deutschland GmbH website La version actuellement en vigueur de la notice d utilisation est disponible sur la page d accueil de KOMET Deutschland GmbH...

Reviews: