background image

23 


15.0  

BASIC TROUBLESHOOTING   

 
This table is only a guide to aid you in getting your scooter operating, should you have any problems. If 
you are unable to get your scooter operating, please contact your Scooter Dealer.     
 

Symptom 

Possible 

Solution 

Scooter does 

not move 

1.


Key switch is 

not “ON”


2.


Main circuit breaker tripped 

3.


Brake rel

ease lever in ‘Freewheel 

Mode’


4.


Charger connected to outlet 

5.


Battery power low 

6.


Scooter shuts down to conserve 
battery 

7.


Controller error 

1.


Turn key switch to ”ON”


2.


Reset circuit breaker   

3.


Place lever in 

‘Drive Mode’


4.


Disconnect charger 

5.


Recharge battery 

6.


Turn key switch 

O

FF”

, then 

ON


7.


Check Power light for Flash Code (See 
16.0 Flash Codes to get a solution) 


Range less than 

expected 

1.


Charging too infrequently 

2.


Defective or worn out battery 

3.


Cold weather reduces battery life 

4.


Defective charger 

1.


Charge scooter more often 

2.


Load test batteries. If necessary replace. 

3.


Allow batteries to reach room 
temperature and then fully recharge 

4.


Contact your Scooter Dealer 


Summary of Contents for Cruise

Page 1: ...MOBILITY SCOOTER USER MANUAL ...

Page 2: ...ves your mobility and quality of life This owner s manual includes operation instructions for every aspect of the scooter CONTENTS 1 0 SAFETY GUIDELINES 2 2 0 PRE RIDE SAFETY CHECK 3 3 0 SPECIFICATION 4 4 0 COMPONENTS OF THE SCOOTER 5 5 0 OPERATION CONTROL PANEL 6 8 6 0 OPERATION SCOOTER ASSEMBLY 8 12 7 0 OPERATION SCOOTER DISASSEMBLY 13 14 8 0 OPERATION GETTING ON YOUR SCOOTER 14 15 9 0 OPERATION...

Page 3: ...ibility of the scooter user who is capable of making such a decision and his her health care professional i e medical doctor physical therapist etc The contents of this manual are based on the expectation that a mobility device expert has properly fitted the scooter to the user and has assisted the prescribing health care professional and or the authorized provider in the instruction process for t...

Page 4: ...e batteries are fully charged Ensure the manual freewheel lever is in drive mode before sitting on the Travel Scooter If you discover a problem contact your authorized Provider for assistance Please refer to the Contact Information insert in your Owner s Package WARNING Never exceed the maximum permissible load see 3 0 Specifications and never use the scooter to transport more than one person WARN...

Page 5: ...Ground Clearance Max Mid Frame 90 mm 3 5 in Seat Type Deluxe Seat Width 460 mm 18 in Seat Height 440 500 mm Front Tyre 230 mm 9 in Solid Puncture Proof Pneumatic Air option Rear Tyre 230 mm 9 in Solid Puncture Proof Pneumatic Air option Lights Front LED Basket Black Plastic Tiller Lock Yes Tiller Type Delta Handle Charger 2 Amp Charging Type Battery Box Tiller Motor 280W Brake Automatic Electromag...

Page 6: ...tor Gauge 7 Tiler Lock 19 Speed Adjustment Dial 8 Front Wheel 20 Key Switch 9 Seat Post 21 Tiller Handle 10 Charger Socket Battery Box 22 Horn Button 11 Battery Box 23 Throttle Lever Forward Back 12 Arm Rest Retaining Screw 24 Charger Socket Tiller 25 Light Switch Your scooter is equipped with a number of elements and parts You should know these before using the scooter Designs and specifications ...

Page 7: ...er s top speed in the range of 0mph 4mph The image of the snail represents the slowest speed setting The image of the hare represents the fastest speed setting 5 3 Key Switch 20 This turns the power on and off your scooter Insert the key into the key switch Turn the key clockwise to turn on your scooters power The battery indicator will light up to indicate that the power is on Turn the key anti c...

Page 8: ... to the centre stop position and engages your scooter s brakes 5 6 Charger Socket Tiller 24 The Tiller Charger Socket allow the batteries to be charged without having to bend down and charge from the battery box charging socket see 11 0 Batteries and Charging for further information WARNING Chargers are selected precisely for particular applications and are especially matched to the type size and ...

Page 9: ...ys make sure you have sufficient room to move the parts around You may need assistance to lift some of the scooter components See Specifications for individual component weights No tools are required to disassemble or assemble your scooter Always disassemble or assemble your scooter on a level dry surface with sufficient space for you to work and move around your scooter Keep in mind that the disa...

Page 10: ...cooter has been provided with a tiller lock which makes transporting and carrying the scooter easier It is only to be used when the scooter is dismantled either for transportation or storage To unlock fully press the tiller lock button down then quickly release your finger The button will spring up to the unlocked position The tiller will now move sideways To lock set the wheels to be directly fac...

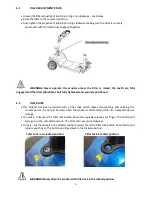
Page 11: ...llow the front section to lower into the correct position Make sure the front and rear sections are securely and correctly connected See Fig 6 3 2 CAUTION When assembling the front and rear sections together keep fingers well clear of pinch points Fig 6 3 1 Fig 6 3 2 6 4 SEAT POST Adjust seat post to your require height by using the seat post pin provided Then securely tighten seat post retaining ...

Page 12: ... 2 6 6 FITTING SEAT Stand behind the scooter and with both hands lower the seat onto the seat post making sure the seat is straight above the seat post If the seat is not straight on the seat post you will not be able to fully lock the seat Make sure seat has fully locked onto seat post Fix arm rests and adjust to the required width then tighten arm rest retaining screws securely See Fig 6 6 1 Fig...

Page 13: ...en WARNING Before placing your scooter into or taking it out of freewheel mode remove the key from the key switch Never sit on the scooter when it is in freewheel mode Never put your scooter in freewheel mode on any incline WARNING When your scooter is in freewheel mode the braking system is disengaged WARNING Disengage the drive motors only on a level surface WARNING Ensure the key is removed fro...

Page 14: ...sections of the scooter take up more floor space than the assembled scooter CAUTION Lifting weight beyond your physical capability may result in personal injury Ask for assistance when necessary while disassembling or assembling your scooter 7 1 REMOVE THE SEAT Stand behind the scooter and fold the seat back down then with both hands lift seat directly upwards 7 2 REMOVE THE BATTERY BOX Grip the b...

Page 15: ...ver in the forward position unless you are manually pushing your scooter WARNING Never attempt to get onto or off of your scooter without first removing the key from the key switch This will prevent the scooter from moving if accidental throttle control lever contact is made WARNING Never sit on the scooter when it is in freewheel mode WARNING Never exceed the maximum permissible load see 3 0 Spec...

Page 16: ...d rotate the seat until you are facing forward 8 Make certain that the seat is secured into position 9 Make certain that your feet are safely on the floorboard WARNING The following can adversely affect steering and stability while operating your scooter Holding onto or attaching a leash to walk your pet Carrying passengers including pets Hanging any article from the tiller Towing or being pushed ...

Page 17: ... to the left to turn left never turn at high speeds as this will result in loss of control Make sure to maintain sufficient clearance when turning your scooter so that the rear wheels will be clear of any obstacles Show even greater caution when steering in reverse WARNING Turning your scooter too sharply at high speed will cause loss of control and balance and will result in the scooter tipping o...

Page 18: ... the curb so that both back wheels of your scooter go over the curb at the same time Never go down curbs by traversing them Doing this will cause the scooter to tip over resulting in serious injury or death Drive down curbs slowly to avoid jarring bumps 9 5 GRASS AND GRAVEL Your scooter performs well on short firm grass and hills but you must follow the operational parameters presented in this man...

Page 19: ...ox 10 20 charging cycles break in period This break in period is necessary to fully activate the battery for maximum performance and longevity Keep the batteries fully charged to keep your scooter running smoothly Charge the batteries daily after every discharge even after partly discharge Depending on the level of discharge it can take up to 12 hours until the batteries are fully charged again If...

Page 20: ...position The LED light on the battery charger will show amber while charging The LED light on the battery charger will show green when batteries are fully charged Turn off the mains power to the charger before removing the charger plug from charging outlet WARNING Risk of explosion and electric shock if batteries are charged when incorrectly wired Never attempt to open or disassemble the battery b...

Page 21: ...er at the same time Do not sit in the scooter while charging the batteries WARNING Chargers are selected precisely for particular applications and are especially matched to the type size and chemical formulation of specific batteries For the safest and most efficient charging of your scooter s batteries we recommend use of the charger supplied as original equipment with your product only Any charg...

Page 22: ...ent or brake release can cause an accident or injury The FDA has determined that each make and model of scooter can resist EMI RFI to a certain level The higher the lever of resistance the greater the degree of protection from EMI RFT measured in volts per meter V m The FDA has also determined that current technology is capable of providing 20 V m of resistance to interference This product has bee...

Page 23: ... scooter is in good condition go to your scooter dealer regularly 13 2 CIRCUIT BREAKER There is one button for the circuit breaker located on the battery pack if the power switch is ON and the battery gauge does not move it is possible an electric current has overloaded the scooter Reset the circuit breaker by pressing the button 13 3 TYRES The condition of the tyres depends on how you drive and u...

Page 24: ...ower low 6 Scooter shuts down to conserve battery 7 Controller error 1 Turn key switch to ON 2 Reset circuit breaker 3 Place lever in Drive Mode 4 Disconnect charger 5 Recharge battery 6 Turn key switch OFF then ON 7 Check Power light for Flash Code See 16 0 Flash Codes to get a solution Range less than expected 1 Charging too infrequently 2 Defective or worn out battery 3 Cold weather reduces bat...

Page 25: ...er stops driving The maximum current has been exceeded over too long a period probably because the motor has been overloaded Switch the scooter off for a few minutes then turn back on again 5 Brake error Scooter stops driving Ensure the manual freewheel lever is in the drive position and restart the scooter There is a fault with the magnetic brake or wiring contact your authorized dealer of assist...

Page 26: ...component found upon examination by an authorized representative of One Rehab to be faulty 1 Electronic controllers 2 Transaxle 3 Motor Brake electronic function ONLY 4 Charger 5 Any other electrical subassembly NOTE If there is an increase in the noise level from the transaxle the warranty does not apply An increase in operational noise level usually occurs due to excessive strain on the scooter ...

Page 27: ...rs failures due to defects in materials or workmanship which occur during normal use and does not cover damage that occurs in shipment or failures which are caused by products not supplied by One Rehab or failures resulting from accident misuse abuse neglect mishandling misapplication alteration modification commercial use or by anyone other than an authorized dealer or damage that is attributable...

Page 28: ...27 ...

Reviews: