background image


KT-70E / KT-90E / KT-70SE User Manual


Page 20 of 59


24 April 2018


special works  

The ECC Machinery Directive provides the following definitions 


“Dangerous Zone”: any zone in side and/or near a machine in which the presence 
of an exposed person constitutes a risk for his/her security and health 


“Exposed Person”: any person wholly or partially inside a Dangerous Zone 


“Operator”:  the person(s) charged with the task of installing, running, maintaining, 
cleaning, repairing and transporting the machine 

 
Removing or tampering with any safety device is strictly forbidden 
 
Maintenance and inspection must be performed in accordance with this manual! These 
activities may only carry out by qualified personnel. 
 
Before doing any work concerning the operation, production adjustment, upgrading or 
setting of the compressor and its safety equipment and inspection, maintenance and re-
pair, the unit must be turned off in accordance with the operating manual and instructions 
for maintenance work! 
 
Disconnect the electrical supply prior to performing maintenance and repair work. 
 
Cleaning of flexible hoses, connections and fittings at the beginning of maintenance is 
important. Aggressive or flammable cleaning agents should not be used! 
 
Before cleaning the compressor, cover all openings so that cleaning agents do not pene-
trate. Particularly at risk are electric motors and control boxes. 
 
After cleaning the covers / seals must be removed completely! 
 
If safety devices are removed during maintenance and repair, they must be replaced im-
mediately after completion of the maintenance and repair work, and all safety devices 
must be checked. 
 
Never place hands or introduce screwdrivers, keys or other tools into moving parts 
 
Periodically check the info plates / labels and restore / replace them where necessary 
 
The workplace must be clean, tidy and free from objects that might hinder movement 
 
Operators must avoid carrying out “awkward” tasks in uncomfortable positions that might 
result in imbalance.  
 
Operators should be aware of the risks of entrapment caused by clothes or hair getting 
caught up in moving parts; wear a cap to contain long hair. 
 
Necklaces, bracelets and rings can be a source of danger 
 
Workplace lighting must be adequate for the work in progress.  Insufficient or excessive 
lighting can generate risks.   

Summary of Contents for KT-70E

Page 1: ...KT 70E KT 90E KT 70SE User Manual 24 April 2018 Page 1 of 59 KT 70E KT 90E KT 70SE HIGH PRESSURE AIR COMPRESSOR User Manual 60Hz Version...

Page 2: ...cs 11 1 12 Symbols Used 11 2 Product Description 13 2 1 Intended Use 13 2 2 Construction 14 2 3 Optional Equipment 14 2 3 1 Automatic shut off 15 2 3 2 Hour counter 15 2 3 3 Minimum Pressure Valve 15...

Page 3: ...art up 29 7 1 Power 29 7 2 Checks before initial Start up 29 8 Operation 30 8 1 Description of the controls 30 8 1 1 Compressor 30 8 1 2 Filling Hose 31 8 2 Adjusting and Setting 32 8 2 1 Operation 32...

Page 4: ...lease top off the crankcase oil each time the air filter is changed 44 10 4 3 Oil Change 45 10 4 4 Final pressure gauge check 46 10 4 5 Check final pressure safety valve 46 10 4 6 Other Maintenance No...

Page 5: ...present or the valve on the pressure vessel Running the compressor Turn on Compressor Residual high pressure within the compressor may prevent the motor either gas or electric from turning over If so...

Page 6: ...d be changed on the interval described in 8 3 or once per year Top off the crankcase oil each time the filter is changed Once a year or every 500 operating hours change the crankcase oil Check the oil...

Page 7: ...e compressor has been built according to state of the art and recognized safety regulations Nevertheless it can be hazardous Read this manual before using the compressor is in operation It helps you P...

Page 8: ...transport costs in connection with the repair or replacement of defec tive parts NO WARRANTY ORAL OR WRITTEN EXPRESED OR IMPLIED OTHER THAN THE ABOVE WARRANTY IS MADE WITH REGARD TO THIS KOMPTEC PROD...

Page 9: ...working life of the compressor make sure updates are incorporated in the manual make sure the manual is given to other users or subsequent owners in the event of resale keep the manual in good condit...

Page 10: ...ures that you receive the correct information or the required spare parts 1 11 Instructional and training aids 1 11 1 Instruction by the operator Any failure to comply with the safety instructions in...

Page 11: ...__________________ ________________________________ 2 To operate the plant Use the operating elements Explanation of the operating instructions for the operating person nel Special experience of the o...

Page 12: ...pecifications or instructions and prohibitions to prevent damage Danger Specifications or instructions and prohibitions to prevent personal injury or substantial property damage Mark for performing an...

Page 13: ...ser It is expressly prohibited to draw gases other than air Operation in a Nitrox environment up to 36 oxygen concentration is permitted Intended use also includes observing the operating instructions...

Page 14: ...re compressed air filter with filter cartridge On off switch 2 3 Optional Equipment The KT 70E and KT 90E are offered as one of three configurations based on the intended use and the user s budget Bas...

Page 15: ...e of the compressor then turn off the motor 2 3 2 Hour counter If configured with the Hour counter the operating hours will be displayed on the hour counter mounted on top of the electrical motor 2 3...

Page 16: ...y and V belts The compressor block con sists of 3 compressor stages The filter unit consists of a high definition filter and the condensate drain The intake filter is incorpo rated in the housing for...

Page 17: ...densate collector is the sintered filter A conical syn thetic sintered filter is installed in the base of the filter housing Air enters the housing after the 3rd stage and the aftercooler and flows th...

Page 18: ...he compressor and per form maintenance and repairs the personnel are regularly instructed in all applicable questions regarding occupa tional safety and environmental protection and knows the operatin...

Page 19: ...be clearly de fined Only authorized personnel should operate the compressor Make sure that training must be performed by an experienced person Work on electrical equipment of the compressor may only b...

Page 20: ...repair work Cleaning of flexible hoses connections and fittings at the beginning of maintenance is important Aggressive or flammable cleaning agents should not be used Before cleaning the compressor c...

Page 21: ...the hoses must comply with the requirements Hazard statements for dealing with the filter and pressure vessels Never remove reservoir cap or pipe connection parts under pressure The KT 70E KT 90E has...

Page 22: ...ructions in the man ual for the engine used Danger from heat generated by the exhaust of the Internal Combustion Engine Wait 30 minutes after switching off the engine before carrying out maintenance w...

Page 23: ...21 2014 DIN EN ISO 13857 2008 DIN EN 1012 1 2010 DIN EN 60204 1 2006 Angewendete nationale Normen und technische Spezifikationen AD 2000 Merkbl tter TRG 400 Technische Regeln Druckgase Abs F llanlagen...

Page 24: ...bore 2nd stage 22 mm Cylinder bore 3rd stage 10 mm Piston Stroke 17 mm Piston Speed 0 5 m sec Intermediate pressure 1st stage 7 2 bar Intermediate pressure 2nd stage 48 bar 5 3 compressor oil Compress...

Page 25: ...ual Page 25 of 59 24 April 2018 Gasoline Engine KT 90G Fuel Type Gasoline Premium Power 6 5 HP Rotation Left For further details refer to the Motor s operating manual Noise level 86 dB A Note supplier...

Page 26: ...age 4 Intercooler 5 1st Stage Pressure Relief Valve 6 2nd Compressor Stage 7 Intercooler 8 2nd Stage Pressure Relief Valve 9 3rd Compressor Stage 10 Aftercooler 11 Condensation Discharge 12 Condensati...

Page 27: ...t least two workers and in any case no indi vidual worker should lift more than 30 Kg 66lbs The preparation work assembly and installation of the compressor may only be carried out by qualified staff...

Page 28: ...tional accessories F The compressor must not be placed directly on the wall Minimum dis tance from the wall is 0 5m F The ambient temperature must be no higher than 35 C and not lower than 5 C F When...

Page 29: ...eneral safety instructions 7 1 Power Electrical connection Observe the following for the electrical connections Comply with local electrical codes Installation of electrical receptacles should be perf...

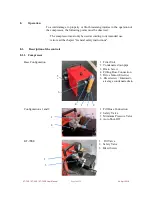
Page 30: ...so read the chapter General safety instructions 8 1 Description of the controls 8 1 1 Compressor Base Configuration 1 Filter Unit 2 Condensate drain pipe 3 Drain Screw 4 Filling Hose Connection 5 Driv...

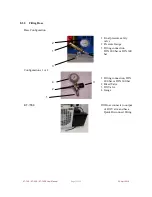
Page 31: ...1 Final pressure safety valve 2 Pressure Gauge 3 Filling connection DIN 200 bar or DIN 300 bar Configurations 1 or 2 1 Filling connection DIN 200 bar or DIN 300 bar 2 Bleed Valve 3 Fill Valve 4 Gauge...

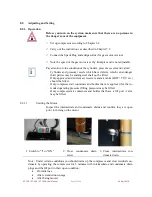
Page 32: ...shall not be filled Only approved and current air receivers and air tanks DOT T V etc should be filled Only compressed air containers and bottles that are approved for the in tended operating pressur...

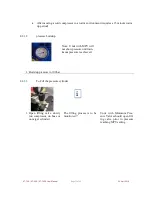
Page 33: ...uildup Note Units with MPV will not show pressure until min imum pressure is achieved 1 Build up pressure to 100 bar 8 2 1 3 To Fill the pressure cylinder 1 Open filling valve slowly on compressor on...

Page 34: ...isposed of in accordance with local laws and regulations to ensure ap propriate places Opening the condensate drain plug too quickly may cause icing in the condensate drain and potentially dangerous a...

Page 35: ...d to severe impairment of filter efficiency including total loss of filter effect Filters must be changed at least once per year 8 3 1 Breathing Air Filter Filters configured for Breathing Air usage i...

Page 36: ...add a few drops of oil so that a light film of lubricant is aspirated and penetrates the interior of the compressor Stop the compressor and refit the intake filter Clean the external parts eliminate a...

Page 37: ...r condensate drain Retighten screw Cartridge defective Check Reduced air deliver Dirty intake filter Clean intake filter Leaking pipes or drain Retighten screw Worn piston rings Change piston rings 1s...

Page 38: ...nd cable Check fuse or circuit breaker Engine failure Replace motor Fuse or circuit breaker blows when engine turned on Wrong size fuses circuit breaker or time delay not correct Replace fuses check w...

Page 39: ...repairs must be performed only by qualified service personnel the accident preven tion regulations must be observed The specified sequence of operations shall be followed precisely All work on the el...

Page 40: ...nes Check fastening of the cooler Final pressure gauge must be located in the unpressurized state to the 0 position 10 4 4 Tighten valve cap screws and valve pin screws Daily Chapter Date Signature Ch...

Page 41: ...s of all cooler and connect ing lines Every 1000 Operating Hours Chapter Date Signature Replace v belt Every 2000 Operating Hours Chapter Date Signature Replace piston rings on 1st and 2nd stages At l...

Page 42: ...KT 70E KT 90E KT 70SE User Manual Page 42 of 59 24 April 2018 10 3 Filter changing log Please top off the crankcase oil each time the air filter is changed Date Hours Sum Date Hours Sum...

Page 43: ...r Only use the recommended oil section 5 3 because other oils have an adverse effect on the service life and can destroy the compressor 1 Open drain valves bleed the system completely 2 Remove oil fil...

Page 44: ...pletely 2 Remove AC power 3 Unscrew the air filter cover possibly with filter wrench Filter wrench not included in the delivery 4 Extraction Tool for fil ter cartridge screw 5 Remove filter cartridge...

Page 45: ...few minutes 4 Compressor carefully put aside 5 Open oil drain plug with 6mm Allen key 6 Screw in oil drain pipe 7 Place a container under neath 8 Raise compressor slowly 9 Raise compressor slowly 10 U...

Page 46: ...Check the functionality of the final pressure safety valve be fore using the compressor 1 Operate the compressor with the filling valve closed If configured with Auto Shut off hold the on button to ov...

Page 47: ...KT 70E KT 90E KT 70SE User Manual Page 47 of 59 24 April 2018 11 Break out Drawings Figure 4 Exploded View 86 87 87 79 87 80 77 79...

Page 48: ...KT 70E KT 90E KT 70SE User Manual Page 48 of 59 24 April 2018 Figure E Crankshaft with Piston Rods...

Page 49: ...KT 70E KT 90E KT 70SE User Manual Page 49 of 59 24 April 2018 Figure F First Stage Cylinder...

Page 50: ...KT 70E KT 90E KT 70SE User Manual Page 50 of 59 24 April 2018 Figure 7 Second Stage Cylinder 86 87...

Page 51: ...KT 70E KT 90E KT 70SE User Manual Page 51 of 59 24 April 2018 Figure 8 Third Stage Cylinder...

Page 52: ...KT 70E KT 90E KT 70SE User Manual Page 52 of 59 24 April 2018 Figure 9 Oil filler tube and housing pressure equalization 78 80 5 77 79 0 79 87 0 6 87 87 0 81 0 78...

Page 53: ...KT 70E KT 90E KT 70SE User Manual Page 53 of 59 24 April 2018 Figure 10 Filter Housing...

Page 54: ...KT 70E KT 90E KT 70SE User Manual Page 54 of 59 24 April 2018 Figure K Casing...

Page 55: ...verview A Exploded view B Crankshaft with piston rod C 1st compressor stage D 2nd compressor stage E 3rd compressor stage F Oil filler tube and housing pressure equalization G Intercooler aftercooler...

Page 56: ...ring 910230 024 1 Cylinder 910240 025 1 Cylinder housing O ring 910250 027 1 Cylinder cover 910270 027a 4 Cylinder head bolts 910490 028 1 Vent connection 910280 029 1 Threaded elbow joint 910290 032...

Page 57: ...G Intercooler and aftercooler Safety valves 082 1 Intercooler 1st to 2nd stage 910820 083 1 Intercooler 2nd to 3rd stage 910830 084 1 Aftercooler 3rd stage 910840 085 1 Safety valve 1st stage 10 16 b...

Page 58: ...KT 70SE User Manual Page 58 of 60 24 April 2018 121 2 Screw M8 x 10 121a 2 Washer Attention Not all parts are available separately Please contact Customer Service for information on parts sets that a...

Page 59: ...one 1 925 596 1056 Email sales komptec com Manufacturer Komptec Kompressoren Technik GmbH Gutenbergring 3 63110 Rodgau Telefon 49 0 6106 2661787 Telefax 49 0 6106 2662829 Email kontakt komptec de Serv...

Reviews: