JBA Explorer.lnk
OE14-122/23
Underwater Colour Pan, Tilt and Zoom Camera
colour
U
ser
Ma
nua
l
Manufacturing:
Airport Industrial Estate, Wick, Caithness, Scotland
tel:
+44 (0)1955 603606
fax:
+44 (0)1955 607520
Sales and Service:
Campus 1, Science and Technology Park, Aberdeen, Scotland
tel:
+44 (0)1224 226500 (24 hrs)
fax:
+44 (0)1224 226501
Kongsberg Maritime Ltd
User Manual:
OE14-122 Colour Pan, Tilt and Zoom Camera - 5023 –5
Page 5 of 14
Quick Start
Important Note:
This product has an automatic initialization routine once switched on. It is essential to
allow a 50 second delay after power up before starting the GUI and sending commands via RS232/485. If
this routine is not followed, you may see a number of error messages appearing on the screen. This does
not indicate a fault condition and the camera will function correctly after the 50 second initiation period. If
commands are sent to the camera before the completion of the initialization routine, the function settings
highlighted on the GUI will not be in synchronization with camera settings until each particular function is
activated.
When you unpack your camera it is recommended that it is tried out on a desk to get some experience in
operating it. You should be able to operate it in roughly 5 minutes. First of all take the CD marked 14-122
GUI and User Manual and insert it into a PC. It will auto play and a front screen will be displayed. Click on the
GUI option and then click on the install 14-122 GUI icon. The GUI will then install. Follow the on screen
instructions while installing the GUI.
Then plug in a suitable cable into the external connector on the camera and wire it up using the wiring
information supplied on the encapsulation card. Connect 16-24V d.c. onto the power pin and connect the 0V
pin to ground. Connect the video output and screen pins to a VBS connector on a monitor and/or a video
capture card on the PC.
Then connect up the RS485/RS232 connection to the 2 serial communication pins on the 14-122. If using
RS232 then also connect RS232 0V(or camera 0V if RS232 0V is not available) to the ISO_GND pin on the
camera.
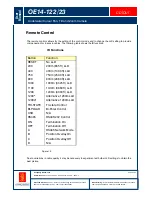
Then you are all ready to use the camera. Turn the power on and then press the RS485 button on the
remote control. On the controlling PC go into the start menu and select Programs-> Kongsberg Software ->
14-122 GUI. This starts the GUI.
The GUI will ask first of all which comm port (1 – 4) the camera is connected to. Select the correct port. The
GUI will then turn on the camera module and all the GUI’s functions will become available. Try out the
functions of the camera to get used to operating it.
If the GUI fails to initialise then the most common problems are:
1) The 2 serial communications pins on the camera have been wired the wrong way round to the PC.
2) The camera has not been put in the correct mode (RS485).
3) The current limit of the power supply is set too low for the camera.
If the video signal appears incorrect the most common problems are:
1) The display is in the wrong mode (PAL or NTSC).
2) LLD is not set at 0m. Press reset to set to 0m.
3) Video signal screen on the display is not linked to screen on the camera.


