35
B: Rotor knives
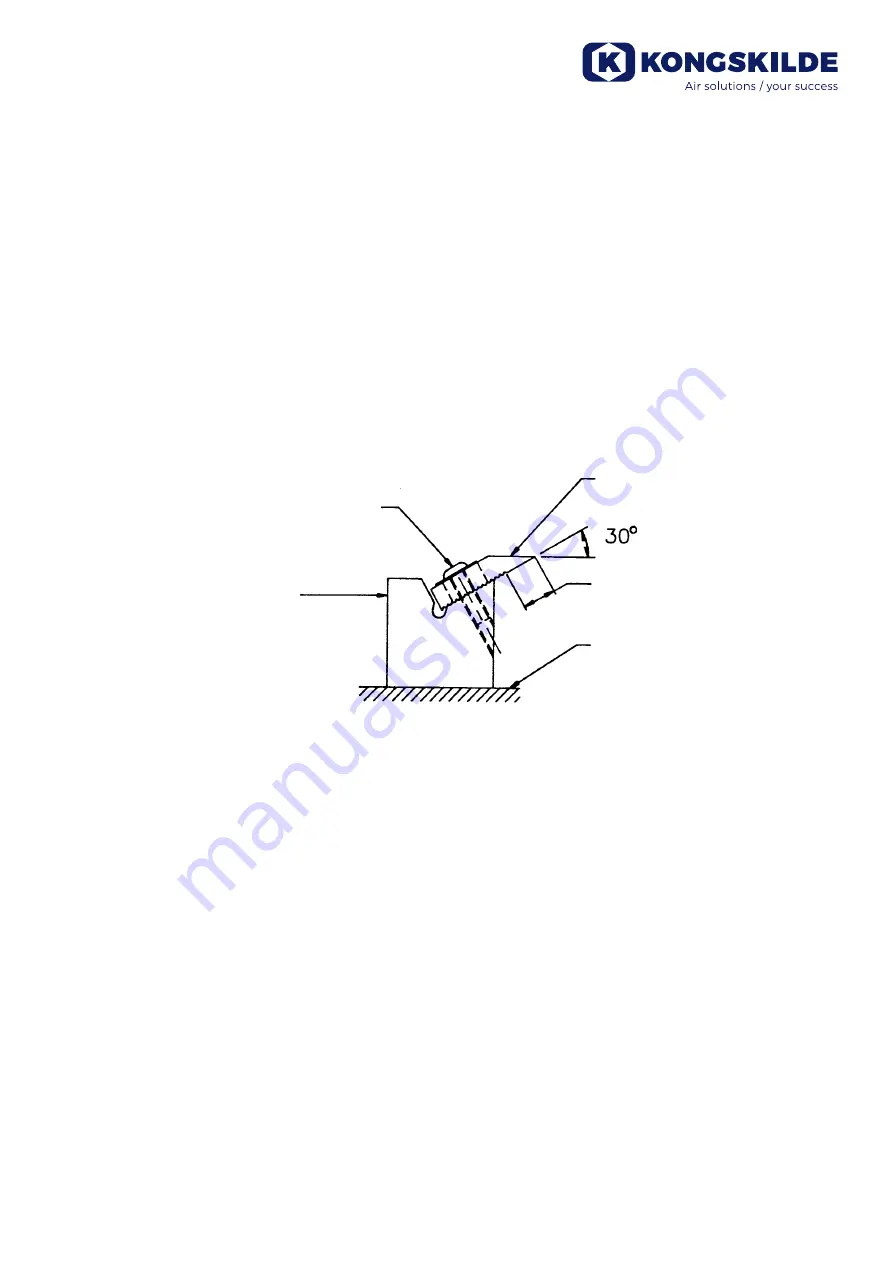
Surface or Blanchard Grinding
Remove nicks in cutting edge by grinding surface D, uniformly removing as little material
as necessary. The knife fixture (part # 121 116 252) allows for surface grinding of two kni
-
ves together.
Rotor knives should always be surface ground in matched pairs, ensuring similar knife
dimension (within 0.05 mm/0.002 in) from depth of serration to cutting edge.
Knives should be well seated in common serrations on the fixture.
Use “SURFACE GRINDING PARAMETERS” as listed.
Cylindrical (or spin) grinding
After nicks have been removed by surface grinding, rotor knives must be cylindrically
ground (either on the rotor within the cutter/granulator base or a spare rotor) to achieve
equal cutting clearances.
Attaching knives to rotor
Clean rust and dirt form serrations of knives and rotor. Fasten knives to rotor in equivalent
serrations (so that knife edges rotate on same arc - nominally 171.5 mm (6 3/4’’)
using
eight button head cap screws and eight disc springs (items 12 and 16). Lock rotor using
wooden 50 x 50 mm (2 x 2 in) (FIG. 2) and tighten screws with 25 Nm/16.5 ft-lb (40 Nm/29
ft-lb for MC 5000).
In-cutter set-up (Recommended method)
Place cutter/granulator on table of cylindrical grinder with cutter or granulator resting on
outlet flange. Square knives with grinding wheel and clamp down cutter. The rotor must be
FIG.4
Button head cap screws with
disc springs (items 12 and 16)
Rotor knife grinding fixture
(holds two knives)
(part 121 116 252)
Surface D
Hold this dimension equal
on ground set of knives
Grinder table
Summary of Contents for KG 3000
Page 15: ...15 FIG 10 ...
Page 29: ...29 FIG 10 ...
Page 43: ...43 FIG 10 ...
Page 57: ...57 FIG 10 ...
Page 71: ...71 FIG 10 ...
Page 85: ...85 FIG 10 ...
Page 99: ...99 FIG 10 ...
Page 113: ...113 FIG 10 Sección de entrada Dirección de giro de cuchillas ...
Page 127: ...127 ...
Page 129: ...129 ...
Page 130: ...130 ...
Page 131: ...131 ...


