background image

4

4.2 Parts Names and Their Functions

4-6

Konica 8020/8031

Pa

rt

 N

a

m

e

s an

d

 T

h

ei

r F

u

nc

ti

o

n

s

Chap

ter

 4

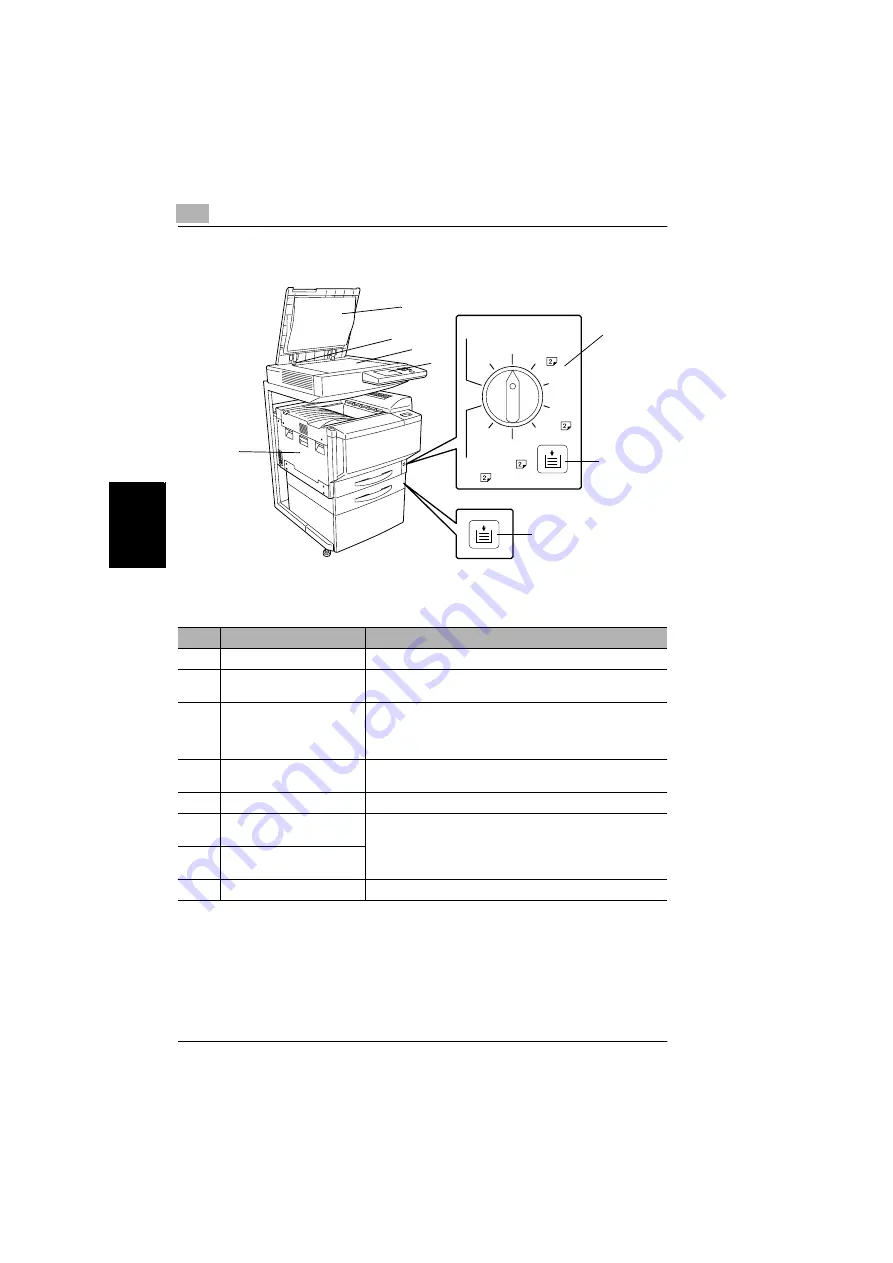
*The illustration above shows the optional platen cover, copier stand and copy desk 
installed.

No.

Part Name

Description

9

Platen Cover (optional)

Presses the document against the platen glass.

10

Document scale

Used to align the document. 
(See section 4.2 in the Basic Operations volume.)

11

Platen glass

When manually feeding the document, place it on the glass so 
the document can be scanned.
Place the document face down on the glass. 
(See section 4.2 in the Basic Operations volume.)

12

Control panel

Used to start copying or to make settings.
(See section 1.3 in the Basic Operations volume.)

13

Media type selection dial

Used to specify the type of paper loaded into the 1st drawer.

14

1st drawer
Paper-empty indicator

Indicates the amount of paper remaining.
• Flashing: Indicates that there is little paper remaining.
• Lit: Indicates that the paper is empty.

Replenish the paper.

15

2nd drawer
Paper-empty indicator

16

Left-side door

Opened when servicing the copier.

Plain

Plain

Thick1

Thick1

Thick2

Thick3

Thick3

Thick2

Envelope

OHP

9

11

12

16

10

14

13

15

Summary of Contents for 8020

Page 1: ...Administrator Operations ...

Page 2: ... Explanation of Basic Concepts and Symbols 1 4 Paper Feeding 1 4 Width and Length 1 5 Paper Orientation 1 5 Portrait and Landscape 1 5 Display Icons 1 6 Paper Supply Icons 1 6 1 4 Energy Star 1 7 What is an ENERGY STAR Product 1 7 2 Safety Information 2 1 Caution Labels and indicators 2 2 CAUTION 2 2 2 2 Warning and Precaution Symbols 2 3 2 3 Meaning of Symbols 2 3 WARNING 2 4 CAUTION 2 5 2 4 Prec...

Page 3: ...ifying the Input Screen Functions 5 3 Specifying the Initial Mode Settings Reset Mode Function 5 4 To specify the initial mode settings 5 4 Using Copy Programs 5 5 To store a copy program 5 5 To recall a stored copy program and use it to make copies 5 6 5 2 Specifying Default Settings User s Choice Functions 5 7 User s Choice 1 Screens 5 7 User s Choice 2 Screens 5 9 To set the Confirmation Beep f...

Page 4: ...paper size function 5 38 To set the Language Selected function 5 39 Specifying Expert Mode functions 5 40 To set the Thick Paper and OHP Film Image Density function 5 41 To adjust the color shifts manually 5 42 To set the Monochrome Image density correct function 5 46 To set the Stabilizer function 5 47 Setting the PRT Area Functions 5 47 To set the PRT Area Top Margin function 5 47 To set the PRT...

Page 5: ...ar a paper misfeed in the large capacity tray 6 24 To clear a paper misfeed in the right side door 6 25 To clear a paper misfeed in the upper right side door 6 28 To clear a paper misfeed in the duplexing document feeder 6 31 To clear a paper misfeed in finisher FS 135 6 35 To clear a paper misfeed in finisher FS 231 6 39 6 5 When the Message Staple mode cannot be used Appears 6 43 To clear jammed...

Page 6: ...232 8 5 Large Capacity Tray DB 432 8 5 Finisher FS 231 8 5 Finisher FS 135 8 6 Option Tray 8 7 8 2 Care of the Copier 8 8 Cleaning 8 8 Housing cover 8 8 Platen glass 8 8 Operation panel 8 9 Document transfer belt 8 9 Paper take up roller 8 10 Charger wire 8 10 8 3 Function Combination Table 8 11 Function Combination Table 8 17 8 4 Paper Size and Zoom Ratio Tables 8 19 Paper Sizes 8 19 Zoom Ratios ...

Page 7: ...tings 6 Controlling Jobs Advanced Operations For details on the following topics refer to the Advanced Operations volume of this Instruction Manual Available Features 1 Auxiliary Functions 2 Scanning Operations Enlarge Display Mode Operation Guide For details on the following topics refer to the Enlarge Display Mode Operation Guide 1 Before Making Copies 2 Basic Copy Operations 3 Copy Paper 4 Orig...

Page 8: ...Introduction Chapter 1 1 1Introduction ...

Page 9: ...ce for future reference G Administrator Operations This volume provides precautions for using the machine descriptions on functions for use by the administrator Utility Mode and Administrator Mode functions procedures for replacing parts and supplies troubleshooting procedures and machine specifications Before using the copier be sure to read Chapters 1 through 4 of the Administrator Operations vo...

Page 10: ...serve all cautions in order to ensure safe use of the copier Note May also appear as Important or Tip Text highlighted in this manner contains useful information and tips to ensure safe use of the copier 1 The number 1 as formatted here indicates the first step of a sequence of actions 2 Subsequent numbers as formatted here indicate subsequent steps of a sequence of actions Text formatted in this ...

Page 11: ...side of the copier and fed into the output tray on top or the finishing option at the left with the printed surface of the page facing down The paper feed direction is shown by the arrows in the diagram below During copying paper is supplied from the right side of the copier and fed into the copy tray on the top or the finishing option at the left with the printed surface of the copy facing down T...

Page 12: ...s X Paper Orientation Lengthwise If the width Y of the paper is shorter than the length X the paper has a vertical or portrait orientation indicated by either L or Crosswise If the width Y of the paper is longer than the length X the paper has a horizontal or landscape orientation indicated by either C or Portrait and Landscape Portrait With the portrait orientation the paper is vertical like a po...

Page 13: ...ick paper 2 Thick paper 3 Second side of a double sided copy on plain paper Second side of a double sided copy on thick paper 1 Second side of a double sided copy on thick paper 2 Second side of a double sided copy on thick paper 3 Paper Supply Icons The icons shown below are displayed to indicate the amount of paper that remains The paper is low The paper is empty ...

Page 14: ...ine meets the ENERGY STAR Guidelines for energy efficiency What is an ENERGY STAR Product An ENERGY STAR product has a special feature that allows it to automatically switch to a low power mode after a period of inactivity An ENERGY STAR product uses energy more efficiently saves you money on utility bills and helps protect the environment ...

Page 15: ...1 1 4 Energy Star 1 8 Konica 8020 8031 Introduction Chapter 1 ...

Page 16: ...Safety Information Chapter 2 2 2Safety Information ...

Page 17: ...to pay special attention to avoid any dangerous situations or serious injury CAUTION Burns or injury may occur from touching the areas detailed in the caution labels and caution indicators If any caution labels or caution indicator is soiled please clean to make legible If you cannot make them legible or if the caution label or indicator is damaged please contact your authorized service representa...

Page 18: ...ls 2 3 Meaning of Symbols Please read the next section before using this device It contains important information related to user safety and preventing equipment problems Make sure you observe all of the precautions listed in this manual Ignoring this warning could cause serious injury or even death Ignoring this caution could cause injury or damage to property A triangle indicates a danger agains...

Page 19: ...ese conditions be found immediately turn the power switch OFF unplug the power cord from the power outlet and then call your authorized service representative Do not use an extension cord in principle Use of an extension cord could cause a fire or electrical shock Contact your authorized service representative if an extension cord is required Do not place a flower vase or other container that cont...

Page 20: ...lfunction The inside of this product has areas subject to high temperature which may cause burns When checking the inside of the unit for malfunctions such as a paper misfeed do not touch the locations around the fusing unit etc which are indicated by a Caution High Temperature warning label Do not place any objects around the power plug as the power plug may be difficult to pull out when an emerg...

Page 21: ...f the PC drum is exposed to intense light poor image quality could result Do not unpack a toner unit or PC drum unit until the very time of use Do not leave an unpacked unit standing Install it immediately or poor image quality could result Do not keep toner units and PC drum units in an upright position or upside down as poor image quality could result Do not throw or drop a toner unit or PC drum...

Page 22: ... ventilée Une quantité d ozone négligable est dégagée pendant le fonctionnement de l appareil quand celui ci est utilisé normalement Cependant une odeur désagréable peut être ressentie dans les pièces dont l aération est insuffisante et lorsque une utilisation prolongée de l appareil est effectuée Pour avoir la certitude de travailler dans un environnment réunissant des conditions de confort santé...

Page 23: ...2 2 8 Acoustic noise For European Users Only 2 8 Konica 8020 8031 Safety Information Chapter 2 ...

Page 24: ...Precautions Chapter 3 3 3Precautions ...

Page 25: ...t exposed to extremely high or low temperatures A well ventilated location A location that is not exposed to high humidity A location that is not extremely dusty A location not subjected to undue vibrations A stable and level location A location where ammonia or other organic gases are not generated A location that does not put the operator in the direct airflow of exhaust from the copier A locati...

Page 26: ...pply replacement and maintenance adhere to the recommended space requirements detailed below Note Be sure to allow a clearance of 100 mm 3 9 in or more at the back of the copier for the ventilation duct Unit mm inch 1 839 72 1 2 285 11 1 4 283 11 1 4 1 271 50 1 521 60 1 432 56 1 2 792 100 540 358 14 1 163 45 3 4 21 1 4 31 1 4 4 ...

Page 27: ...ted below Never place heavy objects on the platen glass or subject it to shocks Never open any copier doors or turn off the copier while it is making copies otherwise a paper jam will occur Never bring any magnetized object near the copier Never use flammable sprays or liquids near the copier Always make sure that the power plug is completely plugged into the electrical outlet Always make sure tha...

Page 28: ... under cold water and then seek professional medical advice Transporting the copier If you need to transport the copier over a long distance consult your authorized service representative Care of copier supplies Use the following precautions when handling the copier supplies toner cartridge paper etc Store the supplies in a location that meets the following requirements Free from direct sunlight A...

Page 29: ...f toner gets in your eyes immediately flush them with water and then seek professional medical advice Storage of copies Copies that are to be kept for a long time should be kept where they are not exposed to light in order to prevent them from fading Adhesive that contains solvent e g spray glue may dissolve the toner on copies Color copies have a thicker layer of toner than normal black and white...

Page 30: ...her certificates of indebtedness G Stock certificates Legal Documents G Food stamps G Postage stamps canceled or uncanceled G Checks or drafts drawn by government agencies G Internal revenue stamps canceled or uncanceled G Passports G Immigration papers G Motor vehicle licenses and titles G House and property titles and deeds General G Identification cards badges or insignias G Copyrighted works w...

Page 31: ...3 3 3 Legal Restrictions on Copying 3 8 Konica 8020 8031 Precautions Chapter 3 ...

Page 32: ...Part Names and Their Functions Chapter 4 4 4Part Names and Their Functions ...

Page 33: ...e combination of the scanner and the printer is referred to as the copier 4 Copy Desk DK 133 optional The printer can stand on the copy desk By setting the printer on the copy desk the printer can be placed on the floor instead of on a desk keeping the entire surface of the desk free Referred to as the copy desk throughout the manual 5 Large Capacity Tray DB 432 optional A paper drawer that can su...

Page 34: ...e manual 11 Copy Table DK 134 optional A paper feed unit can stand on the copy table and then the printer can be set up on the top By setting the printer on the copy table the printer can be placed on the floor instead of on a desk keeping the entire surface of the desk free Referred to as the copy table throughout the manual 12 Finisher FS 231 optional Finishes copies according to the selected Ou...

Page 35: ...ddition by installing hard disk drive HD 131 and the optional memory the Distribution function can be used Referred to as the hard disk throughout the manual 17 Printer Controller IP 711 optional Internal printer controller that allows the copier to be used as both a color printer and a color scanner configured into a computer network For more details refer to the manual of the printer controller ...

Page 36: ...oaded See section 3 5 in the Basic Operations volume 3 Power switch Used to turn the copier on and off See section 1 5 in the Basic Operations volume 4 Lower right side door Opened when clearing misfeeds 5 2nd drawer Holds up to 500 sheets of paper The paper size can be adjusted freely See section 3 5 in the Basic Operations volume 6 1st drawer Holds 250 sheets of paper The paper size can be adjus...

Page 37: ...t can be scanned Place the document face down on the glass See section 4 2 in the Basic Operations volume 12 Control panel Used to start copying or to make settings See section 1 3 in the Basic Operations volume 13 Media type selection dial Used to specify the type of paper loaded into the 1st drawer 14 1st drawer Paper empty indicator Indicates the amount of paper remaining Flashing Indicates tha...

Page 38: ...for connecting the finisher hookup cord 18 Printer power cord socket Used for connecting the printer s power cord 19 Scanner power cord outlet Used for connecting the scanner s power cord 20 Scanner connector Used for connecting the scanner hookup cord 21 Scanner power cord socket Used for connecting the scanner s power cord 22 Duplexing Document Feeder connector Used for connecting the duplexing ...

Page 39: ...ngle colors of the image generated by the imaging unit in order to create a full color image 4 Image transfer roller unit Transfers onto the paper a full color image generated by the image transfer belt unit 5 Waste toner bottle Collects waste toner 6 Fusing unit Fuses the transferred toner to the paper 7 Ozone filter Collects the ozone generated in the copier 8 Filter Collects the toner dust gene...

Page 40: ...leaning tool Used to clean the surface of the LED unit for example when replacing the image transfer belt unit 3 Imaging unit removal bracket Used to remove the imaging unit 4 Charger cleaning tool Used to clean the charger wire for example when incorrect copies are produced 5 Imaging unit release lever Used to install and replace the imaging unit 6 Toner cartridge compartments Contains a toner ca...

Page 41: ...d tray Load the documents to be copied face up See section 4 2 in the Basic Operations volume 3 Document output tray Collects documents that have been copied 4 Misfeed clearing cover Opened when clearing a misfed document No Part Name Description 5 Duplex unit door Opened when clearing a paper misfeed within the duplex unit No Part Name Description 6 3rd drawer Holds up to 500 sheets of paper As m...

Page 42: ...aper tray Collects copies made with booklet binding 9 Front door Opened when replacing the staple cartridge 10 Paper output tray elevated tray Collects copies 11 Upper door Opened when clearing a paper misfeed within the finisher 12 Paper guide Opened when clearing a paper misfeed within the finisher 13 Transport guide Opened when clearing a paper misfeed within the finisher ...

Page 43: ...rations volume No Part Name Description 15 Front door Opened when clearing a paper misfeed within the finisher 16 Secondary paper output tray sorted copies Collects copies that are sorted 17 Primary paper output tray non sorted copies Collects copies that are not sorted made with the Non Sort setting 18 Upper cover Opened when clearing a paper misfeed within the finisher No Part Name Description 1...

Page 44: ...Utility Mode Operations Chapter 5 5 5Utility Mode Operations ...

Page 45: ...s Choice 1 screen and the functions that can be set while the copier is waiting to print are on the User s Choice 2 screen Refer to p 5 32 G The various counters showing the number of copies that have been made since the copier was installed can be viewed Refer to p 5 34 G The level of use for the various supplies and parts can be checked Refer to p 5 6 G The various copy programs stored with the ...

Page 46: ...e Input screen when Input is touched Refer to p 5 4 G The initial mode settings selected after the copier is reset can be changed Refer to p 5 5 G User specified copy modes can be stored as copy programs G Up to 10 specified copy modes can be stored as copy programs These stored copy programs can be recalled by touching Copy Program Recall on the Utility screen ...

Page 47: ...ied using the Reset Mode function To specify the initial mode settings 1 Select the desired Copy mode settings For details on selecting Copy mode settings refer to Specifying Copy Settings in the Basic Operations volume 2 Press the UTILITY key 3 Touch Input 4 Touch Reset Mode 5 Touch Set up Mode 6 Touch Input Note If Set up Mode is selected the current Copy mode settings are stored as the initial ...

Page 48: ...ut 4 Touch Job Memory Input 5 Touch the number of the program where you wish to store the settings A screen appears allowing you to enter the name of the program 6 Touch the letters and numbers to enter a name 9 characters long for the copy job and then touch Enter To delete a copy program Touch Delete and then touch the number of the program that you wish to delete When the number of the program ...

Page 49: ...reen 1 Press the UTILITY key 2 Touch Copy Program Recall 3 Touch the number of the program that you wish to recall The copy program settings appear 4 Check that the copy program settings that appear are the ones that you wish to use and then touch Enter The Copy mode settings change to the ones that are recalled If the displayed copy program settings are not the ones that you wish to use touch Men...

Page 50: ... This function is used to set the memory recall feature which allows settings from past copy jobs to be recalled Refer to p 5 15 G This function is used to specify the length of time until the repeat feature for a key starts and the length of the time that a key must be held down between subsequent repeats Refer to p 5 16 G This function is used to specify the length of time after the last operati...

Page 51: ...hapter 5 Refer to p 5 19 G This function is used to specify whether all modes and functions are automatically reset when the key counter is removed Refer to p 5 20 G This function is used to specify the length of time that the message requesting confirmation to cancel the Enlarge Display mode is displayed ...

Page 52: ...ern if the necessary conditions are met while using the Sort or Group settings Refer to p 5 26 G This function is used to specify the print timing for print jobs that have been received Refer to p 5 27 G This function is used to adjust the level for detecting whether a document will be copied in color or in black and white Refer to p 5 28 G This function is used to specify the zoom ratios for 2 in...

Page 53: ...ion This function is used to specify whether or not a confirmation beep is sounded each time a key in the operation panel is pressed The default setting is ON 1 Press the UTILITY key 2 Touch User s Choice 1 3 Touch Confirmation Beep 4 Select the desired setting 5 Touch Enter 6 Touch Fin Time and then touch Fin Time again in the screen that appears ...

Page 54: ...0 in 30 minute intervals The default setting is 0000 1 Press the UTILITY key 2 Touch User s Choice 1 3 Touch Date Time Set 4 Touch Year 5 Press the C CLEAR QTY key The current setting is erased 6 Using the keypad enter the year for the current date 7 Specify the settings for Month Day Hour min and Time Zone in the same way Touch Time Zone first before touching to specify the time zone Tip The time...

Page 55: ...ying Default Settings User s Choice Functions 5 12 Konica 8020 8031 Utility Mode Operations Chapter 5 8 Touch Enter The clock begins ticking 9 Touch Fin Time and then touch Fin Time again in the screen that appears ...

Page 56: ...k Mode parameter on the Copy Track screen must be set to No For details on setting the Copy Track Mode parameter on the Copy Track screen refer to To set the Copy Track Mode parameter in chapter 5 Utility Mode Operations of the Administrator Operations volume 1 Press the UTILITY key 2 Touch User s Choice 1 3 Touch Memory Recall Note If the Copy Track Mode parameter on the Copy Track screen is set ...

Page 57: ...ng Default Settings User s Choice Functions 5 14 Konica 8020 8031 Utility Mode Operations Chapter 5 4 Select the desired setting 5 Touch Enter 6 Touch Fin Time and then touch Fin Time again in the screen that appears ...

Page 58: ... interval is 0 1 second For more details refer to Repeat Feature for Keys in Before Making Copies of the Enlarge Display Operations volume Note The settings for the repeat feature are only applied in the Enlarge Display mode they are not applied when the screen is displayed normally 1 Press the UTILITY key 2 Touch User s Choice 1 3 Touch Key Repeat Start Time Interval 4 Touch and to specify the de...

Page 59: ... 1 min For details on the automatic reset refer to Original Documents Feeding the Document in the Basic Operations volume 1 Press the UTILITY key 2 Touch User s Choice 1 3 Touch 2 2 4 Touch Auto Reset 5 Press the C CLEAR QTY key The current setting is erased 6 Using the keypad enter the desired length of time between 1 and 9 minutes If you do not wish for the copier to automatically reset its mode...

Page 60: ...Low Power mode The default setting is 15 min For details on the Low Power mode refer to Original Documents Feeding the Document in the Basic Operations volume 1 Press the UTILITY key 2 Touch User s Choice 1 3 Touch 2 2 4 Touch Low Power 5 Press the C CLEAR QTY key The current setting is erased 6 Using the keypad enter the desired length of time between 10 and 240 minutes 7 Touch Enter 8 Touch Fin ...

Page 61: ... mode is set to No The default setting is 30 min No is not displayed in the default setting For details on the Shut off mode refer to Original Documents Feeding the Document in the Basic Operations volume 1 Press the UTILITY key 2 Touch User s Choice 1 3 Touch 2 2 4 Touch Shut off 5 Press the C CLEAR QTY key The current setting is erased 6 Using the keypad enter the desired length of time between ...

Page 62: ... user of the copier has changed for example when the key counter has been removed The default setting is Yes For details on clearing all settings when a new user is detected refer to Original Documents Feeding the Document in the Basic Operations volume 1 Press the UTILITY key 2 Touch User s Choice 1 3 Touch 2 2 4 Touch Auto Clear Mode 5 Select the desired setting 6 Touch Enter 7 Touch Fin Time an...

Page 63: ... Display mode is displayed For more details refer to Confirming the Cancellation of the Enlarge Display Mode in Before Making Copies of the Enlarge Display Operations Guide 1 Press the UTILITY key 2 Touch User s Choice 1 3 Touch 2 2 4 Touch Enlarge Display Notice 5 Select the desired setting and specify the length of time 30 60 90 or 120 seconds that the message requestingconfirmation to cancel th...

Page 64: ...ing is the Specialty paper setting selected for making copies Standard setting G Select this setting if plain paper is loaded This is the default setting G Paper with this setting can be automatically selected with the paper setting Auto Paper and Zoom setting Auto Size High Quality Paper setting G Select this setting when using High Quality paper G Paper with this setting is not automatically sel...

Page 65: ...erations Chapter 5 To set the Specialty Paper function 1 Press the UTILITY key 2 Touch User s Choice 2 3 Touch Specialty Paper 4 Select the paper drawer that you wish to set 5 Select the desired paper setting 6 Touch Enter 7 Touch Fin Time and then touch Fin Time again in the screen that appears ...

Page 66: ...e tray 2 for copying and printing and tray 3 for Internet faxing Applications The applications referred to here are copying PC printing and Internet fax printing Internet faxing PC printing and Internet fax printing can only be used if the optional printer controller is installed To set the Priority exit tray function 1 Press the UTILITY key 2 Touch User s Choice 2 3 Touch Priority exit tray 4 Sel...

Page 67: ...ng this function to Yes the Non Sort setting will automatically be selected if a document consisting of only one page is loaded into the duplexing document feeder and the Sort setting will automatically be selected if a document consisting of two or more pages is placed in the duplexing document feeder The default setting is Yes 1 Press the UTILITY key 2 Touch User s Choice 2 3 Touch Intelligent S...

Page 68: ...how copies are sorted when the Sort setting is selected The default setting is Yes For details on crisscross sorting refer to Original Documents Feeding the Document in the Basic Operations volume 1 Press the UTILITY key 2 Touch User s Choice 2 3 Touch Criss Cross Mode 4 Select the desired setting 5 Touch Enter 6 Touch Fin Time and then touch Fin Time again in the screen that appears ...

Page 69: ...net fax print jobs are normally printed as a set The default setting is Copier Copier setting Print jobs are queued as a job when the data for all pages is received Printer setting Print jobs are queued as a job when the data for the first page is received 1 Press the UTILITY key 2 Touch User s Choice 2 3 Touch Priority Device 4 Select the desired setting 5 Touch Enter 6 Touch Fin Time and then to...

Page 70: ... for detecting a color or black and white document with the Color setting Auto Color The detection level can be adjusted to one of 5 settings The default setting is 3 Std 1 Press the UTILITY key 2 Touch User s Choice 2 3 Touch 2 2 4 Touch ACS Judgement Level Adjust 5 Touch and to specify the desired detection level 6 Touch Enter 7 Touch Fin Time and then touch Fin Time again in the screen that app...

Page 71: ...for 2 in 1 copying 4 in 1 copying and booklet binding If this function is set the specified zoom ratio is automatically applied when any of these Copy settings are selected The default setting is Presets 1 Press the UTILITY key 2 Touch User s Choice 2 3 Touch 2 2 4 Touch 2in1 4in1 Booklet Copy Zoom 5 Select the desired setting 6 Touch Enter 7 Touch Fin Time and then touch Fin Time again in the scr...

Page 72: ...following conditions When the START key is pressed with the Paper setting Auto Paper selected but the size of the document is too small to be detected and the paper cannot be selected When the START key is pressed with the Paper setting Auto Paper selected but no document has been loaded Tip If this function is set to ON copies will be made even under the conditions described above In this case si...

Page 73: ...Touch Fin Time and then touch Fin Time again in the screen that appears To set the 4 in 1 Copy Order function This function is used to specify the copy order during 4 in 1 copying The default setting is 1 Press the UTILITY key 2 Touch User s Choice 2 3 Touch 2 2 4 Touch 4in1 Copy Order 5 Select the desired setting 6 Touch Enter 7 Touch Fin Time and then touch Fin Time again in the screen that appe...

Page 74: ...ction This function is used to specify the printing position of the image when the document is smaller than the paper The default setting is Yes 1 Press the UTILITY key 2 Touch User s Choice 2 3 Touch 2 2 4 Touch Centering 5 Select the desired setting 6 Touch Enter 7 Touch Fin Time and then touch Fin Time again in the screen that appears ...

Page 75: ...nd white copies G Copy Size Total number of black and white copies on paper specified as large size paper G Printer Total Total number of black and white printouts G Printer Size Total number of black and white printouts on paper specified as large size paper G Copy Printer Total number of black and white copies and printouts Full Color counters G Copy Total Total number of full color copies G Cop...

Page 76: ...ons Chapter 5 1 Press the UTILITY key 2 Touch Meter Count 3 Select the desired color mode The counters are displayed 4 To print the list of counters touch Print and then press the START The list of counters is printed The lists are only printed in English 5 Touch Cancel 6 Touch Fin Time ...

Page 77: ... of use for the various supplies and parts can be checked 1 Press the UTILITY key 2 Touch Unit life indicator 3 Graphs showing the maintenance levels for the various parts and supplies are displayed 4 To print the maintenance levels for the copier touch Print and then press the START key The list of maintenance levels are printed The list is only printed in English 5 Touch Cancel 6 Touch Fin Time ...

Page 78: ...ntered the following screen appears Refer to p 5 36 G These functions allow you to specify the amount of loss at the edge of images and various settings for the Disable Shut off Mode the A3 Wide paper size and the language Refer to p 5 60 G These functions allow you to restrict the number of copies possible for each account Refer to p 5 40 G In the Expert mode you can make various expert adjustmen...

Page 79: ... the amount of loss at the edge of the original This amount is erased during printing The default setting is 5 mm 1 Press the UTILITY key 2 Touch Admin Mode 3 Using the keypad enter the administrator access code 4 Touch Admin set 5 Touch Top Erase 6 Select the desired setting 7 Touch Enter 8 Touch Fin Time again in the next three screens that appear ...

Page 80: ...tion available through the User s Choice 1 screen For details on the Shut off mode refer to Original Documents Feeding the Document in the Basic Operations volume For more details on setting the Shut off function refer to Specifying Default Settings User s Choice Functions page 5 7 1 Press the UTILITY key 2 Touch Admin Mode 3 Using the keypad enter the administrator access code 4 Touch Admin set 5...

Page 81: ...tion is used to set the paper size for A3 Wide sized paper The default setting is 305 mm 457 mm 1 Press the UTILITY key 2 Touch Admin Mode 3 Using the keypad enter the administrator access code 4 Touch Admin set 5 Touch A3 wide paper size 6 Select the desired setting 7 Touch Enter 8 Touch Fin Time again in the next three screens that appear ...

Page 82: ... to change the display language for the touch panel The default setting is English 1 Press the UTILITY key 2 Touch Admin Mode 3 Using the keypad enter the four digit administrator access code 4 Touch Admin set 5 Touch Language Selected 6 Select the desired language 7 Touch Enter 8 Touch Fin Time and then touch Fin Time again in the screen that appears ...

Page 83: ...o make fine adjustments in the color shift of the printed image Refer to p 5 46 G This function is used to make adjustments to the printed image of black and white copies This function is only available on the Konica 8020 Refer to p 5 47 G This function is used to perform image stabilization Refer to p 5 47 G These functions are used to make fine adjustments to the print area margins of a printed ...

Page 84: ... thick paper and overhead projector transparencies to be adjusted The default settings are the standard settings middle settings 1 Press the UTILITY key 2 Touch Admin Mode 3 Using the keypad enter the administrator access code 4 Touch Expert Mode 5 Touch Thick Paper and OHP Film Image Density 6 Touch and to adjust the image density 7 Touch Enter 8 Touch Fin Time again in the next three screens tha...

Page 85: ...t can be made The procedure with A3 size paper loaded into the 1st drawer is described below 1 Load A3 size paper into the 1st drawer 2 Press the UTILITY key 3 Touch Admin Mode 4 Using the keypad enter the administrator access code 5 Touch Expert Mode 6 Touch Color Shift Correction Bk 7 Press the START key The automatic color shift adjustment procedure begins and the test pattern is printed on the...

Page 86: ...If horizontal lines A and B are angled as shown at the right touch to specify the desired negative adjustment for θ between 1 dot and 10 dots 10 If horizontal lines A and B are angled as shown at the right touch to specify the desired positive adjustment for θ between 1 dot and 10 dots 11 Press the START key The adjusted test pattern is printed on A3 size paper B A A B A B ...

Page 87: ... the START key The automatic color shift adjustment procedure begins and the test pattern is printed on the A3 size paper 16 Check the distance from the reference line of the black lines to the cyan lines in the test pattern along the X and Y directions If there is no shift in the reference line skip to step 23 17 If the lines are shifted as shown at the right touch to specify the desired negative...

Page 88: ... A3 size paper 22 Check the print result If the distance between the reference line of the black lines and the cyan lines is adjusted to 0 skip to step 23 If more adjustment is necessary return to step 14 and repeat the adjustment procedure 23 Touch Enter The Expert User s Mode screen appears again 24 Touch Color Shift Correction M Repeat the procedure for adjusting the cyan shift steps 13 to 23 t...

Page 89: ...te copies to be adjusted This function is only available on the Konica 8020 The default setting is the standard setting middle setting 1 Press the UTILITY key 2 Touch Admin Mode 3 Using the keypad enter the administrator access code 4 Touch Expert Mode 5 Touch Monochrome Image density correct 6 Touch and to adjust the image density 7 Touch Enter 8 Touch Fin Time in the next three screens that appe...

Page 90: ...ion Refer to p 5 50 G This function adjusts the starting print position with regard to the paper feed direction from the left edge of the paper Refer to p 5 52 G This function adjusts the starting print position at the left edge of the paper for the second side of a double sided copy To set the PRT Area Top Margin function The top margin of the printing area can be adjusted for each paper type Not...

Page 91: ...st pattern is between 4 5 mm and 5 5 mm If the top margin is within the specified range skip to step 14 10 If the top margin is less than 4 5 mm touch to specify the desired positive adjustment between 0 1 mm and 3 0 mm 11 If the top margin is more than 5 5 mm touch to specify the desired negative adjustment between 0 1 mm and 3 0 mm 12 Press the START key The adjusted test pattern is printed on A...

Page 92: ...tions Chapter 5 13 Check the print result to make sure that the top margin is adjusted to between 4 5 mm and 5 5 mm If more adjustment is necessary return to step 8 and repeat the adjustment procedure 14 Touch Enter 15 Touch Fin Time again in the next three screens that appear ...

Page 93: ...to the 1st drawer is described below Note The top margin of the print area is adjusted during manufacturing of the copier Normally the top margin will not need to be adjusted 1 Load A3 size paper into the 1st drawer 2 Press the UTILITY key 3 Touch Admin Mode 4 Using the keypad enter the administrator access code 5 Touch Expert Mode 6 Touch PRT Area Left Margin 7 Touch 1st Drawer 8 Press the START ...

Page 94: ...ve adjustment between 0 1 mm and 3 0 mm 11 If the left margin is more than 3 5 mm touch to specify the desired negative adjustment between 0 1 mm and 3 0 mm 12 Press the START key The adjusted test pattern is printed on A3 size paper 13 Check the print result to make sure that the left margin is adjusted to between 2 5 mm and 3 5 mm If more adjustment is necessary return to step 8 and repeat the a...

Page 95: ...per loaded into the 1st drawer is described below Note The top margin of the print area is adjusted during manufacturing of the copier Normally the top margin will not need to be adjusted 1 Load A3 size paper into the 1st drawer 2 Press the UTILITY key 3 Touch Admin Mode 4 Using the keypad enter the administrator access code 5 Touch Expert Mode 6 Touch PRT Area Dup Left Margin 7 Touch 1st Drawer 8...

Page 96: ...red positive adjustment between 0 1 mm and 3 0 mm 11 If the left margin for the second side is more than 3 5 mm touch to specify the desired negative adjustment between 0 1 mm and 3 0 mm 12 Press the START key The adjusted test pattern is printed on A3 size paper 13 Check the print result to make sure that the left margin for the second side is adjusted to between 2 5 mm and 3 5 mm If more adjustm...

Page 97: ... make a copy sample For details on booklet binding refer to Original Documents Feeding the Document in the Basic Operations volume 1 Press the UTILITY key 2 Touch Admin Mode 3 Using the keypad enter the administrator access code 4 Touch Expert Mode 5 Touch Center Binding Position 6 Compare the width of the left pages of the copy sample with the width of the right pages 7 If the staple position is ...

Page 98: ...olding position is shifted to the left touch to specify the desired positive adjustment between 1 mm and 7 mm 11 If the folding position is shifted to the right touch to specify the desired negative adjustment between 1 mm and 7 mm 12 Touch Enter 13 Touch Fin Time in the next three screens that appear 14 Use the Booklet Creation setting to make another copy sample 15 Check the print result If more...

Page 99: ...Load A3 size paper into the 1st drawer A4 C 11 17 Ledger or Letter C can be loaded instead 2 Press the UTILITY key 3 Touch Admin Mode 4 Using the keypad enter the administrator access code 5 Touch Gradation Adjust The Gradation Adjust screen appears 6 Press the START key A test pattern is printed 7 After the test pattern is printed the screen changes as shown at the right 8 Place the printed test ...

Page 100: ...the platen cover or the duplexing document feeder if it is installed 11 Press the START key The printed test pattern is scanned 12 Based on the scanned image the gradation levels are automatically adjusted After the gradation levels are adjusted the Admin Mode screen appears again 13 Repeat steps 5 through 12 three times 14 Touch Fin Time and then touch Fin Time again in the screen that appears ...

Page 101: ...ation based on past data up to the previous session Image stabilization should normally be performed with Stabilizer Mode selected Select Reset And Stabilizer Mode only if the desired effect cannot be attained with the Stabilizer Mode 1 Press the UTILITY key 2 Touch Admin Mode 3 Using the keypad enter the administrator access code 4 Touch Expert Mode 5 Touch Stabilizer 6 Press the START key The in...

Page 102: ...5 5 Administrator Mode Operations 5 Konica 8020 8031 5 59 Utility Mode Operations Chapter 5 7 Touch Enter 8 Touch Fin Time again in the next three screens that appear ...

Page 103: ...e the copier In addition permissions for use can be specified for each account The following four Copy Track parameters are available G Total Count parameter Counts the total number of copies and printouts G Copy Limit parameter Limits the number of copies or printouts that can be made when the limit is reached no more copies or printouts can be made Even if a limit is specified the number of copi...

Page 104: ...ion cannot be used at the same time In order to use the Copy Track function the Memory Recall function on the User s Choice 1 screen must be set to No For details on setting the Memory Recall function on the User s Choice 1 screen refer to To set the Memory Recall function of Specifying Default Settings User s Choice Function in chapter 5 Utility Mode Operations ...

Page 105: ... Total Count Total Count Copy Limit Size 2 Black Total Count Copy Limit Size Full Color Total Count Size Color Limit Mono Color Total Count Size Color Limit Copy Total Count Total Count Size 2 Black Total Count Size Full Color Total Count Size Mono Color Total Count Size Print Total Count Total Count Size 2 Black Total Count Size Full Color Total Count Size ...

Page 106: ... by each account can be specified G If the Max of Prints parameter is not set to Yes use of the copier will not be affected when the number of copies reaches the specified limit G If the Max of Prints parameter is set to Yes and printing is stopped when the maximum number of copies specified when the account was registered is exceeded the stopped job is skipped if Job Skip available when specifyin...

Page 107: ...e Copy Track parameters cannot be set by anyone without knowledge of the administrator access code For details on the administrator access code contact your service representative 4 Touch Copy Track 5 Touch Copy Track Mode 6 Touch Yes to select the Copy Track Mode parameter To select the Job Skip setting touch Yes and then touch Enter Default setting Yes 7 To cancel the Copy Track Mode parameter t...

Page 108: ...e Memory Recall function on the User s Choice 1 screen refer to To set the Memory Recall function of Specifying Default Settings User s Choice Function in chapter 5 Utility Mode Operations 8 To clear the Copy Track data touch Yes and then touch Enter The Copy Track Data counters are initialized and then the Copy Track function is canceled Note In order to cancel the Copy Track function the Copy Tr...

Page 109: ...de 3 Using the keypad enter the four digit administrator access code 4 Touch Copy Track 5 Select the desired Copy Track Data counter The selected Copy Track Data screen appears 6 Touch Print 7 Load A4 size paper crosswise into the 1st drawer and then press the START key The icon indicating that data is being sent appears 8 The print job is queued for printing The Copy Track Data counter is printed...

Page 110: ...ng the keypad enter the four digit administrator access code 4 Touch Copy Track 5 Select the desired Copy Track Data screen appears The selected Copy Track Data screen appears 6 To initialize the Copy Track Data counter for a particular account touch Sel Dept count reset A screen appears allowing you to select the account number 7 Select the 3 digit account number for the desired account To initia...

Page 111: ... for the selected accounts are initialized The ID Copy Limit and Color Limit settings are not initialized 10 To initialize the Copy Track Data counter for all accounts touch All counter reset The Clear All Counters screen appears 11 Touch Enter The Copy Track Data counter for all accounts are initialized 12 Touch Enter The Copy Track screen appears again ...

Page 112: ...ng the keypad enter the four digit administrator access code 4 Touch Copy Track 5 Touch Copy Track Data Copy Print The Copy Track Data Copy Print screen appears 6 Select the block for the desired account 99 accounts are divided so that there are ten to a block each of which can be selected For example touch 1 20 for accounts 001 to 005 Touching displays accounts 006 through 010 7 Select the ID for...

Page 113: ...and then use the keypad to enter the limit value The limit can be set between 1 and 999 999 sheets 12 Touch Black 13 Specify the limit of black and white copies printouts for the account Using the keypad enter the limit value 14 Touch Full Color 15 Specify the limit of full color copies printouts for the account Using the keypad enter the limit value If the limit for full color copies printouts is...

Page 114: ...y Track 5 Touch Copy Track Set 6 Select the block for the desired account 99 accounts are divided so that there are ten to a block each of which can be selected For example select 1 20 for accounts 001 to 005 7 To cancel the permissions for a desired account touch Allow once Allow changes to Prohibit Touch Prohibit once to change it back to Allow Note For example if Prohibit appears below Color fo...

Page 115: ...unt 001 once The permissions for all accounts are canceled Note For example if permissions for all accounts are set to Prohibit for color printing the users of all accounts can make copies printouts using the Color setting Black but cannot use the Color setting Full Color or the Monotone function 9 Touch Enter The specified permissions are set 10 Touch Enter The Copy Track screen appears again ...

Page 116: ... digit administrator access code 4 Touch Copy Track 5 Touch Copy Track Set 6 Select the block for the desired account 99 accounts are divided so that there are ten to a block each of which can be selected For example touch 1 20 for accounts 001 to 005 7 Touch Max of Prints 8 To apply a specified limit touch Inactivate once Inactivate changes to Activate Touch Activate once to change it back to Ina...

Page 117: ...to Activate applies the specified limit of 1 000 sheets for full color printing The user of account 001 can only make color copies prints of 1 000 sheets 9 To apply the limit to all accounts touch Same for All Dept and then touch Inactivate once for account 001 The specified limits will apply to all accounts 10 Touch Enter The specified limits are applied 11 Touch Enter The Copy Track screen appea...

Page 118: ...Touch Panel Messages Chapter 6 6 6Touch Panel Messages ...

Page 119: ...run out appears in the screen on the touch panel Touch to display the message shown in the following illustration When the message appears prepare to replace the toner cartridge according to your maintenance agreement After the message warning that the toner is almost empty the message indicating that the toner is empty appears and the copier stops operating The number of copies that can be made f...

Page 120: ...ty when replaceable by the user is shown below Display in Enlarge Display Mode When the message appears replace the toner cartridge according to your maintenance agreement For details on replacing the toner cartridges refer to page 6 5 Please Be Reminded Replacing the toner cartridge Do not replace the toner cartridge until the message indicating that it be replaced appears in the touch panel In a...

Page 121: ...ause burns CAUTION Be careful not to spill toner inside the copier or get toner on your clothes or hands If your hands become soiled with toner immediately wash them with soap and water If toner gets in your eyes immediately flush them with water and then seek professional medical attention CAUTION Used toner cartridges Do not throw away the used toner bottle Keep it in the shipping box to be coll...

Page 122: ...he yellow toner cartridge as an example Note Be careful since the installation location of toner cartridges for other colors is different 1 Open the front door and then turn counterclockwise the lever for the toner cartridge that you wish to replace For example If the yellow toner is empty turn the lever for the yellow toner cartridge 2 Pull out the empty toner cartridge Note Do not throw away the...

Page 123: ...r different than the one that was removed otherwise the machine may be damaged 4 Remove the desiccant 5 Shake the new toner cartridge well Note The toner within the toner cartridge may have become compacted If it has be sure to shake the toner cartridge until the toner is mostly broken up before installing the cartridge 6 Peel off the tape Note Slowly remove the tape attached to the toner cartridg...

Page 124: ...7 Touch Panel Messages Chapter 6 7 Remove the protective cap 8 Position the toner cartridge as shown and then insert it into its compartment 9 Turn the lever clockwise Note Make sure that the lever is fully turned as shown otherwise the front door cannot be closed Protective cap ...

Page 125: ...Then slowly push in the charger cleaning tool completely Repeat the above operation three times 11 Be sure to push in the charger cleaning tool completely Then carefully close the front door Notel Use only the lever of the charger cleaning tool located below the new toner cartridge when using the charger cleaning tool to clean the charger wire If the door cannot be closed securely the lever may no...

Page 126: ...ed and is about to run out of staples the message shown below appears Follow the procedure below to replace the staple cartridge Display in Enlarge Display Mode If the staples are empty appears in the screen on the touch panel Touch to display the message shown in the following illustration Note Be sure to replace the staple cartridge only after the message appears otherwise the machine may be dam...

Page 127: ... 10 Konica 8020 8031 Touch Panel Messages Chapter 6 To replace the staple cartridge for FS 135 1 Slide the finisher away from the copier 2 Turn the dial to the left in order to position the stapler at the center 3 Pull the staple holder out toward you Stapler ...

Page 128: ...6 11 Touch Panel Messages Chapter 6 4 Remove the empty staple cartridge 5 Insert the new staple cartridge into the staple holder and then carefully pull out the stopper 6 Insert the refilled staple holder until it locks into place 7 Slide the finisher back against the copier ...

Page 129: ...ple cartridge for FS 231 Note Be sure to replace the staple cartridge only after the message appears otherwise the machine may be damaged 1 Open the front door of the finisher 2 Turn misfeed clearing dial clockwise until the removal indicator is completely blue If the dial is turned too far turn it counterclockwise to adjust it ...

Page 130: ... Slowly pull out the stapler unit as far as possible 4 Turn dial clockwise until the staple cartridge moves to a position from where it can be removed If the dial is turned too far turn it counterclockwise to adjust it 5 Grasp both sides of the staple cartridge lift up the staple cartridge and then pull it out ...

Page 131: ...rtridge Appears 6 14 Konica 8020 8031 Touch Panel Messages Chapter 6 6 Press the button marked PUSH on the side of the staple cartridge The staple case is released 7 Pull up the staple case 8 Remove the paper holder from the staple case PUSH ...

Page 132: ...taple Cartridge Appears 6 Konica 8020 8031 6 15 Touch Panel Messages Chapter 6 9 Refill the staple case with staples Fully insert the staple case as far as possible 10 Press the staple case down 11 Peel off the tape from the staples ...

Page 133: ...Insert the staple cartridge making sure the tabs on the cartridge slide along the rails in the compartment 13 Fully insert the staple cartridge so that it locks into place Check that the staple cartridge is firmly installed 14 Carefully move the stapler unit back into its original position 15 Close the front door ...

Page 134: ...llustration shows a paper jam that occurred in a paper drawer The procedure for clearing misfed paper differs depending on where the misfeed occurs Determine the misfeed location by looking at the illustration displayed with the error message and then clear the misfeed according to the appropriate procedure Locations of Paper Misfeeds in the Enlarge Display Mode If a paper misfeed occurs while the...

Page 135: ...n the upper right side door unit p 6 28 3 A paper misfeed in the right side door p 6 25 4 A paper misfeed in the manual bypass tray p 6 19 5 A paper misfeed in the large capacity tray p 6 24 6 A paper misfeed in finisher FS 135 option tray p 6 35 7 A paper misfeed in the duplex unit p 6 21 8 A paper misfeed in a paper drawer p 6 22 9 A paper misfeed in finisher FS 231 p 6 39 1 6 9 2 4 3 5 3 7 8 7 ...

Page 136: ...tion a lit O indicates areas where paper may have been misfed and that should be checked 1 Pull up the lock release lever to open the right side door Please Be Reminded Decreased copy quality may result if the surface of the image transfer belt or the image transfer roller is touched Be careful not to touch the surface of the image transfer belt or the image transfer roller Image transfer belt Ima...

Page 137: ...6 6 4 When the Message Misfeed detected Appears 6 20 Konica 8020 8031 Touch Panel Messages Chapter 6 2 Carefully pull out the paper 3 Close the right side door ...

Page 138: ...hapter 6 To clear a paper misfeed in the duplex unit A flashing O indicates the location of the paper misfeed In addition a lit O indicates areas where paper may have been misfed and that should be checked 1 Open the duplex unit door 2 Carefully pull out the paper 3 Close the duplex unit door ...

Page 139: ...misfeed in a paper drawer A flashing O indicates the location of the paper misfeed In addition a lit O indicates areas where paper may have been misfed and that should be checked 1 Open the right side door of the paper drawer indicated by the O 2 Turn the green wheels to feed the paper so that it can be easily removed ...

Page 140: ...eed detected Appears 6 Konica 8020 8031 6 23 Touch Panel Messages Chapter 6 3 Carefully pull out the paper 4 Close the lower right side door 5 Pull out the paper drawer and then remove any misfed paper 6 Close the paper drawer ...

Page 141: ... indicates areas where paper may have been misfed and that should be checked 1 Open the right side door of the large capacity tray 2 Turn the green dial in the direction of the arrow to feed out the paper 3 Carefully pull out the paper 4 Close the right side door of the large capacity tray 5 Pull out the paper drawer of the large capacity tray and then remove any misfed paper 6 Close the paper dra...

Page 142: ...isfeed In addition a lit O indicates areas where paper may have been misfed and that should be checked 1 Pull out the paper drawer being used and then remove any paper remaining in the drawer 2 Load the paper in the drawer again and then close the drawer Note Be careful not to touch the surface of the paper take up roller with your hands 3 Pull up the lock release lever to open the right side door...

Page 143: ...wise to feed out the paper 5 Pull out any paper caught in the image transfer roller section Please Be Reminded Decreased copy quality may result if the surface of the image transfer belt or the image transfer roller is touched Be careful not to touch the surface of the image transfer belt or the image transfer roller Image transfer belt Image transfer roller ...

Page 144: ...r authorized service representative The paper is wrapped around the roller in the image transfer roller The paper is folded or shredded by the roller in the image transfer roller The paper that was removed tore and remains in the fusing unit 6 Pull out any paper caught in the fusing unit 7 Open the right side door and then make sure that there is no paper in the fusing unit ...

Page 145: ...ion of the paper misfeed In addition a lit O indicates areas where paper may have been misfed and that should be checked 1 Pull up the lock release lever to open the right side door 2 Grasp the upper right side door as shown and then carefully open the door completely while making sure to support it Note Be sure to support the door while carefully opening it otherwise it may be damaged ...

Page 146: ...ion of the arrow carefully pull out the paper CAUTION The area around the fusing unit is extremely hot Touching anything other than specifically indicated parts may result in burns If you get burned immediately cool the skin under cold water and then seek professional medical attention 4 Grasp the tab on the left end of the fusing unit cover and then swing the cover toward you to open it ...

Page 147: ...ately cool the skin under cold water and then seek professional medical attention Note If the paper is caught in any of the ways described below contact your authorized service representative The paper is wrapped around the fusing unit The paper is folded or shredded by the fusing unit The paper that was removed tore and remains in the fusing unit 6 Grasp the tab on the left end of the fusing unit...

Page 148: ...tes the location of the paper misfeed In addition a lit O indicates areas where paper may have been misfed and that should be checked 1 Open the left side misfeed clearing cover 2 Carefully pull out any documents from the document feed tray 3 Open the right side misfeed clearing cover 4 Turn the dial counterclockwise to feed out any documents 5 Carefully pull out any documents ...

Page 149: ...Chapter 6 6 Open the guide 7 Turn the dial to feed out any documents 8 Carefully pull out the documents 9 Carefully open the duplexing feed guide as far as possible Check that the guide remains securely open 10 Turn the dial to feed out any documents 11 Carefully pull out any documents Guide ...

Page 150: ...Messages Chapter 6 12 Close the duplexing feed guide 13 Open the duplexing document feeder and then carefully pull out any documents 14 Remove any documents on the platen glass and then close the duplexing document feeder 15 Close the left side and right side misfeed clearing covers ...

Page 151: ...6 6 4 When the Message Misfeed detected Appears 6 34 Konica 8020 8031 Touch Panel Messages Chapter 6 16 Reload the documents according to the instructions that appear on the touch panel ...

Page 152: ... in finisher FS 135 A flashing O indicates the location of the paper misfeed In addition a lit O indicates areas where paper may have been misfed and that should be checked 1 Slide the finisher away from the copier 2 Open the horizontal transport unit cover and then remove any paper 3 Close the horizontal transport unit cover ...

Page 153: ...ge Misfeed detected Appears 6 36 Konica 8020 8031 Touch Panel Messages Chapter 6 4 Open front door FN4 5 Turn knobs FN5 clockwise at the same time 6 While holding the misfeed clearing guide FN7 open pull out any paper FN7 ...

Page 154: ...y turn knobs FN5 counterclockwise at the same time to feed out any paper 8 Close front door FN4 9 Open upper cover FN1 CAUTION Metallic parts on the inside of upper cover FN1 are very hot Touching anything other than the paper within the area around the fusing unit may result in burns 10 While holding misfeed clearing guide FN2 open pull out any paper ...

Page 155: ...g guide FN3 open pull out any paper 12 Close upper cover FN1 If the Option tray is not installed skip to step 16 13 If the Option tray is installed Open the Option tray 14 Remove any misfed paper 15 Close the Option tray 16 While holding misfeed clearing guide FN6 open pull out any paper 17 Slide the finisher back against the copier ...

Page 156: ...isher FS 231 A flashing O indicates the location of the paper misfeed In addition a lit O indicates areas where paper may have been misfed and that should be checked 1 Slide the finisher away from the copier 2 Open the cover of the horizontal transport unit 3 Remove any paper and then close the cover of the horizontal transport unit ...

Page 157: ...oval indicator is completely blue If the dial is turned too far turn it counterclockwise to adjust it Note If the message Misfeed detected appears be sure to perform these steps If the paper is pulled out with too much force without performing these steps the finisher may be damaged 6 Open the upper door of the finisher and then pull out any paper in the feed section 7 Close the upper door ...

Page 158: ...emove any paper 10 Open the transport guide and then pull out any paper in the transport section Note If the paper cannot easily be pulled out stop trying to pull it out Pulling out the paper with too much force may damage the folding unit If the paper cannot be pulled out easily turn the misfeed clearing dial in the folding section as described in the following step and then pull out the paper ...

Page 159: ...not be removed in step 10 turn the misfeed clearing dial in the folding section clockwise Feed the paper into the lower paper output tray and then pull it out 12 Close the front door of the finisher Note Be careful that your fingers are not pinched when the front door is closed 13 Slide the finisher back against the copier ...

Page 160: ...ge Staple mode cannot be used Appears To clear jammed staples in FS 135 When a finisher is installed and the staples are jammed the message shown below appears Follow the procedure below to clear the jammed staples 1 Slide the finisher away from the copier 2 Turn the dial to the left in order to position the stapler at the center ...

Page 161: ...Push the staple holder guide up and then pull out one sheet of staples 5 Move the guide back to its original position 6 Insert the staple holder until it locks into place 7 Slide the finisher back against the copier Note If stapling still cannot be performed even after performing the above procedure contact your authorized service representative Stapler ...

Page 162: ...ing procedure When a finisher is installed and the staples are jammed the message shown below appears Follow the procedure below to clear the jammed staples Note If the message Staple mode cannot be used appears be sure to perform the following procedure If the paper is pulled out in any way other than that described below the stapler unit may be damaged 1 Slide the finisher away from the copier ...

Page 163: ... 8020 8031 Touch Panel Messages Chapter 6 2 Open the cover of the horizontal transport unit 3 Remove any paper and then close the cover of the horizontal transport unit 4 Open the feed guide for the finisher and then remove any paper 5 Open the front door of the finisher ...

Page 164: ...ese steps If the paper is pulled out with too much force without performing these steps the finisher may be damaged 7 Pull out any paper fed into the output tray 8 Open the transport guide and then pull out any paper in the transport section Note If the paper cannot easily be pulled out stop trying to pull it out Pulling out the paper with too much force may damage the folding unit If the paper ca...

Page 165: ...tray the paper that could not be fed out in step 8 and then pull out the paper 10 Slowly pull out the stapler unit as far as possible 11 Turn misfeed clearing dial clockwise until the cartridge removal indicators are aligned The staple cartridge moves to a position from where it can be removed If the dial is turned too far turn it counterclockwise to adjust it so the cartridge removal indicators a...

Page 166: ...le cartridge lift up the staple cartridge and then pull it out 13 Swing open the shutter of the staple cartridge 14 Pull out toward you the two staples jammed at the end of the staple cartridge Note Be sure to remove two staples otherwise stapling cannot continue correctly 15 Return the shutter of the staple cartridge to its original position ...

Page 167: ...ridge making sure the tabs on the cartridge slide along the rails in the compartment 17 Fully insert the staple cartridge so that it locks into place Check that the staple cartridge is firmly installed 18 Carefully move the stapler unit back into its original position 19 Close the front door 20 Slide the finisher back against the copier ...

Page 168: ...ove Punch scraps Appears If the punch kit is installed in the finisher FS 231 the following message will appear when the hole punch waste container is full Display in Enlarge Display Mode If the hole punch waste container is full appears in the screen on the touch panel Touch to display a message if it can be emptied by the user ...

Page 169: ...waste container Empty the hole punch waste container and then re install it according to the following procedure 1 Slide the finisher away from the copier 2 Pull out the hole punch waste container 3 Empty the container 4 Insert the hole punch waste container into its original position 5 Slide the finisher back against the copier ...

Page 170: ...the Basic screen appears the image stabilization or printing or scanning functions of the copier have become unstable Display in Enlarge Display Mode If an error occurs during image stabilizing printing or scanning appears in the screen on the touch panel Touch to display the message shown in the following illustration Contact your authorized service representative for information ...

Page 171: ...tion mark that appears in the Basic screen displays a screen like the one shown below When contacting the service representative inform them of the numbers P 7 for the example below listed in the screen that appears Touching Exit in the top right corner displays the Basic screen again Display in Enlarge Display Mode ...

Page 172: ...l a malfunction has occurred within this copier Display in Enlarge Display Mode Contact your authorized service representative Note When the Malfunction detected screen is displayed be sure to contact your authorized service representative immediately by following the procedure below 1 Make note of the code No C 0200 for the example in the screen that appears 2 Turn OFF the power switch 3 Unplug t...

Page 173: ...6 6 8 When the Message Malfunction detected Appears 6 56 Konica 8020 8031 Touch Panel Messages Chapter 6 4 Contact your authorized service representative and report the condition and code No ...

Page 174: ...el Touch to display the message shown in the following illustration When the message appears prepare to replace the specified supplies or part according to your maintenance agreement As an example the message warning that the yellow imaging unit will soon need to be replaced is shown below After the message warning that the part supplies should soon be replaced the message indicating that the part...

Page 175: ...eplaced and the copier stops operating As an example the message indicating that the yellow imaging unit should be replaced if replaceable by the user is shown below Display in Enlarge Display Mode When the message appears replace the specified supplies or part according to your maintenance agreement Please Be Reminded Used supplies or part Do not throw away the used supplies or parts Keep it in t...

Page 176: ...s code See Section 2 6 of the Basic Operations volume Your account has reached its maximum allowance The limit on the number of copies that can be made has been reached Contact your authorized service representative Section is open Close it properly Since a copier door or cover is open or an option is not installed correctly the copier is unable to make copies Make sure that all doors and covers a...

Page 177: ...urred the copier is unable to make copies Clear the paper misfeed p 6 17 Re insert the following of originals After clearing a paper misfeed it is necessary to reload the documents that have already been fed through the document feeder Load the indicated document pages into the document feeder Malfunction detected Call your Service Rep and provide code The copier malfunctioned and is unable to mak...

Page 178: ...Troubleshooting Chapter 7 7 7Troubleshooting ...

Page 179: ...ume The printed output is blurry The paper is damp Replace the paper See section 3 5 in the Basic Operations volume The document is not pressed tight enough against the platen glass Position the document so that it is pressed tightly against the platen glass See section 4 2 in the Basic Operations volume There are dark specks or spots throughout the printed output The platen glass is dirty Wipe th...

Page 180: ...selected paper size See section 5 3 in the Basic Operations volume Otherwise set Zoom to Auto Size to reduce the copy to the selected paper size See section 5 3 in the Basic Operations volume The image is not aligned properly on the paper The document is not positioned correctly Correctly position the document against the document width scale See section 4 2 in the Basic Operations volume Correctl...

Page 181: ... light up in green An access code has not been entered Enter your access code See section 2 6 of the Basic Operations volume Even though the START key is pressed no copies are made The copy print job is queued for printing Touch Job Log to check the jobs that are queued Wait until printing begins The copier is still warming up after just being turned on The copier takes about 5 minutes to warm up ...

Page 182: ...Appendix Chapter 8 8 8Appendix ...

Page 183: ... 2nd drawer A3 L to B5 C L Manual bypass tray Width 90 to 311 mm Length 140 to 457 mm Can only be fed through the 1st drawer or the manual bypass tray Paper capacity 1st drawer 250 sheets when using 64 g m2 Plain paper 2nd drawer 500 sheets when using 64 g m2 Plain paper Manual bypass tray 1 sheet plain paper thick paper 1 thick paper 2 thick paper 3 overhead projector transparency or postcard War...

Page 184: ...copies 1 to 999 sheets Density control Automatic and manual Power requirements 110V 15 A 60 Hz 127 V 14 5 A 60 Hz 220 240 V 11 A 50 60 Hz Power consumption Less than 1 5 kW Dimensions Scanner 589 mm width 730 mm depth 152 mm height Printer 596 mm width 730 mm depth 571 mm height Space requirements 642 mm width 792 mm depth with the copier stand installed Memory Optional MU 433 Weight Scanner 19 5 ...

Page 185: ...sided or Mixed Orig Detection function 50 to 110 g m2 Document paper size Single sided double sided documents A3 L to B6 L Mixed original sizes Refer to Table 1 Capacity of document feeder Single sided double sided documents Less than 100 sheets 80 g m2 Mixed original sizes Less than 100 sheets 80 g m2 Power requirements Supplied by copier Power consumption Less than 60 W Dimensions 586 mm width 5...

Page 186: ...568 mm depth 284 mm height Weight About 17 0 kg Specification Output trays Paper output tray and lower paper output tray Settings Normal functions Non sort Sort Sort Staple and Saddle Staple settings Hole punch functions Non sort Punch Sort Punch and Sort Staple Punch settings Paper type Paper output tray Non sort setting Plain paper 64 to 90 g m2 thick paper 1 91 to 150 g m2 thick paper 2 151 to ...

Page 187: ...dge 5 000 staples for 50 sheets Specification No of bins Non sort tray Elevated tray Settings When copying Non sort setting When printing Non sort Sort Group and Staple settings Paper type Non sort tray Non sort setting Plain paper 64 to 90 g m2 Thick 1 91 to 150 g m2 Thick 2 151 to 209 g m2 Thick 3 210 to 256 g m2 overhead projector transparencies postcards envelopes and label sheets Elevated tra...

Page 188: ...imensions 538 mm width 637 mm depth 978 mm height Weight About 38 1 kg Accessories 1 staple cartridge 3 000 staples Specification Setting Option Tray Paper type Plain paper 64 to 90 g m2 Paper size A4 L C A3 L Paper capacity A4 C 100 sheets Except A4 C 50 sheets Dimensions 341 mm width 527 mm depth 149 mm height Weight About 1 8 kg Specification ...

Page 189: ...f the Copier Cleaning Set the power switch of the copier to O before cleaning it Housing cover Clean the surface of the housing cover by wiping it with a soft cloth dampened with a mild household detergent Platen glass Clean the platen glass by wiping it with a soft dry cloth ...

Page 190: ...aner to clean the operation panel or touch panel Document transfer belt 1 Clean the document transfer belt by wiping it with a soft cloth dampened with a mild household detergent 2 Carefully slide the belt to the left to expose a hidden area of the belt 3 Clean the newly exposed surface of the belt by wiping it with a soft cloth dampened with a mild household detergent as in step 1 Repeat the abov...

Page 191: ...arger wire is dirty streaks will appear though the copies If this occurs clean the charger wire according to the following procedure 1 Open the front door 2 Pull out and push in the charger cleaning tool several times Perform the same step on each of the four charger cleaning tools that are installed 3 Securely insert each charger cleaning tool and then close the front door ...

Page 192: ...8 3 Function Combination Table 8 Konica 8020 8031 8 11 Appendix Chapter 8 8 3 Function Combination Table ...

Page 193: ...8 8 3 Function Combination Table 8 12 Konica 8020 8031 Appendix Chapter 8 ...

Page 194: ...8 3 Function Combination Table 8 Konica 8020 8031 8 13 Appendix Chapter 8 ...

Page 195: ...8 8 3 Function Combination Table 8 14 Konica 8020 8031 Appendix Chapter 8 ...

Page 196: ...8 3 Function Combination Table 8 Konica 8020 8031 8 15 Appendix Chapter 8 ...

Page 197: ...8 8 3 Function Combination Table 8 16 Konica 8020 8031 Appendix Chapter 8 ...

Page 198: ... manual bypass tray should be selected as the paper source Previously selected settings will be canceled when paper is loaded The Mixed Orig Detection function cannot be used when making single sided Ödouble sided copies The functions cannot be combined depending on the finisher model The Original Direction and Margin functions can be specified but their settings are not applied A message appears ...

Page 199: ...ujst parameters applied 77 82 85 4 40 12 19 1st drawer multipurpose paper drawer The functions cannot be combined if a paper size that cannot be loaded into the 1st drawer is selected A message appears warning that the 1st drawer is selected and the paper type was changed 48 50 52 53 54 11 19 23 27 67 Multi Page Enlargement function The zoom ratio specified for the Multi Page Enlargement function ...

Page 200: ...rmat English Size Metric Size Ledger 11 in 17 in 279 mm 432 mm 11 in 14 in 11 in 14 in 279 mm 356 mm Computer 10 1 8 in 14 in 257 mm 356 mm 10 in 14 in 10 in 14 in 254 mm 356 mm 9 1 4 in 14 in 9 1 4 in 14 in 236 mm 356 mm Legal 8 1 2 in 14 in 216 mm 356 mm F4 Government Legal 8 1 2 in 13 in 216 mm 330 mm F4 8 in 13 in 203 mm 330 mm F4 8 2 3 in 13 in 220 mm 330 mm F4 Folio 8 1 4 in 13 in 210 mm 330...

Page 201: ...5 0 610 A4 210 mm 297 mm 8 1 4 in 11 3 4 in A5 0 707 A6 0 500 B5 0 866 B6 0 610 A3 1 414 B4 1 224 A5 148 mm 210 mm 5 3 4 in 8 1 4 in A6 0 707 B6 0 866 A4 1 414 A3 2 000 B4 1 733 B5 1 224 A6 105 mm 148 mm 4 1 4 in 5 3 4 in A4 2 000 A5 1 414 B5 1 733 B6 1 224 B4 257 mm 364 mm 10 in 14 1 4 in A4 0 816 A5 0 577 B5 0 707 B6 0 500 A3 1 154 B5 182 mm 257 mm 7 1 4 in 10 in A5 0 816 A6 0 577 B6 0 707 A3 1 ...

Page 202: ...F4 0 764 Letter 0 647 Invoice 0 500 11 in 15 in 279 4 mm 381 mm 11 in 14 in 0 933 Legal 0 772 F4 0 772 Letter 0 733 Invoice 0 500 11 in 14 in 279 4 mm 355 6 mm Legal 0 772 F4 0 772 Letter 0 772 Invoice 0 500 Legal 8 1 2 in 14 in 215 9 mm 355 6 mm F4 0 928 Letter 0 785 Invoice 0 607 11 in 17 in 1 214 F4 8 1 2 in 13 in 215 9 mm 330 2 mm Letter 0 846 Invoice 0 647 11 in 17 in 1 294 11 in 14 in 1 076 ...

Page 203: ...ables 8 22 Konica 8020 8031 Appendix Chapter 8 Zoom ratio Paper size Document size 1 in inch 25 4 mm 1 mm 0 0394 in inch Invoice 5 1 2 in 8 1 2 in 139 7 mm 215 9 mm 11 in 17 in 2 000 11 in 14 in 1 647 Legal 1 545 F4 1 529 Letter 1 294 ...

Page 204: ... Paper In addition to plain paper thick paper A3 Wide paper and overhead projector transparencies are also available Note In order to protect unwrapped paper from humidity keep it in a plastic bag and stored in a cool dark location Toner Cartridges Cartridges for cyan magenta yellow and black toner are available Note Only use toner that has been manufactured specifically for this copier Do not thr...

Page 205: ... Konica 8020 8031 Appendix Chapter 8 Staple Cartridges FS 135 Staples for staple binding 3 000 staples are provided in the staple cartridge FS 231 Staples for staple binding 5 000 staples are provided in the staple cartridge ...

Page 206: ...Index Chapter 9 9 9Index ...

Page 207: ...el adjust 5 27 Adjust the color shifts 5 42 Administrator access code 5 35 Administrator mode 5 35 Auto clear mode 5 19 Auto reset 5 16 Auto select paper for small original 5 29 C Care of the copier 8 8 Center binding position 5 54 Centering 5 31 Confirmation beep 5 10 Control panel 4 6 Copier 4 2 Copier stand 4 3 Copy desk 4 2 Copy program 5 5 5 6 Copy table 4 3 Copy track 5 60 Criss cross mode 5...

Page 208: ...4 2 4 10 8 4 Dust remover 4 8 E Expert mode 5 40 F Filter 4 8 Finisher FS 135 4 2 4 12 Finisher FS 231 4 3 4 11 Front door 4 5 Function combination table 8 11 Fusing unit 4 8 G Gradation adjust 5 56 H Hard disk 4 4 I Image transfer belt unit 4 8 Image transfer roller unit 4 8 Imaging unit 4 8 Initial mode 5 4 Input 5 3 Installation site 3 2 Intelligent sorting 5 24 ...

Page 209: ...mory recall 5 13 Meter count 5 32 Monochrome image density correct 5 46 O Operation precautions 3 4 Option tray 4 2 4 12 8 7 Output tray priority 5 23 Ozone filter 4 8 P Paper feed unit 4 3 4 10 Paper feeding 1 4 Paper misfeed clearing 6 17 Duplex unit 6 21 Duplexing document feeder 6 31 Finisher FS 135 6 35 Finisher FS 231 6 39 Large capacity tray 6 24 Manual bypass tray 6 19 Paper drawer 6 22 Ri...

Page 210: ...argin 5 47 Punch kit 4 4 Punch scraps 6 51 R Reset mode 5 4 S Scanner 4 2 Shut off 5 18 Space requirements 3 3 Specialty paper 5 22 Specialty paper settings 5 21 Specifications 8 2 Stabilizer 5 58 Staple cartridge replacement FS 135 6 10 FS 231 6 12 Staple jam clearing FS 135 6 43 FS 231 6 45 T Thick paper and OHP film image density 5 41 Toner cartridge 4 8 8 23 Top erase 5 36 Troubleshooting 7 2 ...

Page 211: ...9 9 1 Index 9 6 Konica 8020 8031 Index Chapter 9 U Unit life indicator 5 34 Upper right side door 4 9 User s choice 1 5 7 User s choice 2 5 9 Utility 5 2 W Waste toner bottle 4 8 Z Zoom ratios 8 20 ...

Page 212: ...2003 04 2 MANUFACTURER TOKYO JAPAN Printed in Japan 4581 7735 12 ...

Reviews: