


bizhub C754/C654
2-119
2.8
Appendix: Manual installation process of the printer driver
2
8
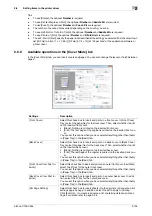
Specify the IP address and port.
%
Enter "\\NetBIOS-name\print-service-name" in the [Port Name] box.
%
For the NetBIOS name and print service name, enter the names displayed by selecting [Utility] - [Ad-
ministrator Settings] - [Network Settings] - [SMB Settings] - [Print Settings] on this machine.
9
Click [Next].
%
If the [Additional Port Information Required] dialog box appears, go to Step 10.
%
If the [Install the printer driver] dialog box appears, go to Step 13.
10
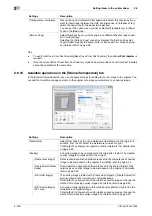
Select the [Custom] check box, then click [Settings...].
11
Change the settings according to the port, and then click [OK].
12
Click [Next].
The [Install the printer driver] dialog box appears.
13
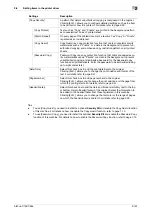
Click [Have Disk...].
14
Click [Browse...].
15
Select a desired printer driver folder in the DVD-ROM, and then click [Open].
%
Select the folder according to the printer driver, operating system, and language to be used.
Selectable printer drivers: PCL driver, PS driver, and XPS driver
16
Click [OK].
The [Printers] list appears.
17
Click [Next].
18
Follow the instructions on the pages that follow.
%
If the [User Account Control] window appears, click [Continue] or [Yes].
19
Click [Finish].
20
After finishing the installation, make sure that the icon for the installed printer is displayed in the [Print-
ers] or [Devices and Printers] window.
21
Remove the DVD-ROM from the DVD-ROM drive.
This completes the installation process of the printer driver.
In Windows XP/Windows 2003
0
Administrator privileges are required to perform this task.
1
Insert the DVD-ROM into the DVD-ROM drive of the computer.
2
From the Start menu, click [Printers and Faxes].
%
If [Printers and Faxes] is not displayed, select [Control Panel] - [Printers and Other Hardware] -
[Printers and Faxes] from the Start menu.
3
Select Printer Install.
%
In Windows XP, select [Add a printer] from [Printer Tasks].
%
In Windows Server 2003, double-click [Add Printer].
[Add Printer Wizard] appears.
4
Click [Next >].
5
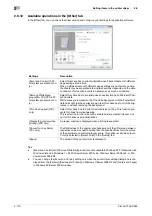
Select [Local printer attached to this computer], then click [Next >].
%
Clear the [Automatically detect and install my Plug and Play printer] check box.
The dialog box for [Select a Printer Port] appears.
Summary of Contents for bizhub C654
Page 2: ......
Page 10: ...Contents 8 bizhub C754 C654 8 Index 8 1 Index by item 8 3 8 2 Index by button 8 5 ...
Page 11: ...1 Printer Functions ...
Page 12: ......
Page 16: ...Cable connection locations on this machine 1 1 6 bizhub C754 C654 1 3 ...
Page 17: ...2 Printing in the Windows Environment ...
Page 18: ......
Page 145: ...3 Printing in a Mac OS Environment ...
Page 146: ......
Page 243: ...4 Printing in a NetWare Environment ...
Page 244: ......
Page 248: ...Installing the printer driver 4 4 6 bizhub C754 C654 4 3 ...
Page 249: ...5 Printing without Using the Printer Driver ...
Page 250: ......
Page 254: ...Directly printing from a Bluetooth device 5 5 6 bizhub C754 C654 5 3 ...
Page 255: ...6 Description of Setup Buttons User Settings ...
Page 256: ......
Page 263: ...7 Description of Setup Buttons Administrator Settings ...
Page 264: ......
Page 278: ...7 7 16 bizhub C754 C654 ...
Page 279: ...8 Index ...
Page 280: ......


