background image

Useful printing functions

2

2-52

bizhub C754/C654

2.4

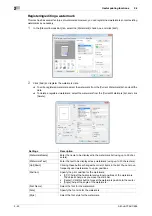
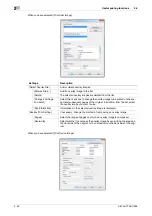
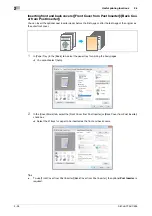
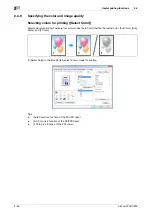
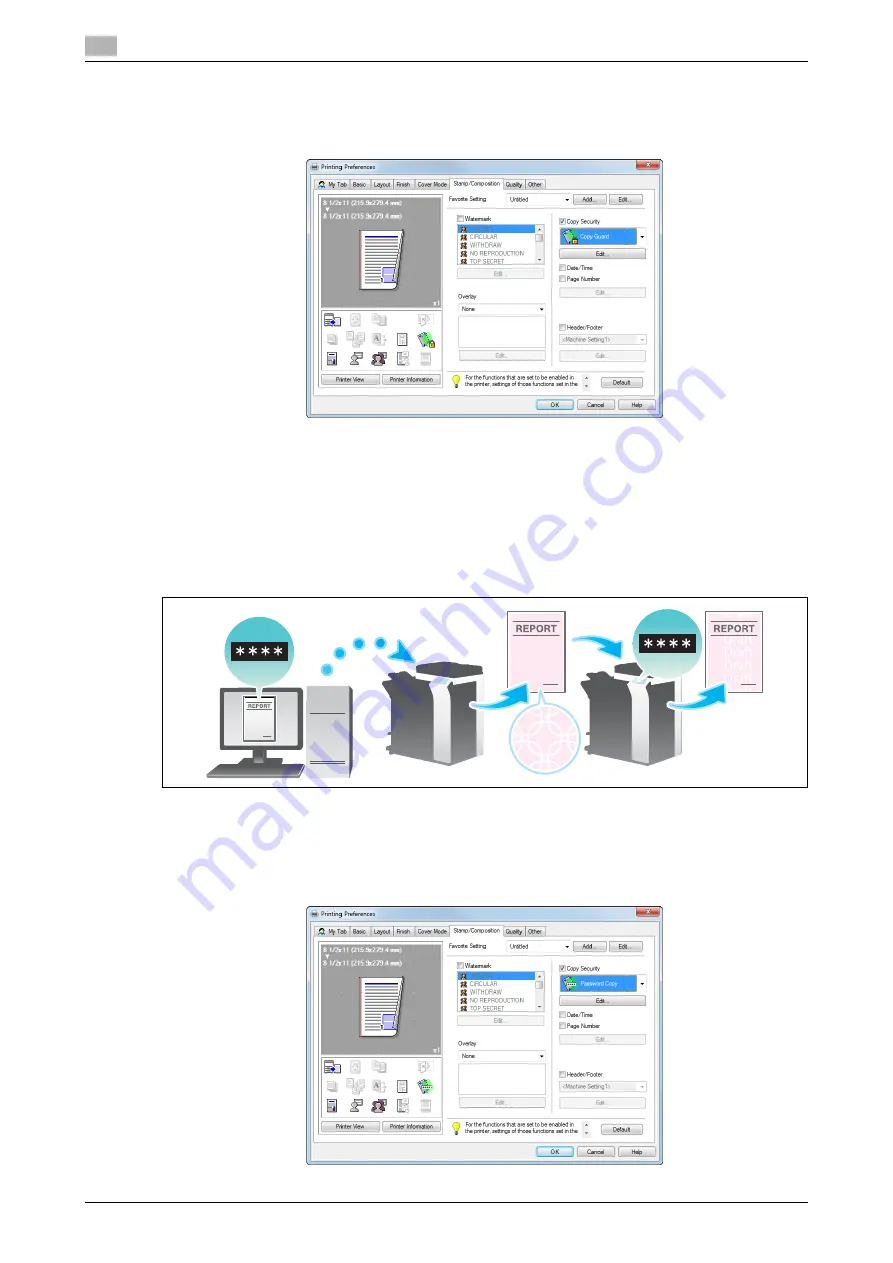
On the [Stamp/Composition] tab, select the [Copy Security] check box, and then select [Copy Guard].

As necessary, click [Edit...] to specify the text to be printed and the format of the text. For details, refer to 
page 2-53.

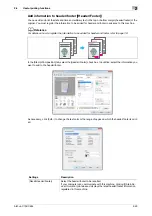
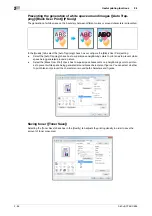
Add a password ([Password Copy])

Password Copy is a copy protection function that prints concealed security watermarks such as "Private" or 
a date in the background to prevent unauthorized copying, and embeds a password for the password copy 
function on all printed sheets.

If an attempt is made using a device that supports the password copy function to copy a sheet that has been 
prepared for password copy, a password copy pattern is scanned and entry of a password is requested. 
Copying starts if the correct password is entered.

0

To use [Password Copy], you need to install the optional 

Security Kit

 and enable the Password Copy 

function of this machine. For details on how to enable the Password Copy function, refer to page 7-15.
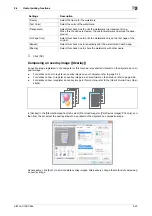
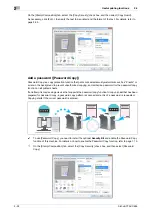
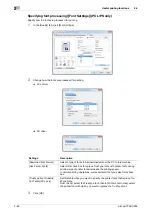
1

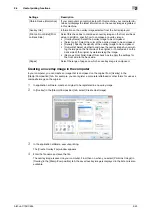
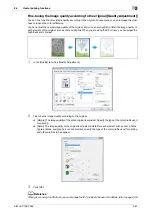
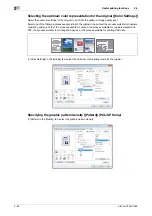
On the [Stamp/Composition] tab, select the [Copy Security] check box, and then select [Password 
Copy].

Summary of Contents for bizhub C654

Page 1: ...0 XXXXXXXX00 Konica Minolta Business Solutions Europe GmbH Europaallee 17 30855 Langenhagen Germany Tel 49 0 511 74 04 0 Fax 49 0 511 74 10 50 www konicaminolta eu 2009 Konica Minolta Business Solutions Europe GmbH All rights reserved Printed in Germany ...

Page 2: ......

Page 3: ...ter driver type 2 11 Checking the operating systems supported by the printer driver 2 11 Changing the installation settings Windows 7 or Windows Server 2008 R2 2 12 Installation procedure 2 13 2 2 3 Configuring the default settings of the printer driver 2 14 Configuring the optional environment of this machine 2 14 Changing the default print settings 2 15 2 3 Printing procedure 2 16 2 3 1 Printing...

Page 4: ... Inserter 2 56 Inserting paper between transparencies Transparency Interleave 2 57 Inserting paper into the specified pages Per Page Setting 2 58 2 4 9 Specifying the color and image quality 2 60 Selecting colors for printing Select Color 2 60 Fine tuning the image quality according to the original Quality Adjustment 2 61 Selecting the optimum color representation for the original Color Settings 2...

Page 5: ...e this function For administrators 2 91 Setting the printer driver 2 92 Printing procedure 2 93 2 5 9 Printing using the PPD driver for applications 2 93 PPD driver for applications 2 93 Printing procedure 2 93 2 6 Setting items in the printer driver 2 94 2 6 1 Properties Window of the printer driver 2 94 How to display the Properties window 2 94 Tabs provided by Windows 2 94 2 6 2 Available opera...

Page 6: ... 3 3 Checking the LAN cable connection 3 4 Configuring the Bonjour settings 3 4 3 1 3 Setting up the computer 3 4 Setup flow 3 4 Checking the operating systems supported by the printer driver 3 4 Installing the printer driver 3 5 Configuring connection using Bonjour Mac OS X 10 4 10 5 10 6 3 5 Configuring connection using Rendezvous Mac OS X 10 2 10 3 3 6 3 1 4 Configuring the default settings of ...

Page 7: ... space around images Auto Trapping Black Over Print 3 44 Saving toner Toner Save 3 44 Increasing the legibility of small or faint text Edge Enhancement 3 45 3 3 10 Using ICC profiles 3 46 Specifying the ICC profiles for printing 3 46 Adding ICC profiles to the printer driver 3 47 3 4 Printing options 3 49 3 4 1 Making a Trial Printing Proof Print 3 49 Proof Print 3 49 How to print from the compute...

Page 8: ...ors 3 85 In Mac OS X 10 4 10 5 10 6 3 85 In Mac OS X 10 2 10 3 3 86 3 7 3 Using with an IPP connection 3 87 Operations required to use this function For administrators 3 87 In Mac OS X 10 4 10 5 10 6 3 87 In Mac OS X 10 3 3 88 In Mac OS X 10 2 3 89 3 8 Appendix Printing in a Mac OS 9 2 environment 3 90 3 8 1 Before Setting Up the Computer For Administrators 3 90 Preparation flow 3 90 Checking the ...

Page 9: ...6 8 Banner Printing 6 8 7 Description of Setup Buttons Administrator Settings Administrator Settings 7 3 System Settings 7 4 Output Settings 7 5 Print Fax Output Settings 7 5 Output Tray Settings 7 5 Shift Output Each Job 7 5 User Box Settings 7 6 Delete Secure Print Documents 7 6 Auto Delete Secure Document 7 6 ID Print Delete Time 7 7 ID Print Delete after Print Setting 7 7 Stamp Settings 7 7 He...

Page 10: ...Contents 8 bizhub C754 C654 8 Index 8 1 Index by item 8 3 8 2 Index by button 8 5 ...

Page 11: ...1 Printer Functions ...

Page 12: ......

Page 13: ...plication software When you install the printer driver on your computer you can use a variety of this ma chine s printing functions Furthermore the printer driver supports a wide range of connection methods and provides flexibility in various environments It also supports direct printing a printing method that does not use the printer driver and printing from a USB memory device ...

Page 14: ...he same or higher specifications as recommended for your operating system Memory Memory capacity as recommended for your operating system Sufficient available memory space is required for your operating system and the applications to be used Drive DVD ROM drive Item Specifications Operating system Mac OS 9 2 OS X 10 2 8 10 3 10 4 10 5 10 6 CPU PowerPC Intel Processor Intel Processor must be Mac OS...

Page 15: ...X 10Base T Connect a LAN cable when using this machine in a network en vironment It supports 1000Base T 100Base TX and 10Base T standards The TCP IP LPD LPR IPP SMB Web services IPX NetWare AppleTalk EtherTalk and other protocols are supported 2 USB port Connect a USB cable when using this machine as a USB con nected device Use type A 4 pin male or type B 4 pin male USB cables A USB cable measurin...

Page 16: ...Cable connection locations on this machine 1 1 6 bizhub C754 C654 1 3 ...

Page 17: ...2 Printing in the Windows Environment ...

Page 18: ......

Page 19: ... fore installing the printer driver 1 Connecting this machine to the network Checking the LAN cable connection Checking the network settings Check that this machine has had an IP address assigned to it 2 Configuring the network printing environment When using the Normal printing at port 9100 Make sure that the RAW port number has been set In normal circumstances you can use the default settings Us...

Page 20: ... Server 2008 Server 2008 R2 you cannot setup Secure Print IPPS using the installer If you are using Windows XP Server 2003 in an IPv6 environment you cannot setup this machine using the installer The Internet Print IPP is not supported in the IPv6 environment How to print Description Normal printing Port 9100 Make sure that the RAW port number has been set In normal circum stances you can use the ...

Page 21: ...he operating systems supported by the printer driver Check that your computer meets the operating environment requirements of the printer driver 2 Installing the printer driver to the computer Installing the printer driver using the installer Insert the DVD ROM into the drive and install the software by following the on screen instructions Performing a test print If necessary perform a test print ...

Page 22: ...fessional e64 Edition Windows Server 2003 Standard e64 Edition Windows Server 2003 Enterprise e64 Edition Windows Server 2003 R2 Standard e64 Edition Windows Server 2003 R2 Enterprise e64 Edition Windows Vista Business 2 Windows Vista Enterprise 2 Windows Vista Home Basic 2 Windows Vista Home Premium 2 Windows Vista Ultimate 2 Windows Server 2008 Standard 2 Windows Server 2008 Enterprise 2 Windows...

Page 23: ...l Printing Internet Printing IPP or Secure Printing IPPS Among the connected printers only the target model is automatically detected and displayed If multiple target models are displayed check the IP addresses You can check the IP address of this machine in the screen that is displayed by tapping Utility Device Information If the connection to this machine cannot be recognized it is not displayed...

Page 24: ...n on how to display the Properties window refer to page 2 94 2 In the Configure tab check the information such as what options are installed in this machine and whether authentication settings have been configured By default Auto in Obtain Settings is enabled The information on this machine is automatically obtained and reflected to Device Option When Auto in Obtain Settings is disabled clicking O...

Page 25: ...ting can be prevented We recommend that you change the default settings to suit your environment 1 Display the Printing Preferences window of the printer driver For information on how to display the Printing Preferences window refer to page 2 98 2 Change the print settings and click OK The changed settings are applied when printing is performed from any application software d Reference The printer...

Page 26: ... printer drivers for different purposes are available Select the printer driver that meets your print ing aims Checking the operating systems supported by the printer driver Check that your computer meets the operating environment requirements of the printer driver 2 Installing the printer driver to the computer Configuring the installation settings on the computer When you are using Windows 7 Ser...

Page 27: ...ence Printer driver Supported Operating Systems PCL driver PS driver Windows XP Home Edition Service Pack 1 or later 1 Windows XP Professional Service Pack 1 or later 1 Windows Server 2003 Standard Edition Service Pack 1 or later Windows Server 2003 Enterprise Edition Service Pack 1 or later Windows Server 2003 R2 Standard Edition Windows Server 2003 R2 Enterprise Edition Windows XP Professional e...

Page 28: ...rom the Start menu click Control Panel System and Security System 2 Click Advanced system settings on the menu to the left The System Properties window appears 3 In the Hardware tab click Device Installation Settings 4 Select No let me choose what to do select Never install driver software from Windows Update then click Save Changes After you have installed the printer driver change the setting ba...

Page 29: ...greement and click AGREE 5 Select Install printers MFPs and click Next USB connected printers are detected 6 Select this machine then click Next 7 Select the check box of the printer driver you want to install then click Next For features of each printer driver refer to page 2 5 8 Check the items to be installed and click Install 9 If necessary change the printer name or print a test page and clic...

Page 30: ...ies window refer to page 2 94 2 In the Configure tab configure the information such as what options are installed in this machine and whether authentication settings have been configured If you are using Windows Vista 7 Server 2008 Server 2008 R2 Auto under Obtain Settings is enabled by default Thus the information on this machine is automatically obtained and applied for Device Option When Auto i...

Page 31: ...ng As a result unnecessary color printing can be prevented We recommend that you change the default settings to suit your environment 1 Display the Printing Preferences window of the printer driver For information on how to display the Printing Preferences window refer to page 2 98 2 Change the print settings and click OK The changed settings are applied when printing is performed from any applica...

Page 32: ...int settings you have changed here are reset to the defaults when you exit the application software For information on how to change the default values of print settings refer to page 2 9 The printer driver has the function to easily recall frequently used print settings For details refer to page 2 17 5 Click Print Printing is executed d Reference When Secure Print Only is set to On in Device Opti...

Page 33: ...e Printing Preferences window set the print conditions you want to register as a favorite 2 Click Add To edit a registered favorite select from Favorite Setting the name of the favorite you want to edit and click Edit 3 Enter the name of the favorite to be registered As necessary specify the icon comment and items to be recalled for the favorite Settings Description Name Enter the name of the favo...

Page 34: ...without switch ing among multiple tabs This section describes how to edit My Tab 1 Click My Tab Edit My Tab You can also register a function in My Tab by selecting to the LEFT or to the RIGHT from the My Tab menu that is displayed by right clicking the function Restore Items Items that are determined when you start printing such as the original size and the number of copies are registered in the f...

Page 35: ... it in the area to the right of My Tab An icon appears to the left of each function that is registered in My Tab 3 As necessary move or delete the registered functions To move a function select the function and click Up Down or Left Right To delete a function from My Tab select the function and click Remove 4 Click OK This completes editing My Tab d Reference From My Tab Settings in the Settings t...

Page 36: ...mined by the original size and paper size If you select a paper size larger than the original size the original is enlarged to the paper size If you select a paper size smaller than the original size the original is reduced to the paper size In Paper Size in the Basic tab select the size of paper for printing The zoom ratio is automatically deter mined by the paper sizes selected in Original Size ...

Page 37: ... or reducing by the desired zoom ratio Zoom You can print the original image after it has been enlarged or reduced by the desired zoom ratio The zoom ratio can be specified to be between 25 and 400 in increments of 1 In Zoom in the Basic tab specify the zoom ratio ...

Page 38: ... In Paper Size select Same as Original Size The Custom Size setting window appears 2 Specify the width and length as desired and click OK d Reference Load the custom sized paper in the Bypass Tray For details on how to add paper to the Bypass Tray refer to User s Guide Introduction Trademark Licenses When you are using the PCL driver you can register a custom size in the Settings tab For details i...

Page 39: ...in the Basic tab select the type of paper for printing This function is enabled when Paper Tray is set to Auto In Paper Settings for Each Tray on the Basic tab you can set a paper type for each tray When you specify anything other than Auto in Paper Tray the paper type information specified here is applied ...

Page 40: ...bizhub C754 C654 2 4 Specifying the paper tray Paper Tray In Paper Tray in the Basic tab select the paper tray for printing Tips If you select Auto the paper tray for the paper you have selected in Paper Size is automatically se lected ...

Page 41: ...ize Select Same as Original Size Paper Tray Select Bypass Tray 2 Click Paper Settings for Each Tray 3 From Paper Type select Thick 3 and click OK 4 Execute printing A message appears on the Touch Panel to prompt you to load postcards 5 Load postcards into the Bypass Tray For details on how to load postcards refer to the User s Guide Introduction Trademark Licenses 6 Tap Complete on the Touch Panel...

Page 42: ...ion is called Carbon Copy For example by using the print command once you can print a submission document on high quality color paper loaded in Tray1 and print your copy on recycled paper loaded in Tray2 This function is useful when you want to create a submission document and its copy at one time 1 In Paper Tray in the Basic tab select the paper tray for printing the original You cannot select Au...

Page 43: ...ount of waste paper generated For details refer to page 2 73 Settings Description Original Copy The paper tray for printing the original is displayed Carbon Copy Tray Select the paper tray for carbon copies Select the check boxes for all pa per trays to be used Output Order Select the order of outputting carbon copies Tray Carbon copies are printed in order of selected trays When an original of mu...

Page 44: ... each set When the Collate check box on the Basic tab is selected copies are output separately in a set by set man ner for example Pages 1 2 3 4 and 5 Pages 1 2 3 4 and 5 and then Pages 1 2 3 4 and 5 When the Offset check box is selected the sets are output in staggered layers When you select both Collate and Offset check boxes the output position is staggered for each set allow ing you to easily ...

Page 45: ...when you select 9 in 1 every set of nine pages is reduced and printed on the same side of one sheet If necessary click Combination Details to set the page layout order and whether to input border lines be tween pages Tips By using this function in combination with the 2 Sided Print function Print Type 2 Sided you can save more amount of paper Settings Description Layout Order Select the page layou...

Page 46: ...oth sides of paper 2 Sided By using both sides of paper for printing you can halve paper consumption In Print Type in the Layout tab select 2 Sided Tips By using this function in combination with the Combine function Combination N in 1 you can save more amount of paper ...

Page 47: ...g blank pages Skip Blank Pages Blank pages contained in the original are skipped when the original is printed You can reduce the number of printed sheets In the Layout tab select the Skip Blank Pages check box Tips For some originals blank pages are also printed ...

Page 48: ...the margin position 2 Click Binding Margin Settings 3 Adjust the size of margin and click OK Settings Description Shift Mode Select how the images are shifted for creating the margin Front Side Back Side Specify the size of the margin on the front side When you print on both sides specify the size of the margin on the back side When the Same value for front and back sides check box is select ed a ...

Page 49: ...itions and output automatically This function is useful for preparing a project proposal or other booklet materials In the Finish tab select the Staple check box In addition specify the number and positions of staples Tips To use Staple the optional Finisher is required In Binding Position in the Layout tab specify the staple position ...

Page 50: ...ets are bound in the center and folded before they are output In the Finish tab select the Center Staple and Fold check box As the sheets are bound in the center use the combined document data or set the Print Type to Booklet on the Layout tab Tips To use Center Staple and Fold the optional Finisher and Saddle Kit are required ...

Page 51: ...s useful when you want to bind printed materials in files In the Finish tab select the Punch check box In addition specify the number and positions of punch holes Tips To use Punch the optional Finisher and Punch Kit are required In Binding Position in the Layout tab specify the punch position The number of punched holes varies depending on the country you are in ...

Page 52: ...age Fold Setting Tips To use Half Fold or Tri Fold of Fold the optional Finisher and Saddle Kit are required To use Z Fold of Fold the optional Finisher and Z Fold Unit are required To use Z Fold of Fold specify the paper size described in the setting you selected from the drop down list Z Fold A3 B4 11 e 17 8K or Z Fold 8 1 2 e 14 as Paper Size of the application software or printer driver This f...

Page 53: ...electing Fold or Center Staple and Fold in the Finish tab in combination with this function you can create booklet form documents by folding the printed sheets in the center or by binding them using two staples in the center To use Center Staple and Fold or Fold the optional Finisher and Saddle Kit are required By selecting Chapters in the Layout tab in combination with this function you can place...

Page 54: ...nlarged divided and printed on multiple sheets When you join the printed sheets to gether a large poster is created In Combination in the Layout tab select N e N For example when you select 2 e 2 one page of the orig inal image is enlarged divided and printed on four sheets As necessary click Combination Details to select whether to create overlap margins ...

Page 55: ... printing functions 2 Rotating the image 180 degrees Rotate 180 The image is printed upside down Use this function when printing on envelopes whose loading direction can not be changed In the Layout tab select the Rotate 180 check box ...

Page 56: ...ition Use this function when you want to make a fine adjustment such as changing the print position a little or printing images in different positions between the front and back sides 1 In the Layout tab select the Image Shift check box 2 Click Image Shift Settings 3 Adjust the upward downward and rightward leftward shift distances and click OK When printing images on both sides selecting the Same...

Page 57: ...watermark Watermark Text such as NO REPRODUCTION and INTERNAL USE are printed on the center of all pages in a tint color By printing a watermark you can specify the handling policy of copied documents In the Stamp Composition tab select the Watermark check box In addition select the watermark you want to print ...

Page 58: ... Settings Description Watermark Name Enter the name to be displayed in the watermark list using up to 30 char acters Watermark Text Enter the text to be displayed as a watermark using up to 30 characters Up Down Clicking these buttons changes the order of items in the list You can move frequently used watermarks to upper positions Position Specify the print position for the watermark X Y Adjust th...

Page 59: ... Host Image or Print Device Image PCL only and then from the list select the overlay image to be printed on the original as a composite image As necessary click Edit to add or delete overlay images Alternatively change the method of composing an overlay image Frame Select the frame for the watermark Text Color Select the color of the watermark Transparent Select this check box to print the waterma...

Page 60: ...k box to change the overlay image to be printed on the sec ond and subsequent pages of the original In addition from the list select the overlay image you want to use File Information Information on the selected overlay image is displayed Overlay Print Setting If necessary change the method of composing an overlay image Pages Select the range of pages on which an overlay image is composed Overwrit...

Page 61: ...e Settings Description Obtain Device Information If your computer can communicate with this machine your computer ob tains and displays the latest information on the overlay images registered in this machine Overlay Info Information on the overlay image selected from the list is displayed Print on Front Side Print on Back Side Select this check box to compose an overlay image on the front and back...

Page 62: ...ed folder for storing the overlay image 1 Display the Properties window of the printer driver For information on how to display the Properties window refer to page 2 94 2 In the Settings tab select the Share Overlay File s check box The Shared Folder Settings window appears 3 Specify the shared folder for storing the overlay image and click OK This completes the registration process of a shared fo...

Page 63: ...d save the file The overlay image is saved in the shared folder From then on when you select Print Host Image in Overlay in the Stamp Composition tab the saved overlay image is displayed in the list and is also available Adding the print date time or page number Date Time Page Number You can add the print date time or page number to your printouts If necessary you can select the print po sition an...

Page 64: ... Text Color Select the print color for the date time Print Position Specify the print position for the date time Page Number Change the print position of page numbers and the page from which the page number printing starts Starting Page Specify the page from which the page number printing starts Starting Page Number Specify the page number to be printed on the page specified in Starting Page Cover...

Page 65: ...nformation to be added for header and footer refer to page 7 8 In the Stamp Composition tab select the Header Footer check box In addition select the information you want to add to the header footer As necessary click Edit to change the text color or the range of pages on which the header footer is print ed Settings Description Recall Header Footer Select the header footer to be recalled If your c...

Page 66: ...ox and then select Copy Protect As necessary click Edit to specify the text to be printed and the format of the text For details refer to page 2 53 Distribution Control Number Select whether to print copy numbers when printing multiple sets of cop ies Print in Header Select this check box to print the copy number in the header Print in Footer Select this check box to print the copy number in the f...

Page 67: ...3 Add copy restriction information Copy Guard Copy Guard is a copy protection function that prints concealed security watermarks such as Private or a date in the background to prevent unauthorized copying and embeds a copy restriction pattern on all printed sheets If an attempt is made using a device that supports the copy guard function to copy a sheet that has been copy protected a copy guard pa...

Page 68: ...rized copying and embeds a password for the password copy function on all printed sheets If an attempt is made using a device that supports the password copy function to copy a sheet that has been prepared for password copy a password copy pattern is scanned and entry of a password is requested Copying starts if the correct password is entered 0 To use Password Copy you need to install the optiona...

Page 69: ...details refer to page 2 53 Configuring the print settings for Copy Security When printing a copy security pattern on sheets you can set the text to be printed and the format of the text as necessary 1 On the Stamp Composition tab check the Copy Security box and then click Edit 2 In the Print Item tab select the item to be printed Items that can be specified vary depending on the selected copy secu...

Page 70: ... check box to print the serial number of this machine Distribution Control Number Select this check box to print copy numbers when printing multiple sets of copies As necessary click Edit to specify the start number and the number of digits Job Number Select this check box to print the job numbers managed in this machine Settings Description Angle Select the angle of the text to be printed Text Si...

Page 71: ...You can print them at a time 1 In Paper Tray in the Basic tab select the paper tray for printing the body pages You cannot select Auto 2 In the Cover Mode tab select the Front Cover or Back Cover check box If necessary you can select whether to print the original on the inserted sheets or to leave them blank When the inserted sheets are printed the first page of the original is printed on the fron...

Page 72: ... of the original as the outer front cover 1 In Paper Tray in the Basic tab select the paper tray for printing the body pages You cannot select Auto 2 In the Cover Mode tab select the Front Cover from Post Inserter or Back Cover from Post Inserter check box Select the PI trays for paper to be inserted as the front and back covers Tips To use Front Cover from Post Inserter Back Cover from Post Inser...

Page 73: ...P transparencies from sticking together due to heat gener ated during printing or static electricity 1 In Paper Type in the Basic tab select Transparency If you select Transparency the Print Type is set to 1 Sided and the Select Color is set to Gray Scale 2 In the Cover Mode tab select the Transparency Interleave check box In Interleave Tray select the paper tray for the paper to be inserted betwe...

Page 74: ...o select whether to print the original on the inserted paper Create in advance a list that specifies the paper and print settings for each page When printing on inserted paper select the list you want to apply to printing 1 In the Cover Mode tab select the Per Page Setting check box then click Edit List When you have already prepared a list select the list you want to apply to printing 2 Create a ...

Page 75: ...ab Paper Settings When using index paper set the number and positions of index tabs Add Edit You can add settings to the Settings List or edit settings Page Number Enter the page numbers you want to add To specify multiple page numbers separate each number with a comma for example 2 4 6 or connect the numbers using a hyphen for example 6 10 Change Settings Change the setting for the item selected ...

Page 76: ...Color Select colors for printing There are four color modes Auto Color that fits the original color Full Color Gray Scale and 2 Color In Select Color in the Quality tab select a color mode for printing Tips Auto Color is a function of the PCL PS driver Full Color is a function of the PS XPS driver 2 Color is a function of the PCL driver ...

Page 77: ...are using the PCL driver you can adjust the brightness and contrast 1 In the Quality tab click Quality Adjustment 2 Fine tune the image quality according to the original Simple The image quality of the entire original is adjusted Specify the type of the color profile used for printing Detail The image quality of the original is adjusted in detail for each element such as text photos figures tables...

Page 78: ...original to be printed the process suitable for originals consisting primarily of text the process suitable for photos the process suitable for originals created with DTP the process suitable for printing Web pages or the process suitable for printing CAD data In Color Settings in the Quality tab select the optimum color setting mode for the original Specifying the graphic pattern density Pattern ...

Page 79: ... Compression in the Quality tab select whether the quality or printing speed is preferred when the image data contained in the original is compressed Making the image glossy Glossy Mode Images are printed with a glossy finish In the Quality tab select the Glossy Mode check box Tips This function is enabled when Print Type is set to 1 Sided ...

Page 80: ... Auto Trapping check box to superimpose neighboring colors to print so as to prevent white space being generated around a picture Select the Black Over Print check box to superimpose black color on a neighboring color to print so as to prevent white space being generated around black characters or figures You can select whether to print black only around the characters or around both characters an...

Page 81: ...seful printing functions 2 Sharpening the border between text etc Edge Enhancement Sharpen the edges of images such as text in the table and graphics to improve legibility In the Quality tab select the Edge Enhancement check box ...

Page 82: ...ts to be downloaded from the PC to this machine Use Printer Fonts Select this check box to replace TrueType fonts with printer fonts during printing Use of printer fonts increases the printing speed In normal printing operations we recommend that you select this check box TrueType Font Substitu tion Table PCL only Set this table when you want to specify the printer fonts that replace Tru eType fon...

Page 83: ...ct the Thin Line Support check box Tips This is effective for thin lines such as table borders created in Excel but not for thin lines used in illus trations Convert colors according to the RGB values of the original Convert to Gray Scale PCL only When you open the Quality tab and set the Select Color to Auto Color the image is automatically con verted into gray scale and printed if the RGB values...

Page 84: ...u need to add the ICC profiles to the printer driver in advance For details refer to page 2 69 1 In the Quality tab click Quality Adjustment 2 Click Detail and select the element for which the image quality is adjusted 3 Click the ICC Profile tab 4 Specify the settings for RGB Color Destination Profile and Simulation Profile The ICC profiles registered in the printer driver can be selected 5 Click...

Page 85: ...achine and loads ICC profiles that the machine can use 0 This function cannot be used when this machine is used via a USB connection 0 To register ICC profiles in this machine use Download Manager bizhub For details on how to register ICC profiles in this machine refer to the Help for Download Manager bizhub 1 In the Quality tab click Quality Adjustment 2 Click Manage Profile If the Download Manag...

Page 86: ...le Name and Pro file Name To edit the profile name click Edit 5 Click OK The profile is added to Driver Profile List 2 4 11 Printing Microsoft Excel PowerPoint data Printing multiple Excel sheets at one time in 32 bit system environment on ly When multiple Microsoft Excel sheets with different print settings are printed at one time this function pre vents the sheets from being printed separately O...

Page 87: ...n 32 bit system environment only The process executed when an overlay image is printed on a PowerPoint original with a white background is optimized This function prevents the overlay image from being overwritten by the white background of the PowerPoint original In the Other tab select the Remove White Background check box ...

Page 88: ...view when printing check box 2 In the application software execute printing The preview window appears 3 Check the print image then execute printing No Functions 1 Move this slider to enlarge or reduce the preview 2 Click this button to switch the currently displayed page 3 Click this button to change the print settings 4 Click this button to delete the displayed print job 5 Select this menu to st...

Page 89: ...e the printing operation before printing the remaining copies Because you can check the print result before starting printing the remaining copies from the Touch Panel this function is helpful to prevent a lot of misprints How to print from the computer 1 In Output Method in the Basic tab select Proof Print 2 Specify the number of copies then execute printing Only one copy is printed Continue to O...

Page 90: ...ions on this machine 1 Tap Job List 2 While In Progress is displayed tap Release Job 3 Select the job you want to print 4 If necessary tap Change Setting to change the print conditions 5 Tap Start or press the Start key The remaining copies are printed ...

Page 91: ...riod this func tion prevents printed materials from being missing or left unattended Since you need to enter the ID and password from the Touch Panel to print the data saved in the box this function is particularly suitable for safely printing highly confidential documents Related setting for the administrator You can limit printing from the computer only to Secure Print Default No For details ref...

Page 92: ...achine Operations on this machine Data printed using the Secure Print function is saved in the Secure Print User Box To print the saved data you need to enter the ID and password specified in the printer driver For details on the printing procedure refer to User s Guide Box Operations Related setting for the administrator You can delete all data saved in the Secure Print User Box For details refer...

Page 93: ...ox you can distribute the data By saving data in the private box Personal Box you can assure security because only you can open the box The data in the box is not deleted by mistake Operations required to use this function Register the boxes for storing print data on this machine For information on the procedure for registering boxes refer to User s Guide Box Operations d Reference You can also re...

Page 94: ...istering them in advance eliminates the need for entering them each time For details refer to page 2 9 3 Execute printing The data is saved in the box on this machine Using data saved in a box You can print or send data saved in a box via E mail or fax For information on how to print data saved in a box refer to User s Guide Box Operations For information on how to print data saved in a box refer ...

Page 95: ...print job that is sent though its User Authentica tion Account Track setting is not correctly configured in the Configure tab in the Properties window of the printer driver Related setting for the administrator You can specify the action that this machine takes when it receives a print job without authentication information Default Restrict For details refer to page 7 11 d Reference When printing ...

Page 96: ...ay the Properties window of the printer driver For information on how to display the Properties window refer to page 2 94 2 In Device Option in the Configure tab check that the User Authentication Account Track setting is correctly configured for your operating environment If it is not configured correctly select User Authentication or Account Track from the list then change the relevant setting i...

Page 97: ... to public users unregistered users selecting Public User ena bles you to execute printing without entering the user name and password When an external authentication server is used click Server Setting and select the authentication server If you always use the same user name and password registering them in advance eliminates the need for entering them each time For details refer to page 2 9 3 If...

Page 98: ... data is not printed within a short time period this function prevents printed mate rials from being missing or left unattended Since you need to be authenticated in this machine to print the data saved in the box this function is suitable for safely printing highly confidential documents When you are successfully authenticated the print data of the login user is automatically printed This enhance...

Page 99: ...er 1 In the Basic tab click Authentication Account Track 2 Enter the authentication information and click OK For details refer to page 2 79 3 In Output Method select ID Print 4 Execute printing The data is saved in the ID Print User Box Continue to Operations on this machine ...

Page 100: ...en an Authentication Unit is used When an optional Authentication Unit biometric type or Authentication Unit IC card type is used you can execute printing just by touching the authentication unit with your finger or IC card 0 You may be required to enter the user name and password before touching the unit with your finger or IC card due to the authentication settings Tap the keyboard icon in the U...

Page 101: ...he authentication information entered in the login page on the computer is used for this authentication Operations required to use this function In the Configure tab of the printer driver check that the User Authentication and Single sign on settings are correctly configured 1 Display the Properties window of the printer driver For information on how to display the Properties window refer to page ...

Page 102: ... procedure 1 In the Basic tab click Authentication Account Track 2 Check Enable Single Sign On functionality for printing functions box and click OK The login name in the PC is displayed in the User Name field 3 Click OK 4 Execute printing Printing starts ...

Page 103: ...ter driver Then the Paper Tray is set to Bypass Tray and Resolution is fixed to 600dpi Paper width Paper length Paper weight 8 1 4 to 11 11 16 inches 210 to 297 mm 18 to 47 1 4 inches 457 3 to 1200 mm 33 13 16 to 55 7 8 lb 127 g m2 to 210 g m2 Using the printer driver select the paper type appropriate for the weight of the banner paper to be used 32 3 16 lb to 41 3 4 lb 121 g m2 to 157 g m2 Thick ...

Page 104: ...g 2 Select Allow then tap OK 3 Check that the screen waiting for banner printing job has appeared If a job is received for printing on paper of a non banner size while a banner print job is expected that job is discarded When a banner paper print job is queued the machine cannot receive a facsimile When you have finished the above settings start to print from the PC ...

Page 105: ...ings are switched Click the Paper Settings for Each Tray and change the type of papers on the Bypass Tray ac cording to the weight of print papers If the Resolution is set to 1200dpi High Quality it is switched to 600dpi 7 Execute printing A message appears on the Touch Panel to prompt you to load papers 8 Load the banner paper into the Bypass Tray For information on how to load banner paper into ...

Page 106: ...word that is sent to this machine for printing using the printer driver When printing is executed some functions may send an authentication password such as the user password or account password The password is encrypted using the encryption passphrase specified in advance in this machine However you can change the encryption passphrase when necessary To change the encryption password you need to ...

Page 107: ...d Encryption Setting 2 Select User Defined and tap Encryption Passphrase 3 Tap Encryption Passphrase and enter the new encryption passphrase up to 20 characters Tap Encryption Passphrase Confirmation then enter the encryption passphrase again An encryption passphrase using a series of the same letters for example 1111 is invalid 4 Tap OK This sets the encryption passphrase ...

Page 108: ...obtained from this machine For details on how to encrypt OpenAPI communication with SSL refer to page 7 12 1 Display the Properties window of the printer driver For information on how to display the Properties window refer to page 2 94 2 On the Configure tab select the Encryption Passphrase check box and enter the encryption pass phrase using up to 20 alphanumeric characters that you have set on t...

Page 109: ...ions PPD driver for applications Install the PPD driver for applications when using PageMaker or other applications that requires a PPD PPD registration destination Example Adobe PageMaker For PageMaker 6 0 Copy the PPD file to RSRC PPD4 under the folder to which PageMaker is installed For PageMaker 6 5 and 7 0 Copy the PPD file to RSRC Language PPD4 under the folder to which PageMaker is installe...

Page 110: ...rinters In Windows Vista Server 2008 click Control Panel Hardware and Sound Printer from the Start menu When Control Panel is displayed in Classic View double click Printers In Windows XP Server 2003 open the Start menu then click Printers and Faxes If Printers and Faxes is not displayed click Control Panel Printers and Other Hardware Print ers and Faxes When Control Panel is displayed in Classic ...

Page 111: ...n Obtain Settings set the method of obtaining the information on this machine Obtain Settings Configure the settings for obtaining the information on this machine Automatic Retrieval Settings Select whether to obtain device information automatically Auto Select this check box to automatically obtain the information on this machine Do not retrieve in Sleep Mode Select this check box if you do not w...

Page 112: ...ircum stances the authentication password is encrypted using the encryption passphrase registered in advance in this machine However you can change the encryption passphrase when necessary To change the encryption passphrase change the setting in this machine then in the printer driver enter the same encryption passphrase as that specified in this machine For details on how to change the encryptio...

Page 113: ...he printer driver Authentication Settings Configure the User Authentication Account Track settings Verify Authentication settings before printing Select this check box to enable the Verify button in the User Authentication Account Track di alog box Popup Authentication Dialog when printing Select this check box to display the User Authentication Account Track dialog box when start ing printing Thi...

Page 114: ...he Printing Preferences window take the following steps 1 Display the printer window If the Windows 7 or Windows Server 2008 Revision 2 is running select Devices and Printers from the Start menu If Devices and Printers is not displayed select Control Panel Hardware and Sound and click View devices and printers In Windows Vista Server 2008 click Control Panel Hardware and Sound Printer from the Sta...

Page 115: ...nt settings for checking the output result image Selecting Printer View displays a printer figure showing the options such as paper trays installed in the machine Paper View Printer View Printer Information Click this button to start Web Connection and check the printer informa tion This button is enabled only when your computer can communicate with this machine OK Applies the changes made to the ...

Page 116: ...ent field containing More Details or Do not show again is not displayed if Display Note is disabled in My Tab Settings in the Settings tab of the Properties window Edit My Tab is not displayed when the Settings tab My Tab Settings Prohibit Editing is enabled in the Properties window d Reference For details in the Settings tab refer to page 2 96 Settings Description More Details Click this button t...

Page 117: ...gth For details refer to page 2 22 Paper Size Select the size of paper for printing If this setting differs from the original size and Zoom is set to Auto the original is enlarged or reduced to the selected paper size To print on custom sized paper select Custom Size and specify the width and length For details refer to page 2 22 Zoom Select how the print image is enlarged or reduced Auto The imag...

Page 118: ...ave in User Box Select this option to save the original in a box on this machine For details refer to page 2 77 Save in User Box Print Select this option to save the original in a box on this machine and print it at the same time For details refer to page 2 77 Proof Print Select this option to print a large number of copies This machine prints only one copy and waits for the user s command before ...

Page 119: ... order of pages in the layout Border When you have selected N in 1 in Combination select this check box if you want to draw border lines between pages In addition select the type of border lines Overlap width line When you have selected N e N in Combination select this check box if you want to create overlap margins Rotate 180 Select this check box to rotate the original 180 degrees and print it S...

Page 120: ...e Same value for Front and Back sides check box applies the same settings to both sides Settings Description Settings Description Staple Select this check box to staple the printed sheets In addition specify the number and positions of staples Center Staple and Fold Select this check box to staple the printed sheets in two positions in the center Use this option when you have set Print Type to Boo...

Page 121: ...iginal is printed on the inserted front cov er You can set this option when you have selected anything other than Auto in Paper Tray in the Basic tab Back Cover Select this check box to insert and print on a back cover In Back Cover Tray select the paper tray for the back cover Then select whether to print on the inserted back cover Blank Nothing is printed on the inserted back cover Print The las...

Page 122: ...r details refer to page 2 26 Settings Description Settings Description Watermark Select this check box to print a watermark text stamp on the original In addition from the list select the watermark you want to print Clicking Edit allows you to register or edit a watermark For details refer to page 2 42 Overlay An overlay image to be composed on the original is created The created overlay image is ...

Page 123: ...ivate or a date in the background to prevent un authorized copying and embeds a copy restriction pattern on all printed sheets Password Copy Password Copy is a copy protection function that prints concealed secu rity watermarks such as Private or a date in the background to prevent unauthorized copying and embeds a password for the password copy function on all printed sheets Enter the password to...

Page 124: ...lable operations in the Quality tab In the Quality tab you can configure settings for the image quality of the original You can specify colors image processing and font processing Items that can be specified vary depending on your printer driver PCL driver PS driver XPS driver ...

Page 125: ...D The color setting suitable for originals composed of thin lines is applied Images are reproduced in high resolutions Resolution PCL PS Select the print resolution Pattern PCL XPS Select the pattern density Image Compression PCL only Select the compression mode for the image data contained in the original Best Quality The process prioritizes quality Quality is improved but printing takes a long t...

Page 126: ...bs depending on the data contained This function avoids job separation as much as possible Remove White Back ground for PCL XPS in 32 bit system environment on ly Select this check box to superimpose an overlay image on Microsoft Pow erPoint data White areas are removed so that the white background of the PowerPoint data does not hide the overlay image Clear this check box to print the orig inal a...

Page 127: ...inter driver Deletion using the installer If you installed the printer driver using the installer you can delete it using the installer 0 Administrator privileges are required to perform this task 1 Insert the DVD ROM into the DVD ROM drive of the computer Make sure that the installer starts and then go to Step 2 If the installer does not start open the printer driver folder on the DVD ROM double ...

Page 128: ...P IP protocol and the LPR printing port For the installation procedure refer to page 2 113 Port 9100 A network connection using the PORT9100 print service It uses a TCP IP protocol and the RAW printing port For the installation procedure refer to page 2 113 SMB A network connection using SMB Server Message Block for sharing files or printers in Windows It supports the TCP IP protocol For the insta...

Page 129: ...d Normally you can use this machine with the default setting How to con figure the setting is explained using Web Connection For details refer to User s Guide Web Manage ment Tool Setup procedures Connection method Connection meth od in which setup is possible using Add Printer Wizard LPR A network connection using the LPR Line Printer Remote print service It uses a TCP IP protocol and the LPR pri...

Page 130: ...lick Printers 4 Select Add a printer In Windows 7 Server 2008 R2 click Add a printer In Windows Vista Server 2008 click Add a printer The Add printer Wizard appears 5 Click Add a network wireless or Bluetooth printer Connected printers are detected 6 Select your machine from the list then click Next If no printers are detected restart this machine Use the IP address to confirm the printer that you...

Page 131: ...ose a printer port dialog box appears 6 Click Create a new port then select Standard TCP IP Port 7 Click Next 8 Select TCP IP Device then enter the IP address 9 Click Next If the Additional Port Information Required dialog box appears go to Step 10 If the Install the printer driver dialog box appears go to Step 13 10 Select Custom and then click Settings 11 Change the settings according to the por...

Page 132: ...03 double click Add Printer Add Printer Wizard appears 4 Click Next 5 Select Local printer attached to this computer then click Next Clear the Automatically detect and install my Plug and Play printer check box The Select a Printer Port page appears 6 Click Create a new port then select Standard TCP IP Port as the Type of port 7 Click Next Add Standard TCP IP Printer Port Wizard starts 8 Click Nex...

Page 133: ...to User s Guide Web Management Tool In Windows Vista 7 Server 2008 Server 2008 R2 You can install the printer driver by automatically detecting the printer on the network or by creating a new port The procedure for installing the printer driver by automatically detecting the printer on the network is as fol lows 0 Administrator privileges are required to perform this task 0 Since the printer is se...

Page 134: ...he installed printer is displayed in the Print ers or Devices and Printers window 16 Remove the DVD ROM from the DVD ROM drive This completes the installation process of the printer driver The procedure for installing the printer driver by creating a new port is as follows 0 Administrator privileges are required to perform this task 0 Since the printer is searched for during the installation be su...

Page 135: ...iver and XPS driver 16 Click OK The Printers list appears 17 Click Next 18 Follow the instructions on the pages that follow If the User Account Control window appears click Continue or Yes 19 Click Finish 20 After finishing the installation make sure that the icon for the installed printer is displayed in the Print ers or Devices and Printers window 21 Remove the DVD ROM from the DVD ROM drive Thi...

Page 136: ...lect the folder on the DVD ROM containing the desired printer driver then click Open Select the folder according to the printer driver operating system and language to be used Selectable printer drivers PCL driver and PS driver 12 Click OK The Printers list appears 13 Click Next 14 Follow the instructions on the pages that follow To use a network connection perform a test print after the network s...

Page 137: ...e Add printer Wizard appears 5 Click Add a network wireless or Bluetooth printer Connected printers are detected 6 In the window showing the search result click The printer that I want isn t listed 7 In Select a shared printer by name enter the URL for the machine in the following format then click Next http IP address of this machine ipp Example http 192 168 1 20 ipp When specifying to use IPPS p...

Page 138: ...ect Add a printer from Printer Tasks In Windows Server 2003 double click Add Printer Add Printer Wizard appears 4 Click Next 5 In the Local or Network Printer page select A network printer or a printer attached to another com puter then click Next 6 In the Specify a Printer page select Connect to a printer on the Internet or on a home or office net work 7 In URL enter the URL for the machine in th...

Page 139: ...e printer driver by creating a new port even if the printer driver is not installed in advance 0 Administrator privileges are required to perform this task 0 To install a different printer driver in the computer where one has already been installed you must un install the whole package of the currently installed printer driver 1 Install the printer driver for this machine For details refer to page...

Page 140: ...ssic View double click Printers The Printers window appears 6 Click Add a printer The Add Printer appears 7 Click Add a local printer The page for Choose a printer port appears 8 Click Create a new port then select Standard TCP IP Port 9 Click Next 10 Select Web Services Device enter the IP address and click Next A printer of the entered IP address is located then the Found New Hardware dialog box...

Page 141: ...ers window d Reference If the printer driver is not correctly installed the driver must be updated using Update Driver For details refer to page 2 126 In Windows XP Server 2003 0 Administrator privileges are required to perform this task 1 Connect this machine to the computer using a USB cable and then start the computer 2 Insert the DVD ROM into the DVD ROM drive of the computer 3 Turn on the mai...

Page 142: ...click Properties 4 In the General tab click Change Settings 5 In the Driver tab click Update Driver 6 In the page in which to select how to search the driver software click Browse my computer for driver software 7 Click Browse 8 Select the folder on the DVD ROM containing the desired printer driver then click OK Select the folder according to the printer driver operating system and language to be ...

Page 143: ...t click on the area that has nothing displayed in the Printers window click Run as administrator Server Properties In Windows XP Server 2003 click the File menu then Server Properties If the User Account Control window appears click Continue or Yes 6 Click the Driver tab 7 From the Installed printer drivers list select the printer driver to be removed then click Remove In Windows Vista 7 Server 20...

Page 144: ...epending on the computer environment Before removing these files open the inf file and then check the model name described on the last few lines to confirm it is the file for the corresponding model The number of the PNF file is the same as that of the inf file When you have deleted a file using Remove driver and driver package in Windows Vista 7 Server 2008 Server 2008 R2 this operation is not re...

Page 145: ...3 Printing in a Mac OS Environment ...

Page 146: ......

Page 147: ...njour technology enables you to configure the network settings for networked devices and find and use services without the need for configuring special settings In Mac OS X 10 2 10 3 Bonjour is called Rendezvous 3 1 2 Before Setting Up the Computer For Administrators Preparation flow In order to use this machine via a Bonjour connection you need to take preparatory steps on this machine 1 Connecti...

Page 148: ...e operating systems supported by the printer driver Check that your computer meets the operating environment requirements of the printer driver 2 Installing the printer driver to the computer Installing the printer driver using the installer Insert the DVD ROM disk into the drive and install the software by following the on screen instructions Adding the printer Add the printer automatically detec...

Page 149: ...lick the file copied onto the desktop The printer driver installer starts 5 Click Continue following the instructions on the pages that follow until the Install page appears When the name and password prompt appears during the procedure enter the administrator name and password 6 Click Install The printer driver is installed in the computer 7 Click Close This completes the installation process of ...

Page 150: ...ted by Rendezvous to the PC 1 From Macintosh HD Applications Utilities double click Printer Setup Utility or Print Center to open it 2 When the You have no printers available window appears click Add When the Printer List appears click Add If available printers have already been specified the You have no printers available window does not appear 3 Select Rendezvous as the connection method Connect...

Page 151: ... the Printer Information window For the Print Fax window click Options Supplies Mac OS X 10 5 10 6 or Printer Setup Mac OS X 10 4 For the Printer Setup Utility Print Center window click Show Info of the Printer menu 3 Display the Installable Options window In Mac OS X 10 5 10 6 click Driver In Mac OS X 10 2 10 3 10 4 select Installable Options 4 Change the settings according to the options install...

Page 152: ...on software 3 Specify the print range and the number of copies to print In Mac OS X 10 5 10 6 if the setting items 1 are not displayed click on the right side of Printer 4 If necessary switch the menu of application names 2 and change the print settings The print settings you have changed here are reset to the defaults when you exit the application software It is useful to register frequently used...

Page 153: ...asily apply all of those settings just by selecting the combination from the presets even if the combination is complicated as it con tains settings on multiple menus 1 Display the Print window of the printer driver For information on how to display the Print window refer to page 3 69 2 Change the settings and select Save As from Presets 3 Enter the name of the print setting The saved setting can ...

Page 154: ...printing functions 3 3 1 Changing the paper size or type Enlarging or reducing by the desired zoom ratio Scale You can print the original image after it has been enlarged or reduced by the desired zoom ratio In Scale in the Page Attributes tab specify the zoom ratio ...

Page 155: ...he Paper Size list In Mac OS X 10 2 10 3 select Custom Paper Size from Settings 3 Click Mac OS X 10 4 10 5 10 6 or Add Mac OS X 10 2 10 3 4 Enter the name of the paper size you are registering Be sure to use paper size names other than existing names such as A4 and Custom 5 Specify the width and length as desired If necessary set the top bottom right and left margins of the paper in Printer Margin...

Page 156: ...ype in Paper Tray Output Tray select the type of paper for printing This function is enabled when Paper Tray is set to Auto In Paper Settings for Each Tray you can set a paper type for each tray When you specify anything other than Auto in Paper Tray the paper type information specified here is applied ...

Page 157: ...sheets of paper loaded in multiple trays Because you can obtain print ing results that look like carbon copied slips using the print command once this function is called Carbon Copy For example by using the print command once you can print a submission document on high quality color paper loaded in Tray1 and print your copy on recycled paper loaded in Tray2 This function is useful when you want to...

Page 158: ...arbon Copy Tray Select the paper tray for carbon copies Select the check boxes for all pa per trays to be used Output Order Select the order of outputting carbon copies Tray Carbon copies are printed in order of selected trays When an original of multiple pages is printed all pages are printed on paper from one tray then the next tray is used Page Carbon copies are printed page by page When an ori...

Page 159: ...r of copies Copies In Copies in Copies Pages specify the number of copies you want to print d Reference When you print a large number of copies use of the Proof Print function will prevent a large number of mis prints being created thereby reducing the amount of waste paper generated For details refer to page 3 49 ...

Page 160: ...age of each set When the Collate check box in Output Method is selected copies are output in a set by set manner for example Pages 1 2 3 4 and 5 Pages 1 2 3 4 and 5 and then Pages 1 2 3 4 and 5 When the Offset check box is selected the sets are output in staggered layers When you select both Collate and Offset check boxes the output position is staggered for each set allow ing you to easily prepar...

Page 161: ...C654 3 17 3 3 Useful printing functions 3 3 3 3 Saving Paper by Printing on Both Sides 2 Sided By using both sides of paper for printing you can halve paper consumption In Print Type in Layout Finish select 2 Sided ...

Page 162: ...r or at two positions and output automatically This function is useful for preparing a project proposal or other booklet materials In Layout Finish select the Staple check box In addition specify the number and positions of staples Tips To use Staple the optional Finisher is required In Binding Position in Layout Finish specify the staple position ...

Page 163: ...is useful when you want to bind printed materials in files In Layout Finish select the Punch check box In addition specify the number and positions of punch holes Tips To use Punch the optional Finisher and Punch Kit are required In Binding Position in Layout Finish specify the punch position The number of punched holes varies depending on the country you are in ...

Page 164: ...ound in the center and folded before they are output In Fold Staple in Layout Finish select Center Staple and Fold As the sheets are bound in the center use the combined document data or set the Print Type to Booklet on the Layout Finish tab Tips To use Center Staple and Fold the optional Finisher and Saddle Kit are required ...

Page 165: ...r of pages to be folded at one time in Page Fold Setting Tips To use Center Staple Fold Half Fold or Tri Fold of Fold Staple the optional Finisher and Saddle Kit are required To use Z Fold of Fold Staple the optional Finisher and Z Fold Unit are required To use Z Fold of Fold Staple specify the paper size described at the setting you selected from the drop down list Z Fold A3 B4 11 e 17 8K Z Fold ...

Page 166: ... the correct order In Print Type in Layout Finish select Booklet Tips By selecting Fold Staple in Layout Finish in combination with this function you can create book let form documents by folding the printed sheets in the center or by binding them using two staples in the center To use Fold Staple the optional Finisher and Saddle Kit are required By selecting Chapters in the Layout Finish tab in c...

Page 167: ... is enlarged divided and printed on multiple sheets When you join the printed sheets to gether a large poster is created In Poster Mode in Layout Finish select N e N For example when you select 2 e 2 one page of the original image is enlarged divided and printed on four sheets To create overlap margins select the Overlap width line check box ...

Page 168: ... bizhub C754 C654 3 3 Rotating the image 180 degrees Rotate 180 The image is printed upside down Use this function when printing on envelopes whose loading direction can not be changed In Layout Finish select the Rotate 180 check box ...

Page 169: ...osition Use this function when you want to make a fine adjustment such as changing the print position a little or printing images in different positions between the front and back sides 1 In Layout Finish select the Image Shift check box The Image Shift window appears 2 Adjust the upward downward and rightward leftward shift distances and click OK When printing images on both sides selecting the S...

Page 170: ... print position and format of the text In Stamp Composition select the Date Time check box As necessary click Settings to change the print position and format of the text Settings Description Format Specify the format for the date time Pages Specify the range of pages on which the date time is printed Text Color Select the print color for the date time Print Position Specify the print position for...

Page 171: ...e the print position and the page from which the page number print ing starts Settings Description Starting Page Specify the page from which the page number printing starts Starting Page Number Specify the page number to be printed on the page specified in Starting Page Cover Mode Select this check box to print page numbers on the front and back covers when they are inserted In addition select the...

Page 172: ...eader and footer in advance to this machine 0 For details on how to register the information to be added for header and footer refer to page 7 8 1 In Stamp Composition select the Header Footer check box then click Settings 2 Select the information to be added to the header footer and click OK As necessary change the text color or the range of pages on which the header footer is printed Settings De...

Page 173: ... copy 1 In Stamp Composition select the Copy Security check box then click Settings Distribution Control Number Select whether to print copy numbers when printing multiple sets of cop ies Print in Header Select this check box to print the copy number in the header Print in Footer Select this check box to print the copy number in the footer Start Number Specify the format for the copy numbers and t...

Page 174: ... the format of the text For details refer to page 3 34 Printing a stamp on the entire page Stamp Repeat Stamp such as Copy and Private are printed on the entire page By printing text such as Copy or Private as a visible stamp you can deter unauthorized copying 1 In Stamp Composition select the Copy Security check box then click Settings ...

Page 175: ...Private or a date in the background to prevent unauthorized copying and embeds a copy restriction pattern on all printed sheets If an attempt is made using a device that supports the copy guard function to copy a sheet that has been copy protected a copy guard pattern is scanned the copying process is canceled and the job is deleted 0 To use Copy Guard you need to install the optional Security Kit...

Page 176: ... bizhub C754 C654 3 3 1 In Stamp Composition select the Copy Security check box then click Settings 2 Select Copy Guard and click OK As necessary specify the text to be printed and the format of the text For details refer to page 3 34 ...

Page 177: ... attempt is made using a device that supports the password copy function to copy a sheet that has been prepared for password copy a password copy pattern is scanned and entry of a password is requested Copying starts if the correct password is entered 0 To use Password Copy you need to install the optional Security Kit and enable the Password Copy function of this machine For details on how to ena...

Page 178: ... OK As necessary specify the text to be printed and the format of the text For details refer to page 3 34 Configuring the print settings for Copy Security When printing a copy security pattern on sheets you can set the text to be printed and the format of the text as necessary 1 In Stamp Composition select the Copy Security check box then click Settings ...

Page 179: ...elect the text you want to print You can select the text to be printed from the registered preset stamps and stamps registered by users Date Time Select this check box to add the print date time If necessary specify the format Serial Number Select this check box to print the serial number of this machine Distribution Control Number Select this check box to print copy numbers when printing multiple...

Page 180: ... a time 1 In Paper Tray in Paper Tray Output Tray select the paper tray for printing the body You cannot select Auto Settings Description Text Size Select the size of the text to be printed Angle Select the angle of the text to be printed Pattern Select whether the text pattern is embossed or outlined when the original is subjected to unauthorized copying Pattern Overwrite Select whether to compos...

Page 181: ... original is printed on the front cover and the last page of the original is printed on the back cover Select the paper trays for paper to be inserted as the front and back covers Inserting front back covers Front Cover from Post Inserter Back Cover from Post Inserter You can insert the optional post inserter paper before the first page or after the last page of the text as the outer front cover 1...

Page 182: ... use Front Cover from Post Inserter Back Cover from Post Inserter the optional Post Inserter is required Inserting paper between transparencies Transparency Interleave When printing on multiple OHP transparencies you can insert the specified paper between the OHP trans parencies These sheets of paper prevent the OHP transparencies from sticking together due to heat gener ated during printing or st...

Page 183: ...ality select Gray Scale 3 In Paper Type in Paper Tray Output Tray select Transparency 4 In Cover Mode Transparency Interleave select Transparency Interleave Select the paper tray for the paper to be inserted between OHP transparencies OHP interleaves are inserted as blank sheets ...

Page 184: ...per Create in advance a list that specifies the paper and print settings for each page When printing on inserted paper select the list you want to apply to printing 1 In Per Page Setting select the Per Page Setting check box and the click Add If nothing is registered in the list selecting the Per Page Setting check box automatically displays the setting window When you have already prepared a list...

Page 185: ...d These buttons move the order of settings in the list They do not change the settings Add This button adds the setting to the list Delete This button deletes the setting selected in the list Add Edit You can add settings to the Setting List or edit settings Page Number Enter the page numbers you want to add To specify multiple page numbers separate each number with a comma for example 2 4 6 or co...

Page 186: ...ality level Select one of the following processes according to the original to be printed the process suitable for originals consisting primarily of text the process suitable for photos the process suitable for originals created with DTP the process suitable for printing Web pages or the process suitable for printing CAD data In Color Settings in Quality select the optimum color setting mode for t...

Page 187: ... 43 3 3 Useful printing functions 3 Making the image glossy Glossy Mode Images are printed with a glossy finish In Quality select the Glossy Mode check box Tips This function is enabled when Print Type is set to 1 Sided ...

Page 188: ... Trapping check box to superimpose neighboring colors to print so as to prevent white space being generated around a picture Configure the Black Over Print setting to superimpose black color on a neighboring color to print so as to prevent white space being generated around black characters or figures You can select whether to print black only around the characters or around both characters and fi...

Page 189: ...eful printing functions 3 Increasing the legibility of small or faint text Edge Enhancement Sharpen the edges of images such as text in the table and graphics to improve legibility In Quality select the Edge Enhancement check box ...

Page 190: ...o use the new ICC profiles registered this machine you need to add the ICC profiles to the printer driver in advance For details refer to page 3 47 1 In Quality click Quality Adjustment 2 Specify the settings for RGB Color Destination Profile and Simulation Profile The ICC profiles registered in the printer driver can be selected 3 Click OK Color processing is performed according to the selected I...

Page 191: ...ommunicate with this machine The computer commu nicates with this machine and loads ICC profiles that the machine can use 0 To register ICC profiles in this machine use Download Manager bizhub For details on how to register ICC profiles in this machine refer to the Help for Download Manager bizhub 1 In Quality click Quality Adjustment 2 Click Manage Profile If the Download Manager bizhub has been ...

Page 192: ...p down list 4 Select the desired profile from the Available Profile list then click Add Sel To register the current driver settings as the profile click New then enter the File Name and Pro file Name The profile name can be changed in New Edit 5 Click OK The profile is added to Driver Profile List ...

Page 193: ...printing operation before printing the remaining copies Because you can check the print result before starting printing the remaining copies from the Touch Panel this function is helpful to prevent a lot of misprints How to print from the computer 1 In Output Method in the Output Method window select Proof Print 2 Specify the number of copies then execute printing Only one copy is printed Continue...

Page 194: ...ions on this machine 1 Tap Job List 2 While In Progress is displayed tap Release Job 3 Select the job you want to print 4 If necessary tap Change Setting to change the print conditions 5 Tap Start or press the Start key The remaining copies are printed ...

Page 195: ...his func tion prevents printed materials from being missing or left unattended Since you need to enter the ID and password from the Touch Panel to print the data saved in the box this function is particularly suitable for safely printing highly confidential documents Related setting for the administrator You can limit printing from the computer only to Secure Print Default No For details refer to ...

Page 196: ...is saved in the Secure Print User Box Continue to Operations on this machine Operations on this machine Data printed using the Secure Print function is saved in the Secure Print User Box To print the saved data you need to enter the ID and password specified in the printer driver For details on the printing procedure refer to User s Guide Box Operations Related setting for the administrator You ca...

Page 197: ...rs can access Public Box or in a box that the members of a specific department can access Group Box you can distribute the data By saving data in the private box Personal Box you can assure security because only you can open the box The data in the box is not deleted by mistake Operations required to use this function Register the boxes for storing print data on this machine For information on the...

Page 198: ...heck box is selected the settings are saved When the Do not show this window when setting check box is selected this dialog box is not displayed next time If you always use the same file name and box number selecting this check box eliminates the need for entering them each time 3 Execute printing The data is saved in the box on this machine Using data saved in a box You can print or send data sav...

Page 199: ...etting for the administrator You can specify the action that this machine takes when it receives a print job without authentication information Default Restrict For details refer to page 7 11 d Reference When printing a highly confidential document in an environment where user authentication or account track is employed using the ID Print function enables high security printing For details refer t...

Page 200: ... the Do not show this window when setting check box is selected this dialog box is not displayed next time If you always use the same user name and password selecting this check box eliminates the need for entering them each time 3 If account track is enabled enter the account name and password then click OK When the Save Settings check box is selected the settings are saved When the Do not show t...

Page 201: ...successfully authenticated the print data of the login user is automatically printed This enhances security as well as ensures smooth operation Related setting for the administrator You can specify the action that this machine takes when the ID Print function is used For details refer to page 7 10 You can set a time to delete files automatically from the ID Print User Box Default 1 day For details...

Page 202: ...izhub C754 C654 3 4 2 Select Recipient User enter the user name and password then click OK 3 In Output Method select ID Print 4 Execute printing The data is saved in the ID Print User Box Continue to Operations on this machine ...

Page 203: ...ID Print you can log in without starting printing You can change the default value for ID Print Default Print Access Basic Screen if neces sary For details refer to page 7 11 When you are successfully authenticated all data items saved in the ID Print User Box are printed d Reference To print a particular data item in the ID Print User Box open the ID Print User Box and select the data item For de...

Page 204: ... selected in Authentication Method 2 Check that ID Print MFP Access is selected in ID Print and touch the Authentication Unit with your finger or IC card When you select Access Basic Screen in ID Print you can log in without starting printing You can change the default value for ID Print Default Print Access Basic Screen if neces sary For details refer to page 7 11 When you are successfully authen...

Page 205: ...ter driver Then the Paper Tray is set to Bypass Tray and Resolution is fixed to 600dpi Paper width Paper length Paper weight 8 1 4 to 11 11 16 inches 210 to 297 mm 18 to 47 1 4 inches 457 3 to 1 200 mm 33 13 16 to 55 7 8 lb 127 g m2 to 210 g m2 Using the printer driver select the paper type appropriate for the weight of the banner paper to be used 32 3 16 lb to 41 3 4 lb 121 g m2 to 157 g m2 Thick...

Page 206: ... from the PC 4 In the Page Setup or Paper Setup window open the window for registering a custom size In Mac OS X 10 4 10 5 10 6 select Manage Custom Sizes from the Paper Size list In Mac OS X 10 2 10 3 select Custom Paper Size from Settings 5 Click Mac OS X 10 4 10 5 10 6 or Add Mac OS X 10 2 10 3 6 Enter the name of the paper size you are registering Be sure to use paper size names other than exi...

Page 207: ... Tray is set to Bypass Tray and that the Paper Type is set to the desired paper type Thick 1 Thick 2 Thick 3 and also they are grayed out to prevent them from being changed If the Paper Type is not set to Thick 1 Thick 2 Thick 3 set the paper type in Paper Settings for Each Tray If the specified paper size is not in the allowable range of the banner size Paper Tray or Paper Type is not grayed out ...

Page 208: ...ded a banner paper tap Complete Printing on the banner paper starts Support the ejected banner paper by hand To continue printing execute printing from the computer 16 Tap Exit A message confirming the end of banner printing is displayed To terminate printing tap Yes ...

Page 209: ... to set the same encryption passphrase in this machine and in the printer driver Tips If the encryption passphrase set in this machine differs from the one set in the printer driver printing cannot be executed because this machine cannot decrypt the encrypted password Operations required to use this function For administrators 1 Tap Utility Administrator Settings Security Settings Driver Password ...

Page 210: ... 3 4 Setting the printer driver 0 Do not perform the following steps when you do not want to change the encryption passphrase on this machine 1 In Output Method window click Detail Settings 2 Select Administrator Settings then click Settings ...

Page 211: ...passphrase on this machine 4 Click OK Printing procedure 1 On the Output Method tab set up the print function which uses the password for Secure Print Save in User Box User Authentication and others 2 Execute printing The password is encrypted with the encryption passphrase being set by the printer driver and the en crypted password is transmitted to this machine The password is decrypted with the...

Page 212: ...operations in Page Attributes In Page Attributes you can configure basic settings about paper Settings Description Paper Size Select the size of paper for printing To print on custom sized paper use Manage Custom Sizes For details refer to page 3 11 Orientation Specify the orientation of the original created in application software If the setting in the printer driver differs from the one specifie...

Page 213: ...aper into the tray to use and check the paper size as follows Select the tray in Paper for the copy mode Select Change Tray Settings Wide Paper specify 8 1 2 e 11W and make sure that the Paper Size is set to Auto Detect and 11 e 17 is displayed If you have loaded the 12 1 4 e 18 papers you must set the Paper Size to 12 1 4 e 18 To print on custom sized paper use the Bypass Tray In Change Tray Sett...

Page 214: ...5 Items common to each window This section describes the settings and buttons common to the Print window Mac OS X 10 5 10 6 Mac OS X 10 4 Settings Description Paper View Displays the sample page layout based on current settings for checking the print result image ...

Page 215: ...ion Displays the current settings in text Printer Information Displays the installation option status This button is enabled only when your computer can communicate with this machine Default Reverts the settings to their default values Cancel Discards or cancels the current changes and closes the setup window Print Applies the changes made to the settings and starts printing Settings Description S...

Page 216: ...r Box Select this option to save the original in a box on this machine For details refer to page 3 53 Save in User Box and Print Select this option to save the original in a box on this machine and print it at the same time For details refer to page 3 53 Proof Print Select this option to print a large number of copies This machine prints only one copy and waits for the user s command before printi...

Page 217: ...ord for Secure Print For details refer to page 3 51 Save in User Box Specify the user box to save the data For details refer to page 3 53 User Authentication When user authentication is employed enter the user name and password For details refer to page 3 55 Account Track When account track is employed enter the account name and password For details refer to page 3 55 Administrator Settings Select...

Page 218: ... used Popup Authentica tion Dialog when printing Select this check box to display the Secure Print dialog box when starting printing This option reminds you to enter the ID and password for Secure Print Print without Pass word Select whether to allow users to print without entering the password Encryption Passphrase Select this check box when you want to set your own encryption pass phrase The enc...

Page 219: ...nal data are arranged spread and printed on both sides of sheets When the printed sheets are stacked and folded in two the pages are arranged in the correct order Binding Position Select the binding positions for stapling or punching the sheets Poster Mode The original image is enlarged divided and printed on multiple sheets For example when you select 2 e 2 one page of the original is divided and...

Page 220: ...gs to both sides Chapters When you have selected 2 Sided or Booklet in Print Type select this check box if you want to print particular pages on the front side In Page Number in the Chapters window that appears when this check box is selected specify the page numbers of the pages you want to print on the front side To specify multiple page numbers separate each number with a comma for example 2 4 ...

Page 221: ...elected Auto in Paper Tray select the type of paper for printing When you have selected anything other than Auto the paper type selected in Paper Settings for Each Tray is used Paper Settings for Each Tray Specify the type of printing paper for each tray Select Paper Tray and change Paper Type Ensure that the settings cor respond correctly to the paper that has been loaded into the paper trays of ...

Page 222: ...age of the original is printed on the inserted front cov er You can set this option when you have selected anything other than Auto in Paper Tray in Paper Tray Output Tray Back Cover Select this check box to insert and print on a back cover In addition select the paper tray for the back cover and whether to print on the inserted back cover Blank Nothing is printed on the inserted back cover Print ...

Page 223: ...back cover You can set this option when you have selected anything other than Auto in Paper Tray in Paper Tray Output Tray Transparency Interleave When printing on multiple OHP transparencies select this check box if you want to insert paper between the OHP transparencies In addition select the paper tray for the paper to be inserted You can set this option when you have selected Transparency in P...

Page 224: ...opy Se curity For details refer to page 3 29 Date Time Select this check box to add the print date time to the original Clicking Settings allows you to change the print position and format of the text For details refer to page 3 26 Page Number Select this check box to add page numbers to the original Clicking Settings allows you to change the print position and the page from which the printing sta...

Page 225: ...d in high resolutions Quality Adjustment The image quality is fine tuned according to the original For each element of the document specify in detail the type of the color profile used for printing and other profiles to be applied You can also manage ICC profiles For details refer to page 3 46 Resolution Select the print resolution Glossy Mode Select this check box to print images with a glossy fi...

Page 226: ...tup Utility Print Center window 4 From Library Printers PPDs Contents Resources on Macintosh HD where the driver was installed in Mac OS X 10 5 10 6 from Resources and in Mac OS X 10 2 10 3 10 4 from Resources en lproj de lproj es lproj fr lproj it lproj ko lproj ja lproj zh_CN lproj and zh_TW lproj drag the following files to the Trash icon KONICAMINOLTAC754 gz KONICAMINOLTAC654 gz 5 Delete unnec...

Page 227: ...ply Then add the printer to the computer 6 Select System Preferences in the Apple menu 7 Click the Print Fax icon 8 Click on the Print Fax window 9 Click Default Connected printers are detected If no printers are detected restart this machine 10 From the Printer Name list select the desired printer that is connected via AppleTalk To check the printer name select Utility Administrator Settings Netw...

Page 228: ...o printers available window appears click Add When the printer list appears click Add If available printers have already been specified the You have no printers available window does not appear 8 Select AppleTalk for the connection method then select the zone to which the machine is connected Connected printers are detected If no printers are detected restart this machine 9 From the Name list sele...

Page 229: ...n changes message appears click Apply Then add the printer to the computer 7 Select System Preferences in the Apple menu 8 Click the Print Fax icon 9 Click on the Print Fax window 10 Click IP or IP Printer 11 In Protocol select Line Printer Daemon LPD 12 In Address enter the IP address for the machine The printer driver for the machine specified with the IP address is displayed in Print Using When...

Page 230: ...k Apply Then add the printer to the computer 7 From Macintosh HD Applications Utilities double click Printer Setup Utility or Print Center to open it 8 When the You have no printers available window appears click Add When the printer list appears click Add If available printers have already been specified the You have no printers available window does not appear 9 Select IP Printing as the connect...

Page 231: ...rs click Apply Then add the printer to the computer 7 Select System Preferences in the Apple menu 8 Click the Print Fax icon 9 Click on the Print Fax window Printer Browser appears 10 Click IP or IP Printer 11 In Protocol select IPP Internet Printing Protocol 12 In Address enter the IP address for the machine In Queue enter ipp The printer driver for the machine specified with the IP address is di...

Page 232: ... the printer to the computer 7 From Macintosh HD system hard disk Applications Utilities double click Printer Setup Utility 8 When the You have no printers available window appears click Add When the printer list appears click Add If available printers have already been specified the You have no printers available window does not appear 9 Select IP Printing as the connection method 10 In Printer T...

Page 233: ...y Then add the printer to the computer 7 From Macintosh HD system hard disk Applications Utilities double click Print Center 8 If the printer list appears hold down the Option key and click Add When the You have no printers available window appears click Cancel 9 From the Connection Methods list select Advanced 10 Set the Device to Internet Printing Protocol http 11 Enter the name of this machine ...

Page 234: ...twork Checking the LAN cable connection 2 Configuring the AppleTalk settings Enabling AppleTalk Setting a printer name Enter the name of this machine to be displayed in Chooser 3 Preparation finished Checking the LAN cable connection Check that a LAN cable is connected to the LAN port of this ma chine Configuring the AppleTalk settings Enable AppleTalk In addition enter the name of this machine to...

Page 235: ...ished Checking the operating systems supported by the printer driver The following lists the printer drivers included on the DVD ROM supplied with this machine and the supported operating systems Installing the printer driver Copy the printer description PPD file to the computer 1 Insert the DVD ROM into the DVD ROM drive of the computer 2 Open the folder in the DVD ROM that contains the desired p...

Page 236: ...d model name then click Create The window for selecting a PostScript printer description PPD file appears To check the printer name select Utility Administrator Settings Network Settings AppleTalk Settings on this machine If a different PPD file has already been selected click Setup then click Select PPD in the win dow that is already displayed 7 Click the applicable PPD file and then click Select...

Page 237: ...n this machine 1 In Apple menu select Chooser 2 Select the printer name 3 Click Setup 4 Click Configure The option setting window appears 5 Specify the options installed in this machine and click OK 6 Close the Chooser window Changing the default print settings In the Print window of the printer driver you can change the default print settings 1 From the File menu click Print to display the Print ...

Page 238: ...r to page 3 94 The print settings you have changed here are reset to the defaults when you exit the application software 5 Click Print Printing is executed 3 8 5 Setting items in the printer driver Available operations in Page Attributes In Page Attributes in the Page Setup or Paper Setup window you can configure basic settings about paper Settings Description Paper Select the size of paper for pr...

Page 239: ...as the number of cop ies and print range Settings Description Paper Size Enter the width and length as desired In Units change the unit of the values as necessary Margins If necessary set the top bottom right and left margins of the paper In Units change the unit of the values as necessary Custom Page Size Name Set a name for the paper size Use a name that helps you easily identify the paper Setti...

Page 240: ...a single sheet of paper Layout direction Select the page layout order Border When you want to draw border lines between pages select the border line type Settings Description Offset When multiple sets of copies are printed the sets are output in staggered layers Output Tray Select the tray to which the printed sheets are output Binding Position Select the binding positions for stapling or punching...

Page 241: ...ossy finish The printing speed is reduced Color Settings Select the optimum color setting mode for the original Auto Trapping To prevent misalignment or generation of white space neighboring colors are superimposed around a picture Black Overprint To prevent white space being generated around black characters or fig ures black is superimposed on neighboring colors Color Matching Text Select this o...

Page 242: ...ed To use Z Fold of Fold specify the paper size described at the setting you selected from the drop down list Z Fold A3 B4 11 e 17 8K Z Fold 8 1 2 e 14 at Paper Size of the application software or printer driver To use Front Cover from Post Inserter Back Cover from Post Inserter the optional Post Inserter is required Front Cover and Front Cover from Post Inserter or Back Cover and Back Cover from ...

Page 243: ...4 Printing in a NetWare Environment ...

Page 244: ......

Page 245: ...is machine supports the following NetWare environments Tips For details on the NetWare functions refer to the NetWare manual NetWare version Protocol used Connection method NetWare 4 x IPX Bindery Pserver Nprinter Rprint er NetWare 5 x IPX NDS Pserver Nprinter Rprinter TCP IP NDPS NetWare 6 x IPX NDS Pserver TCP IP NDPS ...

Page 246: ...strators The installation method for the printer driver differs depending on the connection method in the NetWare en vironment Before installing the printer driver configure the NetWare print mode according to your environ ment How to configure the setting is explained using Web Connection For details refer to User s Guide Web Management Tool ...

Page 247: ... Execute Install printers MFPs or Add Printer The Add Printer Wizard appears 4 In the port settings browse the network and specify the name of the created queue or NDPS printer name 5 From the printer model list specify the desired folder in the DVD ROM that contains the printer driver Select the folder according to the printer driver operating system and language to be used Selectable printer dri...

Page 248: ...Installing the printer driver 4 4 6 bizhub C754 C654 4 3 ...

Page 249: ...5 Printing without Using the Printer Driver ...

Page 250: ......

Page 251: ...r to User s Guide Web Management Tool 2 Log in to the user mode For details on how to login to the user mode refer to User s Guide Web Management Tool 3 Click Direct Print 4 Select the file you want to print and click OK Change the print settings as necessary The file is sent and printed d Reference When you print a password protected PDF file the file is stored in the Password Encrypted PDF User ...

Page 252: ...ed in the device Use only a USB memory device on this machine Do not use other USB devices such as hard disk unit and USB switching hub Do not connect or disconnect the USB memory when the hourglass is being displayed in the Control Panel while this machine is active Do not disconnect the USB memory just after connecting it Printing procedure Connect the USB memory device to this machine and on th...

Page 253: ...upported Bluetooth devices Bluetooth devices that have the following specifications can be connected to this machine Printing procedure Connect a Bluetooth compatible mobile phone smartphone tablet PC or other terminal to this machine then specify the file you want to print For details on the printing procedure refer to User s Guide Box Operations Item Specifications Communication protocol Bluetoo...

Page 254: ...Directly printing from a Bluetooth device 5 5 6 bizhub C754 C654 5 3 ...

Page 255: ...6 Description of Setup Buttons User Settings ...

Page 256: ......

Page 257: ...el in this machine When necessary print the status of consumables in list form Banner Printing Press this button to select whether to permit banner printing of the print function Device Information Press this button to display the function version or IP address IPv4 IPv6 of this machine Remote Panel Operation Press this button to control the Control Panel of this machine from a dis tant place Sett...

Page 258: ...DL Setting Select the Page Description Language When you select Auto this ma chine automatically switches between PCL and PS Auto is specified by default Number of Copies Enter the number of copies to be printed 1 is selected by default Original Direction Select the orientation of the image to be printed Portrait is selected by default Spool Print Jobs in HDD before RIP Select whether to save the ...

Page 259: ...nt Mode Select whether to directly print OOXML docx xlsx pptx files with the pri ority of quality or with the priority of speed Prioritize Speed is selected by default Fold Type Settings Select whether to fold the printed sheets When you want to fold the print ed sheets select the folding mode No is specified by default Half Fold Tri Fold Specifi cation Settings Select the unit by which the paper ...

Page 260: ...ll letters have the same width 10 00 pitch is specified by default Line Page Enter the number of lines of text data to be printed on one page The default values vary depending on the country you are in CR LF Mapping Select whether to replace the line feed codes when printing text data When you want to replace the line feed codes select the replacement method No is specified by default Settings Des...

Page 261: ... printing The Current Sheet is selected by default Paper Size Select a paper size to print OOXML docx xlsx or pptx files Auto is specified by default Paper Type Select a paper type to print OOXML docx xlsx or pptx files Auto is specified by default Settings Description Yes No Select whether to reduce and print multiple pages on the same side of a single sheet of paper No is specified by default Ro...

Page 262: ...t page is printed Change print settings as required then tap Start to start printing PCL Font List A list of PCL fonts installed in this machine is printed Change print settings as required then tap Start to start printing PS Font List A list of PS fonts installed in this machine is printed Change print settings as required then tap Start to start printing Settings Description Paper Selection Sele...

Page 263: ...7 Description of Setup Buttons Administrator Settings ...

Page 264: ......

Page 265: ...d User Authentication Ac count Track Configure user authentication and account track This function allows you to restrict users who can use this machine or man age the use status of this machine Specify the authentication method or register user information or account track information Network Settings Configure the network function such as TCP IP settings or Scan to Send function operating enviro...

Page 266: ...erated for a certain period of time User Box Settings Specify the user box settings such as deletion of unnecessary user boxes and files and the time until the file saved in each user box is automatically deleted Standard Size Setting Specify the detection capability setting of original size in the Original Glass and the Foolscap paper size setting Stamp Settings Register header footer programs an...

Page 267: ...fore ejection Yes is specified by default Tips This item is available when the optional Finisher is installed Custom Display Settings Change the view of the main screen for the main menu and each mode in a user friendly manner Settings Description Settings Description Print Fax Output Settings Select when to start printing received print fax data Output Tray Settings Select the tray to which paper...

Page 268: ...nt Docu ments All files saved in the Secure Print User Box are deleted Auto Delete Secure Docu ment Specify the time to automatically delete files in the Secure Print User Box from the date time the files were saved Encrypted PDF Delete Time Specify the time to automatically delete files in the Password Encrypted PDF User Box from the date time the files were saved ID Print Delete Time Specify the...

Page 269: ...ct whether to delete the file from the ID Print User Box after the file is printed For details refer to page 7 7 ID Print Delete after Print Setting To display Utility Administrator Settings System Settings User Box Settings ID Print Delete after Print Setting Select whether to ask the user if they want to delete the file from the ID Print User Box after it is printed or to always delete the file ...

Page 270: ...nd time To print it select the appropriate display format Other Select whether to print information such as job number ma chine s serial number and distribution control number Do Not Print is specified by default Pages Select to print the header footer on all pages or only on the first page All Pages is selected by default Text Details Select the size font and color of the text to be printed Setti...

Page 271: ...the printer driver is used for printing in an environment where user authentication is employed When employing external server authentication register the authentication server for quick authentication for printing Settings Description Settings Description Administrative Settings Configure the display of the user name list the function permission applied to external server authentication and the I...

Page 272: ...rint function ID Print Operation Settings To display Utility Administrator Settings User Authentication Account Track User Authentication Settings Administrative Settings ID Print Operation Settings When using the ID Print function on an optional Authentication Unit select whether to request user au thentication for printing each job or to allow the user to print all jobs once the user is authenti...

Page 273: ...d by default Access The user logs in to this machine The ID Print job is not executed Settings Description Full Color Black Both color printing and black and white printing are allowed Print jobs are counted as public user jobs Black Only Only black and white printing is allowed Print jobs are counted as public user jobs Restrict Printing is restricted Canceling Restrict allows everybody to perfor...

Page 274: ... tion are allowed Non SSL Only is specified by default Port No If necessary change the OpenAPI communication port number In normal circumstances you can use the original port number 50001 is specified by default Port Number SSL If necessary change the SSL communication port number In normal circumstances you can use the original port number 50003 is specified by default Client Certificate Select w...

Page 275: ...nced Security Mode the various security functions are forcibly configured This allows you to ensure higher level security of data management For details contact your service representative HDD Settings Manages the hard disk of this machine Prevents the leakage of personal and corporate information by protecting data in the hard disk against eras ure and protecting the hard disk with password and e...

Page 276: ...og Settings Select whether to obtain a job log After you have changed these settings the job log is obtained when you restart this machine The job log allows you to check usage paper usage operations and job history for each user or account For details on viewing the output job logs contact your service representative Restrict Fax TX Select whether to restrict fax transmissions Personal Data Secur...

Page 277: ...ord Copy is a copy protection function that prints concealed security watermarks such as Private or a date in the background to prevent unauthorized copying and embeds a password for the password copy function on all printed sheets No is specified by default Tips To use Password Copy optional Security Kit is required Driver Password Encryption Setting To display Utility Administrator Settings Secu...

Page 278: ...7 7 16 bizhub C754 C654 ...

Page 279: ...8 Index ...

Page 280: ......

Page 281: ...d 2 51 3 31 Copy protect 2 50 3 29 Cover mode tab 2 105 Cover mode transparency interleave 3 78 Custom page size 3 95 D Date time 2 47 3 26 Default settings 2 8 2 14 3 7 3 93 Direct print 5 3 E Edge enhancement 2 65 3 45 Encryption passphrase 2 90 3 65 Excel 2 70 F Favorite setting 2 17 Finish tab 2 104 Fold 2 36 3 21 Font settings 2 66 Front cover 2 55 3 36 Front cover from post inserter 2 56 3 3...

Page 282: ... preferences window 2 98 Printing procedure 2 16 3 8 3 94 Proof print 2 73 3 49 Properties window 2 94 Punch 2 35 3 19 Q Quality 3 80 Quality adjustment 2 61 Quality tab 2 108 R Rotate 180 2 39 3 24 S Save in user box 2 77 3 53 Scale 3 10 Secure print 2 75 3 51 Select color 2 60 3 41 Settings tab 2 96 Setup 3 4 3 91 Single sign on 2 85 Skip blank pages 2 31 SMB connection 2 117 Stamp repeat 2 51 3...

Page 283: ... ID Print Settings 7 10 L Layout Combination 6 7 O OOXML Print Settings 6 7 OpenAPI Settings 7 12 Output Settings 7 5 Output Tray Settings 7 5 P Paper Setting 6 5 Password Copy 7 15 PCL Settings 6 6 Print Data Capture 7 14 Print Reports 6 8 Print without Authentication 7 11 Print Fax Output Settings 7 5 Printer Settings 6 4 7 11 PS Setting 6 6 S Secure Print Only 7 15 Security Details 7 14 Securit...

Page 284: ...Index by button 8 8 6 bizhub C754 C654 8 2 ...

Reviews: