background image


Account Track/User Authentication Common Settings 


Deleting Other Users Jobs 

When any form of authentication is turned on the default security setting is to prohibit users from 
deleting anyone 

else’s jobs. The only way to delete jobs in the queue would be to have the user 

who sent the jobs to the device log in, then delete the jobs from the queue. To change the default 
setting to allow any user to delete jobs from the queue follow these steps after you have turned on 
your authentication settings: 

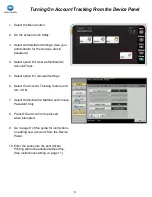
1.  At the device panel select the Menu 

button. 

2.  On the screen select Utility. 

3.  Select Administrator Settings and enter 

the admin password when prompted. 

4.  Select System Settings. 

5.  Select Restrict User Access. 

6.  Select Restrict Access to Job Settings. 

7.  Select Delete Other User Jobs and 

select Allow. Select OK to save the 
settings. 

Logout Confirmation Screen 

When any form of authentication is turned on the default setting is to ask users to confirm if they 
want to log out when they select the Access key once they are finished their tasks. You can turn off 
this confirmation screen to make it quicker for users to log out of their account when finished at the 
device. Follow the steps below to turn off the confirmation screen from the device panel. You can 
also turn off the confirmation screen using the web connection (see instructions at the end of pages 
7 or 8). 

1.  At the device panel select the Menu 

button. 

2.  On the screen select Utility. 

3.  Select Administrator Settings and enter 

the admin password when prompted. 

4.  Select User Authentication/Account 

Track. 

5.  Select User/Account Common Settings 

6.  Select Logout Confirmation Screen 

Display Setting and select OFF. Select 
OK to save the settings. 

Summary of Contents for bizhub Colour Series

Page 1: ...Account Tracking and User Authentication How To Guide For Konica Minolta bizhub Devices For the bizhub Colour Series...

Page 2: ...thentication with Public User Mode using the Web Connection 8 Adding Editing and Deleting User Accounts from the Device Panel 9 Adding Editing and Deleting User Accounts using the Web Connection 10 En...

Page 3: ...h alphanumeric passwords are also possible When to use User Authentication User Authentication is the only feature that will allow the use of the biometric scanner or card reader to authenticate User...

Page 4: ...s 7 Select Delete Other User Jobs and select Allow Select OK to save the settings Logout Confirmation Screen When any form of authentication is turned on the default setting is to ask users to confirm...

Page 5: ...cation Account Track 5 Select option 1 General Settings 6 Select the Account Tracking feature and turn it ON 7 Select Authentication Method and choose Password Only 8 Press OK and confirm to proceed w...

Page 6: ...e User Authentication Account Track menu select option 2 User Authentication Settings 10 Select User Registration 11 Screen 1 of 50 of accounts will be displayed Scroll up to the last page to find the...

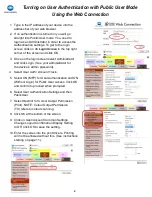
Page 7: ...nter the device s administrator password See your administrator for the password 4 Click on User Authentication Account Track 5 Select ON for Account Track and Password Only for Account Track Input Me...

Page 8: ...ick Login See your administrator for the device s admin password 4 Select User Auth Account Track 5 Select ON MFP for User Authentication and ON Without Login for Public User Access Click OK and confi...

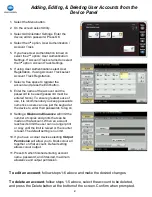
Page 9: ...e greatest ease of use it is recommended you keep passwords numeric so users can use just the keypad at the device to enter their passwords to log on 9 Setting a Maximum Allowance will limit the numbe...

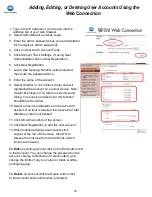
Page 10: ...device Note Output Permission TX refers to scanning and faxing The colour permission for this function should be left on Allow 10 Select a maximum allowance on the account if desired If no limit is re...

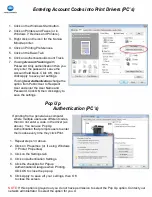
Page 11: ...ivers PC s 1 Click on the Windows Start button 2 Click on Printers and Faxes or in Windows 7 Devices and Printers 3 Right click on the icon for the Konica Minolta printer 4 Click on Printing Preferenc...

Page 12: ...word Only Authentication or your User Name and Password if using User Authentication 6 Click Save Setting then click OK Pop Up Authentication MAC s If printing from a general use computer where multip...

Page 13: ...Print Counter List 6 Select the paper size you would like to print the report on 13 Generating Reports for Account Tracking User Authentication From the Device Display 1 Press Start 2 The device will...

Page 14: ...e Counter and click on Export 6 Choose Account Track Counter and click OK 7 When prompted click Download 8 Choose Save File and select a location on your computer to save the file It will save as a Ta...

Page 15: ...dmin password 4 Select option 4 Account Track User Authentication 5 Select the third option Account Track Settings or the second option User Authentication Settings if using that feature 6 Select the...

Reviews: