Preparing to Use Crown Print
12
Preparing to Use Crown Print
Before you can use Crown Print , you need to:
Install Crown Print
Add a printer port
Configure the port
Automatic Installation
If you use the AutoInstaller (setup.exe) on the
Software Utilities
CD-ROM that
came with your printer, follow this procedure to automatically install Crown
Print and add a printer port.
1
Insert the
Software Utilities
CD-ROM in your PC’s CD-ROM drive.
If the AutoInstaller does not start automatically, double-click
setup.exe in the CD-ROM’s root directory.
2
In the Main Menu select Additional Software.
3
When prompted, in the Product list select Printer Management Utilities
and in the Setup Type drop-down box select Custom.
4
When prompted, select Crown Print .
5
Follow the instructions to install Crown Print and add a printer port.
6
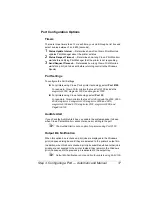
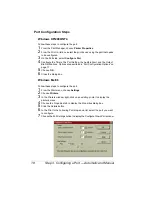
Skip to “Step 3. Configuring a Port — Automatic and Manual Installation”
on page 16 to configure the port you just added.
Manual Installation
You can also load Crown Print manually, using files from the
Soft-
ware Utilities
CD-ROM or downloaded from the Internet.
Step 1. Installing Crown Print
Manually
If you used the
Software Utilities
CD-ROM AutoInstaller (as described
in “Automatic Installation” above), this step is performed automatically
for you. Skip to “Step 3. Configuring a Port — Automatic and Manual
Installation” on page 16.
Use Crown Print files on the
Software Utilities
CD-ROM or go to our
web site at printer.konicaminolta.net/support. On the web site, choose Sup-
port & Drivers; select your printer; choose Drivers, PPDs, and Utilities;
choose your operating system; and scroll through the options to find Crown
Print .
Summary of Contents for Crown Print Monitor+
Page 1: ...Crown Print Monitor Administrator s Guide 1800722 001A ...
Page 5: ...Introduction ...
Page 11: ...Installation ...
Page 23: ...Troubleshooting ...


