background image

2. Initial Settings

4-12

Mi

s

c

e

llaneo

us

Ch

apte

r 4

System Settings

Description

Selection

Initial Setting

Auto Skew Cor-
rection Retain

Determines whether or not to retain the 
original (uncorrected) skew of a screen 
image after the print has been made.

Retained

Not 

retained

*

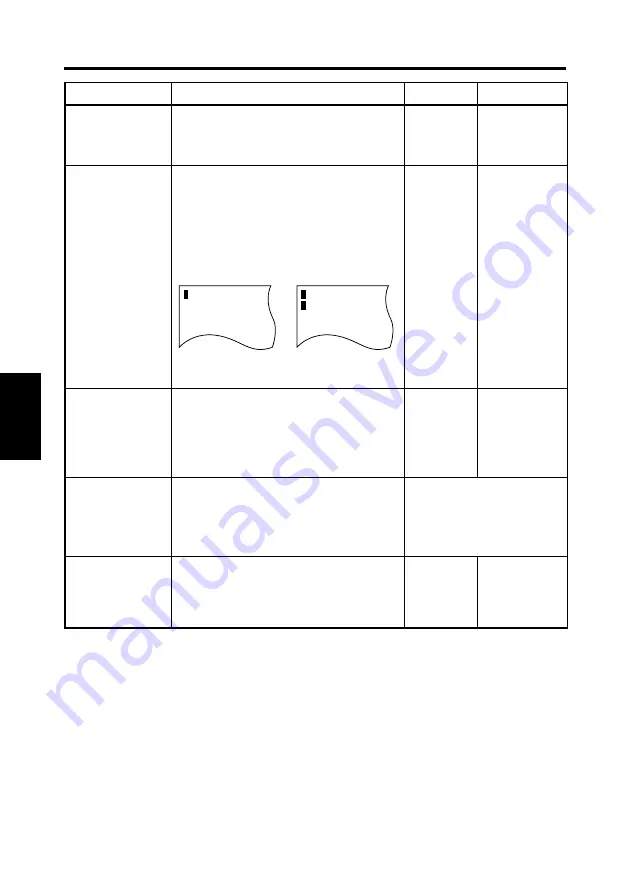
Unit ID Printing
(PR mode only)

When two scanners are connected to one 
printer, this function leaves an identifica-
tion marker on the print so that the scan-
ner used for the job can be determined 
after printing.

Disabled

*

Pattern 1

Pattern 2

Cycle print mode
(PR mode only)

This function automatically scans the 
next image following a preset period of 
time (the period can be set by an autho-
rized dealer). Images are set by the user 
onto the Carrier Glass in between cycles.

Enabled

Disabled

*

Paper Size of 
Paper Feeding 
Tray
(PR mode only).

Determines the desired paper size and the 
orientation from the Paper Feeding Tray 
of the printer.

Same as the setting for U4
of the User Mode. See page
4-8.

Contrast setting

To view subtle images with standard 
ranges of density clearly: Light (–1 - –7)
To bring out the darker and lighter ranges 
of an image: Dark (+1 - +7)

Lighter

Normal

*

Darker

Pattern 1

Paper

Pattern 2

Paper

Summary of Contents for MS6000 MKII

Page 1: ...0820 7732 01 0820 7732 01 CMYK 2004 6 konicaminolta com 30mm MS6000 MKII User s Guide...

Page 2: ......

Page 3: ...s it to automatically switch to a low power mode after a period of inactivity An ENERGY STAR product uses energy more efficiently saves you money on utility bills and helps protect the environment Onl...

Page 4: ...some parts of the contents of this section may not correspond with the purchased product Warning and Precaution Symbols Meaning of Symbols Ignoring this warning could cause serious injury or even dea...

Page 5: ...rce voltage Failure to do that could result in a fire or electrical shock Do not use a multiple outlet adapter to connect any other appli ances or machines Use of a power outlet for more than the mark...

Page 6: ...ately hot or emits smoke or unusual odor or noise Immediately turn OFF the power switch unplug the power cord from the power outlet and then call your authorized service representative If you keep on...

Page 7: ...o not place this product on an unstable or tilted bench or in a location subject to a lot of vibration and shock It could drop or fall causing personal injury or mechanical breakdown After installing...

Page 8: ...units PC drum units and other supplies and consumables in a place subject to direct sunlight and high temper ature and humidity as poor image quality and malfunction could result Do not attempt to re...

Page 9: ...surface of the toner unit developing roller and the PC drum as poor image quality could result Use the supplies and consumables recommended by the dealer Use of any supply or consumable not recommend...

Page 10: ...h the unit s operation and features Please keep this User s Guide and use it as a quick and handy reference tool for immediately clarifying any questions that may arise Please follow the instructions...

Page 11: ...device may not cause harmful interference and 2 this device must accept any interference received including interference that may cause un desired operation WARNING This equipment has been tested and...

Page 12: ...complies with the following EU directives 89 336 EEC 73 23 EEC and 93 68 EEC directives This declaration is valid for the area of the European Union EU only This device must be used with shielded int...

Page 13: ...iation Performance Standard according to the Radiation Con trol for Health and Safety Act of 1968 This means that the printer does not produce hazardous laser radiation CDRH Regulations The Center for...

Page 14: ...hjeessa mainitulla tavalla saattaa altistaa k ytt j n turvallisuusluokan 1 ylitt v lle n kym tt m lle lasers teilylle VARNING Om apparaten anv nds p annat s tt n i denna bruksanvisning specificerats k...

Page 15: ...Dersum apparatet brukes p annen m te enn spesifisert i denne bruksanvis ning kan brukeren utsettes for unsynlig laserstr ling som overskrider grensen for laser klasse 1 Dette er en halvleder laser Ma...

Page 16: ...of ozone is released This amount is not large enough to cause any adverse affects or harm However be sure the room where the machine is being used has adequate ventilation especially if you are print...

Page 17: ...Safety Information MSP 3000 Printer viii...

Page 18: ...anel Basic 2 5 Control Panel Shift Function 2 11 When Misfeed Call Tech Rep Code Lights up 2 13 4 Image Processing Functions 2 15 5 Printing Scanning 2 17 6 Selecting a Projection Lens 2 18 7 Replacin...

Page 19: ...between scanning operations 2 32 Operating in the Cycle Print Mode 2 33 19 Selecting the Connection Mode 2 34 20 Selecting the Resolution 2 35 21 Registering the Job Program 2 36 22 Calling the Job P...

Page 20: ...Control Panel 4 4 User Mode 4 5 Entering and Leaving the User Mode 4 6 Settings in Each User Mode Function 4 7 System Settings by the dealer 4 11 3 System Care 4 14 Cleaning the Scanner 4 14 Cleaning...

Page 21: ...Contents 4...

Page 22: ...apter 1 Safety Notes Chapter 1 This chapter provides precautions for use a description of the oper ating environment and conditions as well as instructions on how to turn the system ON and OFF Safety...

Page 23: ...window Power Source The power source voltage requirements are as follows Use a power source with minimal voltage fluctuation Power Source 50Hz 60Hz Voltage fluctuation within 10 Frequently fluctuatio...

Page 24: ...e should be a clearance of the following dimensions between the wall and the rear of the unit as well as it s right and left sides to provide ample space for the ventilation ports to dis sipate heat S...

Page 25: ...es Chapter 1 For ease of operation maintenance and replenishment of supplies the minimum clearance di agrammed below is required Install the unit in an area that allows easy access MSP 3000 Printer Pr...

Page 26: ...may however be created in poorly ventilated rooms during extensive printer operations For a comfortable healthy and safe operating environment it is recommended that the room be well ventilated Care...

Page 27: ...ful Tips If you load the film in the film carrier and press the start button while the printer is warming up you can scan and memorize the film image of about 9 pages Letter or A4 size 400dpi into thi...

Page 28: ...osition Press the Power Switch of the printer to the O OFF position NOTE The printer and scanner can be turned ON and OFF at the same time by employing a cord that is equipped with an on off switch sa...

Page 29: ...Auto Power Save 60 min Only the setting of Auto Power Save 15 min complies with the Energy Star standard NOTE The Auto Power Save Mode can also be disabled Ask the authorized Technical Representative...

Page 30: ...2 1 Chapter 2 Scanner Chapter 2 This chapter identifies different parts of the Scanner and explains its operation Scanner...

Page 31: ...tion Lens Single Lens Zoom Lens 7 5 9 16 13 27 23 50 Film Carrier Auto retrieval Controller FC 5 RFC 9B UC 2 RFC 21 22A RFC 15A MARS C 4 MARS MINI 2 RFC 15M Scanner Prism Unit Manual Frame Masking Kit...

Page 32: ...ective Printer Contact the authorized dealer in order to change the scanner that is connected to your printer PC Mode MS6000 MKII Personal Computer The Scanner is connected to a personal computer and...

Page 33: ...of the image on the Screen Fiche Carrier 5 Optional Supports the viewing of microfiche Projection Lamp Unit Contains are Mirror and Lens which projects the film image onto the Screen Connectors Provid...

Page 34: ...ontrol Panel Basic Auto Skew Correction Centering Fit Masking Print Mode Film Type Darker Auto Lighter Start Auto Photo Fine Text Nega Posi C Auto Manual Resolution Job Recall Zoom Zoom clr Zoom PC PR...

Page 35: ...th lengthwise and crosswise posi tions in the paper feeding tray and paper feed ing cassette Paper that best suits the format of the image on the screen will be used for print ing If you would like to...

Page 36: ...Auto Masking will automatically be enabled when Center ing is selected Centering Places a screen image that had been searched using Auto masking or an image that has been trimmed in the center of the...

Page 37: ...atically masked Masking Prints only the image outside of the area that is de fined on the Screen If Trimming is selected from the OFF state the previ ously entered settings for Centering Fit and Manua...

Page 38: ...key supports darker image density and the Lighter key supports lighter image density Exposure Mode Key Press to select between the Auto or Manual Exposure mode Exposure Display Indicates the current...

Page 39: ...tering or Fit 7 Masking 8 Auto Skew Correction 9 Horizontal Area setting 10 Vertical Area setting 11 Electrical Zoom 12 Resolution 13 Image Distortion Correction NOTE If you do not press the pinhole f...

Page 40: ...ol Panel Shift Function Auto Skew Correction Centering Fit Masking Print Mode Film Type Darker Auto Lighter Start Auto Photo Fine Text Nega Posi C Auto Manual Resolution Job Recall Zoom Zoom clr Zoom...

Page 41: ...ed together with the Shift Key the program registration locations 1J 2J and 3J are called Each time this key is pressed while the Shift Key is held down the display is switched in order of 1J 2J 3J Zo...

Page 42: ...ate Print function or call your Tech Rep for replacement of the battery The power to the printer is OFF or there is a problem with the connection of the interface cable to the printer Turn ON the prin...

Page 43: ...appears when two or more sheets of paper are taken up at the same time A misfeed near the paper take up section A misfeed near the Imaging Cartridge A misfeed near the Fusing Unit An aperture card mis...

Page 44: ...option is re quired Masking 1 Frame The system masks the center of the image appearing on the screen through the Manual Frame Masking Panel function The Manual Frame Masking Kit option is re quired Au...

Page 45: ...rized Technical Representative Image Zoom The system magnifies the screen image according to the size of paper being used The range of magnifica tion is 1 55x for Ledger 1 27x for Legal 1 41x for A3 a...

Page 46: ...ess the Auto Skew Correction key to have the skew of the image automatically corrected 5 Select either negative or positive printing See page 2 22 Select between negative or positive printing accordin...

Page 47: ...pe 3 23 to 50 This list shows the standard types of film and the recommended zoom ratios of lenses to be used with the unit The size and format of one frame of film may vary depending on the shoot ing...

Page 48: ...Unit into position along the Lens Guide Pull out the Brightness Select Lever and slide it to a position appropriate for the type of the Projection Lens loaded in the unit The lever should click into...

Page 49: ...creen into print size frame Marked on the Screen are the size frame markers corresponding to the paper size 8 1 2 11 or A4 Zoom the film image so that it fits inside the markers Focusing of the Screen...

Page 50: ...ob the faster the turning speed When the Image Rotation Knob is turned while holding down the Shift Key the image quickly rotates by 90 If the Auto Skew Correction Key is turned ON the system will aut...

Page 51: ...uld this occur the film type should be selected manually The system does not detect exterior conditions such as when the glass surface of the Carrier is dirty or scratched Nega negative film If negati...

Page 52: ...ER and DARKER keys are depressed at once the exposure level comes at the center Using Manual Exposure Depress the Exposure Mode Select Button as necessary to select the Manual Exposure mode The LED to...

Page 53: ...Number of Prints Set the desired number using the Multi Print Key NOTE This function is only available on the PR mode The number that can be entered is 19 max Correcting Entry To correct an entry dep...

Page 54: ...from the cassette 2 When the Tray and Cassette 1 indicators are both lit The standard magnification is fixed according to the selected size of the paper from the paper feeder For A3 B4 Ledger and Lega...

Page 55: ...OFF Lengthwise Prints the on screen lengthwise area Crosswise Prints the on screen crosswise area Light ON Lengthwise Prints the on screen crosswise area Crosswise Prints the on screen lengthwise area...

Page 56: ...ditions for Auto Masking A The image area of the screen must provide at least 45mm horizontally and vertically B The width of the frame to be masked must be at least 10mm NOTE If the film image on the...

Page 57: ...a on the screen that will be printed Vertical Area Clear Key Press to clear a previously specified vertical print scan area Horizontal Area Indica tion Panel Use to specify the horizontal print scan a...

Page 58: ...the currently selected paper size and print position NOTE It is possible to print the area specified by the green lights The lights which do not accord with the selected paper size and the print posi...

Page 59: ...scan area 1 Horizontal Area Clear Key 2 Vertical Area Clear Key Selecting Masking Press the manual Masking key to select Masking when you want to mask a given area of the image The basic operation fo...

Page 60: ...reen onto the entire surface of the print Centering Press the Centering Fit key to turn ON Centering and then press the Start key NOTE Centering Fit mode cannot be used if Masking is selected Fit Pres...

Page 61: ...setting Then you can perform the following operations NOTE This function is only available on the PR mode Specifying the interval between scanning operations Press the Multi Print Key to change the va...

Page 62: ...hes during the scanning and waiting operations The next scanning job can be started manually by pressing the Start key before the system automatically initiates the same job To pause an operation duri...

Page 63: ...the PC For the connection to the PC the optional interface kit is required Hold down the Shift Key and the PC PR Key together for over one second PC mode When the display is switched from Multi Print...

Page 64: ...r The present resolution is displayed Press the Resolution Key while holding down the Shift Key to set the resolution 800 dpi can only be selected when the width of scan area is less than 220mm Connec...

Page 65: ...m registration location press the Multi Print Key The display is switched in order of 1J 2J 3J 1J Select the program registration location 1J 2J or 3J and press the Memory Input Key again When all LED...

Page 66: ...program can be called Press the Shift Key and the Job Recall Key together Each time the Job Recall Key is pressed while the Shift Key is held down the display is switched in order of 1J 2J 3J When the...

Page 67: ...the magnification is increased by an increment of 0 01X up to 2 00X Zoom When the Zoom key is pressed together with the Shift Key the magnification is decreased by a decrement of 0 01X down to 0 50X N...

Page 68: ...fication is fixed according to the selected paper size NOTE When the Zoom magnification is changed the display is made in the Multi Print Display as follows When it is returned to the standard magnifi...

Page 69: ...umination of the screen can be adjusted Hold down the Shift Key and the Illumination Key together to adjust the illumination of the screen The screen is gradually darkened until it is turned OFF When...

Page 70: ...nd the print job will stop a blank piece of paper may be output depending upon the stage of the job Once the system detects that the Projection Lamp has burnt out the scan job will be cancelled If the...

Page 71: ...on Lamp and the Lamp Socket NOTE Do not touch the reflector mirror surface of the Projection Lamp Fingerprints smudges or debris should be wiped clean with a soft dry cloth Insert the new Projection L...

Page 72: ...3 1 Chapter 3 MSP 3000 Printer Chapter 3 This chapter identifies the different parts of the system and explains the MSP 3000 printer s operational procedures MSP 3000 Printer...

Page 73: ...sheets of standard paper Paper Guides Slide the guides to secure the paper stack Paper Feeding Tray Tray Capable of holding up to 150 sheets of standard size paper 8 1 2 11 11 17 8 1 2 14 or A3 B4 A4...

Page 74: ...g Unit Permanently fixes the image onto the sheet of paper Interface Connectors Facilitates connections for the Scanner The Printer has two connectors to facilitate connection with two separate Scanne...

Page 75: ...pe Plain and recycled paper weight 16 to 24 lbs 60 to 90 g m2 Size Standard sizes 11 17 8 1 2 11 8 1 2 14 or A3 B4 A4 Capacity Paper Feeding Tray 8 1 2 11 11 8 1 2 8 1 2 14 11 17 or A3 B4 A4 plain and...

Page 76: ...Feeding Tray Fan the paper stack thoroughly and align the edges Load the paper stack face up in the tray and adjust the Paper Guides to secure the paper stack NOTE Make sure that the paper stack does...

Page 77: ...fting Plate until it locks Fan the paper stack thoroughly align the edges and place the paper in the cassette Secure the paper stack in the Paper Cassette with the Paper Guides NOTE Make sure that the...

Page 78: ...before opening the Upper Unit Remove the old Imaging Cartridge from the printer Take a new Imaging Cartridge out of the box Holding it with both hands shake it well in the directions indicated by the...

Page 79: ...ntenance 3 8 MSP 3000 Printer Chapter 3 Slide the pins located on both sides of the Imaging Cartridge into the grooves of the printer as shown and gently push the Imaging Cartridge securely into place...

Page 80: ...CAUTION The Fusing Unit inside the printer becomes very hot during operation To avoid a burn be very careful not to touch it Clearing a Misfeed from the Paper Feeding Tray Open the Upper Unit by pull...

Page 81: ...Tray in before opening the Upper Unit Remove the Imaging Cartridge NOTE Be sure to cover the Imaging Cartridge with a heavy cloth to protect it from light when it is removed from the Printer Pull out...

Page 82: ...he Printer If the misfeed occurred before the sheet of paper entered the Fusing Unit gently pull the misfed sheet up and out as shown If the misfeed occurred after the sheet of paper entered the Fusin...

Page 83: ...t properly set Change the print density setting as necessary Toner in the Imaging Car tridge is running out Replace the Imaging Car tridge with a new one Dark image Print density is not properly set C...

Page 84: ...tion Uneven image density Toner in the Imaging Car tridge is not evenly distrib uted Remove the Imaging Car tridge shake it several times and replace Blank print The Printer has malfunc tioned Contact...

Page 85: ...MSP 3000 Printer Chapter 3 Memo...

Page 86: ...4 1 Chapter 4 Miscellaneous Chapter 4 This chapter contains the specifications of the unit as well as pro vides care and maintenance instructions Miscellaneous...

Page 87: ...n Carrier Rotation Microfiche Print Size 8 1 2 11 or A4 Crosswise 11 17 or A3 Lengthwise 8 1 2 11 or A4 Lengthwise 8 1 2 14 or B4 Lengthwise Power Consumption 350W Auto Power Save Mode Less than 6W 12...

Page 88: ...thwise Print Speed 20 sheets per minute 8 1 2 11 or A4 Crosswise First Print Time 13 seconds 8 1 2 11 or A4 Crosswise Warm up Time Less than 70 seconds Multiple Printing 1 19 sheets LED countdown iden...

Page 89: ...ttings on the Control Panel When any of these functions has been changed and you want to store that new setting in the system s memory press the Memory Input Key User Settings Initial Setting Remark E...

Page 90: ...on U3 Auto Power Save Used to set the time it takes the unit to be automat ically set into the Auto Power Save mode U4 Paper Feeding Tray Size Used to set the size and direction of the paper loaded in...

Page 91: ...t setting value Press the Exposure Adjustment key Darker or Lighter to select the specific setting value Pressing the Darker key selects the setting value in the following order d0 d1 Pressing the Lig...

Page 92: ...the Exposure Mode key to display d Press the Exposure Adjustment key Darker or Lighter to select the desired setting value Press the Start key to validate the setting value NOTE NOTE This setting ret...

Page 93: ...ction becomes available for setting only if the Energy Star Kit is mounted on the Scanner U4 Paper Feeding Tray Size The size and direction of the paper loaded in the Paper Feeding Tray can be set wit...

Page 94: ...al computer and an I F kit are necessary only when the overlay data is transmitted to the scanner U6 Year Month and Date Set Mode The print pattern for the Date Print function can be set with this fun...

Page 95: ...moves upward to select the currently validated setting mode in the following order month day hours minutes Each time the Lighter key is pressed on the other hand the lit Exposure Display moves downwa...

Page 96: ...Auto Power Save mode For USA and Canada 120V area the Auto Power Save mode becomes avail able only if the Energy Star Kit is mounted on the Scanner Enabled Disabled 200V 120V Printer Heater OFF PR mod...

Page 97: ...abled Pattern 1 Pattern 2 Cycle print mode PR mode only This function automatically scans the next image following a preset period of time the period can be set by an autho rized dealer Images are set...

Page 98: ...egree rota tion setting Enables the prism to rotate the screen image 90 degrees Enable Disable Automatic paper source switching PR mode only Allows you to specify the paper source when Letter or A4 si...

Page 99: ...rkers Dust the exterior panels of the Scanner with a soft dry cloth With a damp cloth clean and remove any dust or debris from the surface of the Carrier Glass NOTE NOTE Before cleaning the Carrier Gl...

Page 100: ...tervals NOTE Before cleaning the Printer turn OFF the power and unplug the cord from the power outlet Use a soft cloth and NEVER use abrasives or corrosive detergents Clean the exterior panels with a...

Page 101: ...Your Company Name Address Telephone Number Department Name Floor Number Unit Location etc 2 Model Name Serial Number Condition or System s Indication s on the Display etc For your reference purpose Mo...

Page 102: ...0820 7732 01 0820 7732 01 CMYK 2004 6 konicaminolta com 30mm MS6000 MKII User s Guide...

Reviews: