background image

Replacing the Drum Cartridge

54

Summary of Contents for PagePro 1350EN

Page 1: ...PagePro 1350EN User s Guide 4136 9562 01A 1800813 001B...

Page 2: ...NESS TECHNOLOGIES INC Notice KONICA MINOLTA BUSINESS TECHNOLOGIES INC reserves the right to make changes to this guide and to the equipment described herein without notice Considerable effort has been...

Page 3: ...nder this Agreement to an assignee of all of Licensee s right and interest to such Software and Documentation Assignee provided you transfer to Assignee all copies of such Software and Documentation A...

Page 4: ...t you will not export the Software in any form in violation of any applicable laws and regulations regarding export control of any countries For EU member states only This symbol means Do not dispose...

Page 5: ...or Functions 3 Continuing a Print Job after an Error Message 3 Printing a Test Page 3 Cancelling a Print Job 4 About the Software Utilities CD ROM 5 PCL Drivers 5 Utilities 5 System Requirements 7 Sel...

Page 6: ...dows 2000 Me 98SE NT 4 0 18 Using the PCL 5e Printer Driver 19 Common Buttons 19 OK 19 Cancel 19 Apply 19 Layout Tab Windows XP Server 2003 2000 19 Paper Quality Tab Windows XP Server 2003 2000 19 Adv...

Page 7: ...How do I refill the manual feed tray 35 Printing on Media 36 How do I load and print custom media 36 How do I load and print envelopes 36 How do I load and print labels 38 How do I load and print pos...

Page 8: ...cessories 73 Introduction 74 Antistatic Protection 74 Dual In Line Memory Module DIMM 75 Installing a DIMM 75 A Appendix 77 Safety Specifications 78 Technical Specifications 78 Printer 78 Consumables...

Page 9: ...Introduction...

Page 10: ...h them Front View 1 Top cover 2 Output tray 3 Control panel 4 Imaging cartridge Toner cartridge plus Drum car tridge 5 Front cover 6 Tray 1 7 Tray cover 8 Paper guides for manual feed tray 9 Manual fe...

Page 11: ...e is no more paper in the tray When paper of a different format than that set in the printer driver was fed into the printer 1 Check that one of the above errors has occurred 2 Perform the remedial ac...

Page 12: ...ess press the Cancel key three times See also Printing Special Pages on page 24 Cancelling a Print Job You can cancel a print job that is currently being processed 1 While data is being processed or p...

Page 13: ...work settings can be accessed For details refer to the PageScope Net Care Quick Guide on the Utilities Documentation CD ROM PageScope Web Connection With a Web browser the status of printers can be ch...

Page 14: ...peer printing refers to printing direcly to a device on the network instead of through the Server For details refer to the Peer to peer Printing Tool User s Guide on the Utili ties Documentatioin CD...

Page 15: ...mmended Windows Server 2003 Windows 2000 Service Pack 4 or later Win dows Me Windows 98SE Windows NT 4 0 Service Pack 6 Free hard disk space Approximately 20 MB of free hard disk space for printer dri...

Page 16: ...the Printers directory Right click the KONICA MINOLTA PagePro 1350EN or KONICA MINOLTA PagePro 1350EN 5e printer icon and choose Printing Preferences 2 Select the default settings for your printer suc...

Page 17: ...driver if necessary 1 Close all applications 2 From the Start menu choose Programs Windows XP All Programs then KONICA MINOLTA PagePro 1350EN and then KONICA MINOLTA PagePro 1350EN Uninstall 3 Confir...

Page 18: ...Uninstalling the Printer Driver 10...

Page 19: ...Working with the PCL 6 Printer Driver...

Page 20: ...1350EN printer icon 5 To display the printer driver settings from the File menu click Printing Preferences Displaying Settings under Windows 2000 Me 98SE NT 4 0 1 From the Start menu point to Setting...

Page 21: ...ges made Cancel Click to exit the Properties dialog box without saving any changes made Apply Click to save all changes without exiting the Properties dialog box Help Click to view online help Easy Se...

Page 22: ...izes Fit printed documents to a specified media size Select the output media size Scale enlarge reduce documents Adjust the printing position Specify the number of copies Turn on off the printer s sor...

Page 23: ...Printer Driver 15 Device Options Setting Tab The Device Options Setting tab allows you to Specify the total amount of memory installed in the printer View version and copyright information about the...

Page 24: ...Using the PCL 6 Printer Driver 16...

Page 25: ...Working with the PCL 5e Printer Driver...

Page 26: ...350EN 5e printer icon 5 To display the printer driver settings from the File menu click Printing Preferences Displaying Settings under Windows 2000 Me 98SE NT 4 0 1 From the Start menu point to Settin...

Page 27: ...dialog box without saving any changes made Apply Click to save all changes without exiting the Properties dialog box Layout Tab Windows XP Server 2003 2000 The Layout tab allows you to Specify the or...

Page 28: ...Properties 3 Click the Device Settings tab The Device Settings tab allows you to view and change the setup of the printer and its options To change a setting select the item that you want to change a...

Page 29: ...eatures are organized in a tree format with three main branches Paper Output Graphic and Document Options To change the setting for a feature first select the feature in the top window and then select...

Page 30: ...Using the PCL 5e Printer Driver 22...

Page 31: ...Working with the Status Display...

Page 32: ...g the Status Display Use one of the following steps to open the Status Display Windows XP Server 2003 Choose Start All Programs then KONICA MINOLTA PagePro 1350EN and then KONICA MINOLTA PagePro 1350E...

Page 33: ...e is not available Specify whether Tray 1 is to be used as a multipurpose tray or as a tray set to a single media size Printer Setting Tab USB and Parallel The Printer Setting tab allows you to Specif...

Page 34: ...the current opera tional status of the printer How to recover Provides you with explanations of what you need to do in order to correct problems and recover from error conditions Warning Status Displa...

Page 35: ...The Status Display identifies which printer has an error and what type of error has occurred Closing the Status Display To close the Status Display from the File menu choose Exit If you click the X b...

Page 36: ...Closing the Status Display 28...

Page 37: ...Using Media...

Page 38: ...2 69 UK Quarto 203 254 8 10 Foolscap 203 330 8 13 G Letter 203 267 0 8 10 5 G Legal 216 330 8 1 2 13 Chinese 16K 185 0 260 0 7 3 10 2 Chinese 32K 130 0 185 0 5 1 7 3 16K 195 270 7 3 4 10 3 4 B5 ISO 17...

Page 39: ...ot adhere well to moist or wet paper On the other hand media that has been stored for a long time without staying in its packaging may dry up too much and also cause jamming Direct sunlight Excess hea...

Page 40: ...itive Special media designed specifically for inkjet printers superfine paper glossy paper glossy film postcards etc Media that has already been printed with An inkjet printer A monochrome or color la...

Page 41: ...early and without distortion Page Margins Margins are set through your application Some applications allow you to set custom page sizes and margins while others have only standard page sizes and margi...

Page 42: ...side up in the tray A maximum of 250 sheets 75 g m2 20 lb plain paper can be loaded If media is loaded past the media limit mark it may not be fed correctly Load letterhead with the side to be printed...

Page 43: ...r must be fed in one at a time 1 Make sure that the tray cover is properly attached to Tray 1 2 Open the paper guides 3 Insert the sheet of paper as far as possible into the manual feed tray with the...

Page 44: ...Tray 1 4 Adjust the paper guides to the width of the custom media Note Improperly adjusted guides may cause poor print quality media jams or printer damage 5 Print the custom media How do I load and...

Page 45: ...nvelope Paper tab Original Document Size option 3 Remove the tray cover from Tray 1 Place the envelopes on a flat surface and flatten them by pressing down the corners 4 Flex the envelope stack includ...

Page 46: ...glue avoids this problem How do I load and print labels A label consists of a face sheet the printing surface adhesive and a carrier sheet The face sheet must follow the plain paper specification The...

Page 47: ...abel media Note Improperly adjusted guides may cause poor print quality media jams or printer damage 5 Print the labels How do I load and print postcards Do not use postcards that are Coated Warped or...

Page 48: ...rformance and to ensure that the image does not shift Do not use thick stock that is Mixed with any other media in the media trays as this will cause printer jamming Note Do not mix thick stock with a...

Page 49: ...oading only 1 10 sheets Do not use transparencies that Are coated such as transparencies designed for color printers or copiers Have static electricity that will cause them to stick together Use trans...

Page 50: ...In the printer driver Setup tab Duplex Booklet option select the appro priate setting from Short Edge Binding Long Edge Binding Booklet Left Binding or Booklet Right Binding 2 From the print dialog b...

Page 51: ...Replacing Consumables...

Page 52: ...r cartridge part numbers on the consum ables reorder label on the inside of the front cover of your printer Note If a toner cartridge used is of an unapproved type cleaning will be performed after eac...

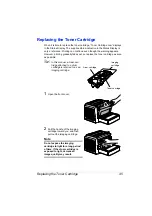
Page 53: ...inting gradually fades out so replace the toner cartridge as soon as possible In this manual a toner car tridge attached to a drum cartridge is referred to as an imaging cartridge 1 Open the front cov...

Page 54: ...eplacing the Toner Cartridge 46 3 Move the lever on the toner car tridge in the direction of the arrow 4 Using both hands separate the toner cartridge and drum car tridge Drum cartridge Toner cartridg...

Page 55: ...dge and drum cartridge keep them level Do not touch the OPC drum under the flap of the drum cartridge otherwise decreased image quality may result Do not touch any metal parts of the drum cartridge an...

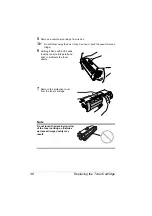
Page 56: ...e used to pack the used toner car tridge 6 Holding it firmly with both hands rock the toner cartridge left and right to distribute the toner evenly 7 Remove the protective cover from the toner cartrid...

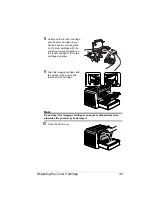
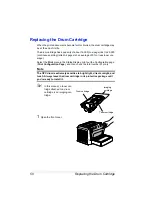
Page 57: ...rum cartridge with the matching colored projection on the toner cartridge to fit the two cartridges together 9 Align the imaging cartridge with the guides in the printer and then insert the cartridge...

Page 58: ...s toner cov erage Select the Print menu in the Status Display print out the Configuration page Print Configuration Page and then check the total number of prints Note The OPC drum is extremely sensiti...

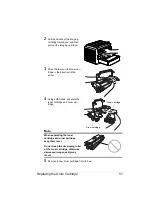
Page 59: ...tridge in the direction of the arrow 4 Using both hands separate the toner cartridge and drum car tridge Note When separating the toner cartridge and drum cartridge keep them level Do not touch the d...

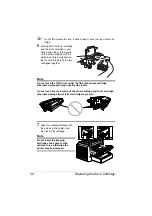
Page 60: ...ridge to fit the two cartridges together Note Do not touch the OPC drum under the flap of the drum cartridge otherwise decreased image quality way result Do not touch any metal parts of the drum cartr...

Page 61: ...Replacing the Drum Cartridge 53 8 Press on the front cover grip and close the front cover...

Page 62: ...Replacing the Drum Cartridge 54...

Page 63: ...Maintaining the Printer...

Page 64: ...eaning solutions directly on the printer s surface the spray could penetrate through the air vents of the printer and damage the internal circuits CAUTION Do not spill water or detergent into the prin...

Page 65: ...ng cartridge toward you and then pull out the imaging cartridge Note Do not expose the imaging cartridge to light for a long period of time If the drum cartridge is exposed to light decreased image qu...

Page 66: ...with a soft dry cloth 5 Align the imaging cartridge with the guides in the printer and then insert the cartridge Note Do not insert the imaging cartridge at an angle or with extreme force otherwise t...

Page 67: ...Troubleshooting...

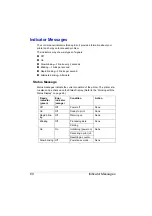
Page 68: ...linking Alternate Status Message Status messages indicate the current condition of the printer The printer sta tus also can be checked on the Status Display Refer to the Working with the Status Displa...

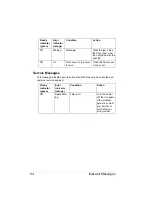
Page 69: ...oner near empty Prepare the toner cartridge On Blinking Toner empty Replace the toner cartridge On Rapid blink ing End of toner cartridge service life Replace the toner cartridge No toner cartridge is...

Page 70: ...n 5 seconds to cancel the print job Decrease the amount of data to be printed for exam ple by decreasing the resolution or by print ing only a few pages at a time and then try printing again If that d...

Page 71: ...ay and then press the Cancel button less than 5 seconds Waiting for the Manual Duplex Reload the media so the second side can be printed and then press the Cancel but ton less than 5 sec onds Refer to...

Page 72: ...ront cover and then continue with the print job Off On Front cover or top cover is open Close the front cover or top cover Ready indicator green Error indicator orange Condition Action Off Rapid blink...

Page 73: ...1 Open the front cover 2 Pull the handle of the imaging cartridge toward you and then pull out the imaging cartridge Note Do not expose the imaging cartridge to light for a long period of time otherw...

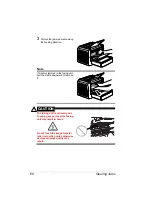
Page 74: ...If media is jammed in the fusing unit pull the media downward to remove it CAUTION The fusing unit is extremely hot Touching any part near the fusing unit may result in burns Do not touch the image tr...

Page 75: ...gn the imaging cartridge with the guides in the printer and then insert the cartridge Note Do not insert the imaging cartridge at an angle or with extreme force otherwise the printer may be damaged 5...

Page 76: ...and check it for damage Replace the toner cartridge if necessary Your printer may require servicing Contact your local vendor or refer to the General Information Guide Print too light The toner cartr...

Page 77: ...d inside the toner cartridge Remove the toner cartridge and shake it left and right a few times to distribute the remain ing toner The toner cartridge may be defective Remove the toner cartridge and c...

Page 78: ...irty Contact your local vendor Toner smudges The toner may be unevenly distributed inside the toner cartridge Remove the toner cartridge and shake it left and right a few times to distribute remaining...

Page 79: ...Installer shows up cancel it 4 Connect the USB cable with the printer Now the New Hardware Found wizard shows up Windows Me Proceed with step 5 Windows 98SE Wait until the Add New Hardware wizard scre...

Page 80: ...ation and then click on Finish You have now installed the USB Printing Support driver this is not the printer driver 8 The New Hardware Found wizard shows up for a second time Wait until the second Ad...

Page 81: ...Installing Accessories...

Page 82: ...is of equipment as on the back of a computer that is plugged in but turned off Never attach the wrist strap to any piece of equipment with an electrical current present Turn off all power switches fir...

Page 83: ...lation of an additional DIMM Additional memory must be 128 MB DIMM Your printer comes with one available DIMM slot Installing a DIMM Note It is very important to protect the printer controller board a...

Page 84: ...of this panel out and then slide the panel up to remove it 6 Insert the new DIMM straight into the DIMM connector until the latches snap into the locked position Move the left side of this panel out a...

Page 85: ...Appendix...

Page 86: ...class B GB 17625 1 Australian model AS NZS 3548 class B Type Desktop laser beam printer Print system Electrostatic dry powder imaging system Exposure system Laser diode polygon mirror scanning Develo...

Page 87: ...1 250 sheets Manual feed tray 1 sheet Output capacity Output tray 100 sheets Operating temperature 10 to 35 C 50 to 95 F Operating humidity 15 to 85 Power supply 220 240 V 50 60 Hz Power consumption 2...

Page 88: ...t Cartridge Standard Capacity Average Cartrdige Yield 3 000 standard pages Replacement Cartridge High Capacity Average Cartridge Yield 6 000 standard pages Declared yield value in accordance with ISO...

Page 89: ...Technical Specifications 81...

Page 90: ...Technical Specifications 82...

Page 91: ...Cleaning Exterior 56 Pick up Roller 57 D Drum cartridge Replacing 50 Dual in line memory modules 75 Duplex 42 E Electrostatic discharge 74 I Indicator 3 Error messages 62 Service messages 64 Status me...

Page 92: ...tab 14 20 21 Setting 12 18 Setup tab 14 20 25 26 Printing Envelope 36 Label 38 Postcard 39 Thick stock 40 Transparency 41 Q Quality tab 14 20 21 S Setup tab 14 20 25 26 Static electricity discharge 7...

Reviews: