background image

Page GB-6  Safety

– Only operate the side burner with the 

permissible size of cookware, not 
larger/smaller or without). This can 
cause burns.

– Do not operate/load the side burner 

with more than the permitted weight, 
this may cause damage to the appli-
ance and injury.

– Always open the hood fully before ignit-

ing.

– Do not lean over the cooking area!
– Never leave the hot grill unattended 

after cooking.

– Only clean the grill when the unit has 

cooled down completely.

– It is best to clean your appliance, espe-

cially grease deposits, immediately 
after the grill has cooled down: grease 
splatter can then still be easily 
removed, this saves more intensive 
cleaning later and protects the sur-
faces.

– Wear suitable clothing. Long, loose-fit-

ting sleeves will catch fire easily!

– When cooking, always wear protective 

gloves.

Risk of injury!

– The appliance is heavy and bulky. Seek 

the help of another person during trans-
port, installation and assembly.

– Sheet metal parts can have sharp 

edges. Be careful during assembly and 
wear protective gloves.

– Do not operate/load the side tray with 

more than the permitted weight, this 
may cause damage to the appliance 
and injury.

Dangers for children and people with 
limited physical, sensory or mental 
capacity!

– This product is not intended to be used 

by persons (including children) or who 
are limited in their physical, sensory or 
mental capacities or who lack experi-
ence and/or knowledge of the product 
unless they are supervised, or have 
been instructed on how to use the prod-
uct, by a person responsible for their 
safety.

– Children shall not play with the appli-

ance.

– Cleaning and user maintenance shall 

not be made by children without super-
vision.

– Ensure that children do not have 

access to the appliance when unsuper-
vised.

NOTE

Risk of damage to health

– To protect against bacteria that may 

cause illness, ensure that the food is 
kept chilled or frozen. Defrost frozen 
items in the fridge or in the microwave. 
Store raw meat and fish away from 
other foodstuffs. Wash everything that 
comes into contact with raw meat or 
fish. Cook the food well, and chill any 
leftovers immediately.

Possible damage to property!

– Do not use sharp or pointed objects to 

unpack the appliance.

Summary of Contents for 70415316

Page 1: ...SJX2002A Anleitung Version wT 00033 220810 Bestell Nr 70415316 Nachdruck auch auszugswei se nicht gestattet Gebrauchsanleitung Gasgrill Basic ...

Page 2: ...übersicht DE 23 Wartungsübersicht DE 23 Brenner und Venturi reinigen DE 24 Grill lackieren DE 27 Aufbewahrung Transport DE 29 Aufbewahrung im Freien DE 29 Aufbewahrung in geschlossenen Räumen DE 29 Transport DE 29 Retoure DE 29 Fehlersuchtabelle DE 30 Technische Daten DE 31 Umweltschutz DE 33 Gerät entsorgen DE 33 Gasflasche entsorgen DE 33 Unser Beitrag zum Schutz der Ozonschicht DE 33 Service DE...

Page 3: ...hnet eine Gefährdung mit einem mittleren Risiko grad die wenn sie nicht vermieden wird den Tod oder eine schwere Verletzung zur Folge haben kann VORSICHT Dieser Signalbegriff bezeichnet eine Gefährdung mit einem niedrigen Risiko grad die wenn sie nicht vermieden wird eine geringfügige oder mäßige Verletzung zur Folge haben kann HINWEIS Dieser Signalbegriff warnt vor möglichen Sachschäden Dieses Sy...

Page 4: ...im Freien lagern Schützen Sie Gasflaschen vor direkter Sonneneinstrahlung Niemals rostige oder verbeulte Gasfla schen oder Flaschen mit einem beschädigten Ventil verwenden Gasflaschen immer stehend verwen den niemals hinlegen Niemals versuchen das Gasventil oder den Druckregler zu zerlegen Gasschläuche nie direkter Sonnenein strahlung aussetzen oder in Kontakt mit erhitzten Flächen kommen lassen B...

Page 5: ...rn und oder die Gültigkeitsdauer über schritten ist Die Art der Schlauchleitung mit der das Gerät an die Gasflasche angeschlos sen wird ist vom Hersteller vorgege ben Die max Länge von 1 5 m darf nicht überschritten werden Vom Hersteller versiegelte Bauteile dürfen unter keinen Umständen mani puliert werden Niemals Holzkohle oder andere Brenn stoffe in einem Gasgrill verwenden Legen Sie die Grillk...

Page 6: ...tfernen Sie diese vollständig Entfernen Sie übermäßiges Fett vom Grillgut um einen Fettbrand zu vermei den Seitenbrenner nur mit der zulässigen Größe an Kochgeschirr betreiben nicht größer kleiner oder ohne Kann zu Ver brennungen führen Seitenbrenner nicht mit mehr als dem erlaubten Gewicht betreiben belasten dies kann zu Schäden am Gerät und zu Verletzungen führen Haube vor dem Anzünden immer vol...

Page 7: ...e len Reinigung und Benutzer Wartung dür fen nicht von Kindern ohne Beaufsichti gung durchgeführt werden Sicherstellen dass Kinder keinen Zugriff auf das Gerät haben wenn sie unbeaufsichtigt sind HINWEIS Risiko von Gesundheitsschäden Um sich vor Bakterien zu schützen die Krankheiten verursachen können bewahren Sie das Grillgut gekühlt oder tiefgekühlt auf Tauen Sie tiefgekühltes Grillgut im Kühlsc...

Page 8: ...häuse seit lich 2 7 Hinteres Bein links 1 8 Hinteres Bein rechts 1 9 Vorderes Bein links 1 10 Vorderes Bein rechts 1 11 Vordere Textilabdeckung 1 12 Ablage unten 1 13 Radachse 1 14 Rad 2 15 Radabdeckung 2 16 Seitenbrenner 1 17 Ölwanne 1 18 Gasregler 1 19 Gasschlauch 1 A M6 10 mm 34 B Unterlegscheibe 2 C Federstecker 2 19 18 1 2 3 4 16 8 10 13 14 15 6 7 9 5 11 12 17 C A B ...

Page 9: ... alle Verpackungsteile Kunststoffprofile Klebestreifen und Schaumpolster 3 Prüfen Sie ob die Lieferung vollständig ist 4 Kontrollieren Sie ob das Gerät Trans portschäden aufweist 5 Sollte die Lieferung unvollständig sein oder das Gerät einen Transportschaden aufweisen nehmen Sie Kontakt mit Ihrem Versandhaus auf siehe Service auf Seite DE 34 ...

Page 10: ...t kann zu Verletzungen führen Das Gerät ist schwer und unhandlich Beim Transport die Hilfe einer weiteren Person in Anspruch nehmen HINWEIS Beschädigungsgefahr Unsachgemäßer Umgang mit dem Gerät kann zu Beschädigungen führen Zum Auspacken keine scharfen oder spitzen Gegenstände verwenden Benötigtes Werkzeug Das benötigte Werkzeug ist nicht im Lieferumfang enthalten Grill montieren VORSICHT Schnitt...

Page 11: ...Montage Seite DE 11 A x 12 6 7 9 12 6 8 A 10 A A 1 A x 8 5 5 A A 2 ...

Page 12: ...Seite DE 12 Montage 13 14 15 B C B x 2 C x 2 3 11 4 ...

Page 13: ...Montage Seite DE 13 A x 4 3 A A 5 16 4 A x 10 A A A A 6 ...

Page 14: ...Seite DE 14 Montage 20 Seitenbrenner Gasschlauch 21 Seitenbrenner Verbindung 22 Seitenbrenner Zündkabel 20 22 21 7 2 8 ...

Page 15: ...Montage Seite DE 15 1 18 9 10 ...

Page 16: ...zel ner Adapter enthalten um eine direkte Ver bindung zwischen Schlauch Druckregler und dem Gasgrill herzustellen Vor dem Anschließen des Schlauches das Verbindungsstück und die Gummi ringe kontrollieren Bei etwaigen Anzei chen von Sprüngen Rissen oder Ver schleiß muß der Schlauch ausgetauscht werden Während des Gebrauchs den Schlauch nicht quetschen biegen oder verdrehen Verwenden Sie eine Schlau...

Page 17: ...asche Stellen Sie die Gasflasche auf flachem und ebenem Boden in der Nähe des Grills ab niemals im Schrank unter dem Gerät Achten Sie darauf den Schlauch dabei nicht zu beschädigen WARNUNG Explosionsgefahr Die Gasflasche darf nicht im Inneren des Grills aufgestellt werden Zugänge zum Grill und insbesondere der Gasflasche immer freihalten Fluchtwege offen halten HINWEIS Der Gasschlauch darf höchste...

Page 18: ...ichtigkeitsprüfung dür fen sich keine Zündquellen in der Nähe befinden Nicht rauchen Poröse oder beschädigte Schlauchlei tungen und Armaturen müssen unbe dingt ausgetauscht werden Überwurfmutter B und Anschlussge winde D des Schlauches E mit Seifen lauge bestreichen Öffnen Sie die Gasflasche A Wenn sich Blasen bilden ist die Verbin dung nicht dicht Beseitigen Sie die Leck stelle und führen Sie die...

Page 19: ...itshinweise Überprüfen Sie den sicheren Zustand des Gerätes Prüfen Sie ob es sichtbare Defekte gibt Prüfen Sie ob alle Teile des Gerätes fest montiert sind Überprüfen Sie alle Gasanschlüsse auf Dichtigkeit Überprüfen Sie ob alle Drehregler auf AUS stehen Öffnen Sie die Grillhaube vollständig Anzünden WARNUNG Verbrennungsgefahr durch möglichen Fettbrand Ein Fettbrand kann zu ernsthaften Sach und Pe...

Page 20: ...r Fehlersuchta belle auf Seite DE 30 Zum Anzünden der direkt neben dem entzündeten Brenner liegenden Brenner den entsprechenden Drehregler drücken und auf die Position große Flamme stel len Die Flamme springt selbsttätig über Flammhöhe einstellen Drehen der Regler gegen den Uhrzeiger sinn kleine Flamme Drehen der Regler im Uhrzeigersinn große Flamme Zu große flackernde Flammen und Flam men mit gel...

Page 21: ...t Verwenden Sie nur sparsam eingeöltes Grillgut und lassen Sie es vor dem Grillen ausreichend abtropfen Direktes Grillen Das Grillgut wird auf dem Grillrost direkt über den Brennern mit hohen Temperaturen gegrillt Indirektes Grillen Beim indirekten Grillen wird das Grillgut nicht direkt über sondern seitlich auf dem Grillrost neben den Brennern mit niedrige ren Temperaturen schonend gegart Das Gri...

Page 22: ...rkaltet ist Reinigen Sie Ihr Gerät insbesondere von Fettanhaftungen am besten gleich nach dem Erkalten des Grills Fettsprit zer lassen sich dann noch leicht lösen dies erspart späteres intensiveres Rei nigen und schont die Oberflächen Schalten Sie alle Brenner ab und schlie ßen Sie das Flaschenventil Lassen Sie den Grill vollständig abküh len bevor Sie ihn reinigen und den Deckel wieder schließen ...

Page 23: ...Stahlbors ten Sie können den Rost auch herausnehmen und mit Wasser und Seife ab waschen Benutzen Sie keine scharfen Gegenstän de oder aggressiven Reini gungsmittel Bestreichen Sie den Grillrost mit etwas Pflanzenöl um Korrosion zu vermeiden Fett schubla de reini gen Fettschublade nach jedem Gebrauch mit Küchenpa pier auswischen und mit Seifenwasser reinigen Be nutzen Sie keine scharfen Gegenstände...

Page 24: ... Spinnen bauen mit Vorliebe Nester im Brenner oder im Venturi Die dadurch verursachten Blockaden min dern die Leistung z B kleine Flamme der Brenner entzündet sich möglicherweise nicht oder es kommt zu einem Feuer im Brenner Es breitet sich Gasgeruch aus weil das Gas nicht in den Brenner gelangen kann Wenn das Gas nach vorne austritt kann es dort zu einem Feuer kommen Hauptbrenner ausbauen Zur Rei...

Page 25: ...Pflege und Wartung Seite DE 25 3 4 5 ...

Page 26: ...en Reinigung eines blockierten Brenners oder Venturis Schauen Sie mit einer Taschenlampe in den Brenner und prüfen Sie ob er ver stopft ist Durchstoßen Sie die Düse mit einer dün nen Nadel oder einem anderen geeigne ten Gegenstand um die Blockierung zu beheben Prüfen Sie erneut mit der Taschenlampe ob alle Hindernisse entfernt wurden 1 2 3 ...

Page 27: ...Grill eingebrannt werden Grill lackieren Wenn die Lackierung des Grills nach länge ren Zeitraum nicht mehr ansehnlich ist kön nen Sie diese folgendermaßen erneuern HINWEIS Erneuern Sie die Lackierung nur auf den Außenflächen und nicht auf Edelstahlflä chen Vorbereitung Verwenden Sie zur Reinigung nur heißes Wasser und einen Schwamm oder eine Grillbürste Verzichten Sie beim Reinigen auf Zusätze wie...

Page 28: ...die Gebrauchsanweisung des Lackherstellers und beachten Sie alle Sicherheitshinweise Lack immer gemäß Anleitung des Lack herstellers verwenden Tragen Sie 3 bis 5 Lackschichten auf Vor dem Auftragen jeder weiteren Lack schicht muss die vorherige Schicht voll ständig getrocknet sein ...

Page 29: ...t bis zum Boden reichen Abdeckung an sonnigen Tagen zum Lüf ten auch bei Nichtgebrauch des Grills entfernen Aufbewahrung in geschlossenen Räumen Sollten sie den Grill in einem geschlosse nen Raum aufbewahren so ist die Gas flasche zu entfernen und im Freien zu lagern Transport Beim Transport von Gasflaschen sind die länderspezifischen Vorschriften zu beachten Retoure Heben Sie mindestens für die D...

Page 30: ... reini gen auf Seite DE 24 Zündung funktioniert nicht Brenner manuell zünden Manuelles Anzün den auf Seite DE 20 Starkes Aufflam men und Brennen an den Flammen verteilern Flammenverteiler stark verschmutzt Flammenverteiler reinigen Grillgut sehr fettig Grillgut abtropfen lassen oder trocken tupfen Grillgut mit hohem Fettanteil bei kleiner Hitze zubereiten um ein Entzünden zu vermeiden Temperatur z...

Page 31: ...ductZ GmbH Werner Otto Straße 1 7 22179 Hamburg Germany Marke Konifera Modell Gasgrill Basic Type SJX2002A Gerätekategorie I3B P 50 Referenzgas G31 Propan G30 Butan oder dessen Mischung Gasdruck 50 mbar Injektorgröße Hauptbrenner 2 ø0 75 mm Injektorgröße Seitenbrenner 1 ø0 75 mm Wärmeeinbringung Gesamtwärmeein bringung 3 0 2 3 0 9 0 kW Gasverbrauch Max Propan Butan 643 g h 655 g h Zündung Integrie...

Page 32: ... Belastung Seitenablage 1 5 kg max Belastung Seitenbrenner inkl Topf oder Pfanne 1 5 kg max Größe Topf Pfanne Seitenbrenner 24 cm min Größe Topf Pfanne Seitenbrenner 8 cm Abmaße 96 5 53 5 101 cm Gewicht 12 6 kg Grillfläche 42 5 41 cm ...

Page 33: ...hr die Sie nicht zurückerhalten wenn Sie die Gasflasche nicht mehr benötigen Wenn Sie den Flascheninhalt verbraucht haben können Sie die Flasche beim Händler gegen eine befüllte eintauschen In der Nutzungsgebühr sind die Kosten für Wartung und Prüfung der Flasche enthalten Nicht mehr benötigte Gasflaschen gehören nicht in den Hausmüll sondern müssen vorschrifts mäßig entsorgt werden Bringen Sie le...

Page 34: ...der die Produktberatung Ihres Versandhau ses Bitte beachten Sie sind für den einwandfreien Zustand des Geräts und die fachgerechte Benutzung im Haushalt verantwortlich Für diesen Artikel gilt die gesetzliche Gewährleistung von 24 Monaten Die folgenden Reklamationen werden nicht anerkannt Schäden am Brenner da Brenner Verschleißteile sind Schäden am Gerät und anderen Gegenständen die durch Brände e...

Page 35: ...Service Seite DE 35 ...

Page 36: ......

Page 37: ...SJX2002A Manual version wT 00033 220810 Order no 70415316 Reproduction even of ex cerpts is not permitted User manual Gas grill Basic ...

Page 38: ...B 21 Care and maintenance GB 22 Cleaning overview GB 22 Maintenance overview GB 22 Clean burner and venturi GB 22 Painting the barbecue GB 26 Storage transportation GB 27 Storing outside GB 27 Storing in closed rooms GB 27 Transport GB 27 Returns GB 27 Troubleshooting table GB 28 Technical data GB 29 Environmental protection GB 31 Disposal of the appliance GB 31 Disposing of gas tanks GB 31 Our co...

Page 39: ...ible dam age to property This symbol refers to useful additional information Explanation of symbols Safety notices In this chapter you will find general safety notices which you must always observe for your own protection and that of third parties Please also pay attention to the warnings in individual chapters on installa tion and operation etc Improper assembly of the grill can cause hazards Fol...

Page 40: ...ity Do not smoke Inspect the gas hose for cracks or dam age before each use Porous or damaged hoses and fittings must be replaced Only use outdoors Turn off the gas supply at the gas con tainer after use Use only commercially available regu lators and hoses commonly used with gas barbecues Ventilation openings of the gas tank installation room must never be closed Before changing the gas tank allo...

Page 41: ...om heated surfaces Set up the barbecue in a safe level location before using it For appliances with castors prevent the appliance from moving from its place Always lock lockable castors Place barbecue as protected from the wind as possible Children and animals may not be allowed in the vicinity of the grill unless supervised Be particularly careful when igniting Provide suitable fire extinguishing...

Page 42: ...y and wear protective gloves Do not operate load the side tray with more than the permitted weight this may cause damage to the appliance and injury Dangers for children and people with limited physical sensory or mental capacity This product is not intended to be used by persons including children or who are limited in their physical sensory or mental capacities or who lack experi ence and or kno...

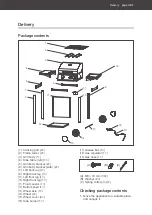
Page 43: ... Right back leg 1 9 Left front leg 1 10 Right front leg 1 11 Front canvas 1 12 Bottom shelf 1 13 Wheel axle 1 14 Wheel 2 15 Wheel cover 2 16 Side burner 1 17 Grease box 1 18 Gas regulator 1 19 Gas hose 1 A M6 10 mm 34 B Washer 2 C Spring cotter pin 2 Checking package contents 1 Move the appliance to a suitable place and unpack it 19 18 1 2 3 4 16 8 10 13 14 15 6 7 9 5 11 12 17 C A B ...

Page 44: ...iles tape and foam padding 3 Check that the delivery is complete 4 Check whether the appliance was dam aged during transit 5 If the delivery is incomplete or the appli ance has been damaged during transit please contact your mail order company see Service on page GB 32 ...

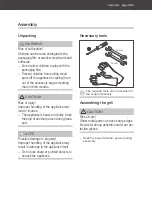
Page 45: ...handling of the appliance may lead to injuries The appliance is heavy and bulky Seek the help of another person during trans port NOTE Possible damage to property Improper handling of the appliance may result in damage to the appliance itself Do not use sharp or pointed objects to unpack the appliance Necessary tools The required tools are not included in the scope of delivery Assembling the grill...

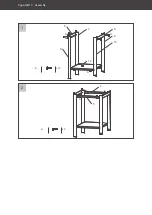
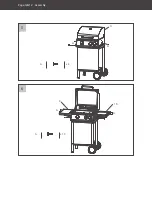
Page 46: ...Page GB 10 Assembly A x 12 6 7 9 12 6 8 A 10 A A 1 A x 8 5 5 A A 2 ...

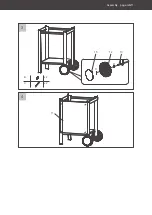
Page 47: ...Assembly page GB 11 13 14 15 B C B x 2 C x 2 3 11 4 ...

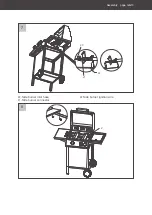
Page 48: ...Page GB 12 Assembly A x 4 3 A A 5 16 4 A x 10 A A A A 6 ...

Page 49: ...Assembly page GB 13 20 Side burner inlet hose 21 Side burner connector 22 Side burner ignition wire 20 22 21 7 2 8 ...

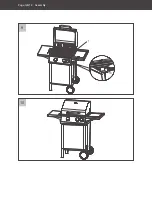
Page 50: ...Page GB 14 Assembly 1 18 9 10 ...

Page 51: ...as grill Before connecting the hose check the connecting element and the rubber rings The hose must be replaced if there are signs of fissures cracks or wear During use do not squeeze bend or twist the hose Use a hose rupture safety device which is commercially available as an acces sory The gas pressure regulator must be replaced after ten years at the latest The date of manufacture is indicated ...

Page 52: ... the barbecue Always keep access to the barbecue and especially the gas tank free keep escape routes open NOTE The gas hose must be a maximum of 1500 mm in length Connecting the gas tank A Gas tank B Union nut C Pressure regulator D Connection thread of the pressure regu lator E Hose F Gas cylinder valve G Bottle connection thread Turn all rotating regulators on the grill body to the OFF position ...

Page 53: ...ot smoke Porous or damaged hoses and fittings must be replaced Coat the union nut B and the connection thread D of the hose E with soapy water Open the gas tank A If bubbles form the connection is not tight Eliminate the leak and carry out the leak test again The connections are sealed correctly if no bubbles form ...

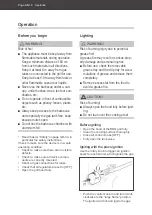
Page 54: ... to make sure there are no visible defects Check to make sure all device compo nents are correctly mounted Check all gas connections for leaks Check that all regulators are set to OFF Open the grill hood fully Lighting WARNING Risk of burning injury due to potential grease fire A grease fire may result in serious prop erty damage and personal injuries Before use check the removable grease tray and...

Page 55: ... the corresponding control knob and set it to the large flame posi tion The flame jumps over automatically Setting the flame height Turn the control knob anti clockwise small flame Turn the control knob clockwise large flame Flickering flames that are too large and flames with yellow tips indicate dirty burner nozzles Cleaning overview on page GB 22 Turn the control knob clockwise as far as it wil...

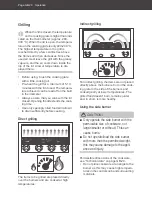
Page 56: ...lid extends the cook ing time Use only sparingly oiled food and allow it to drain sufficiently before cooking Direct grilling The items to be grilled are placed directly over the burners and are cooked at high temperatures Indirect grilling For indirect grilling the items are not placed directly above the burners but on the cook ing grate to the side of the burners and cooked gently at lower tempe...

Page 57: ...has cooled down completely It is best to clean your appliance espe cially grease deposits immediately after the grill has cooled down grease splatter can then still be easily removed this saves more intensive cleaning later and protects the sur faces Switch off all burners and close the tank valve Let the grill cool down completely before cleaning it and closing the lid again ...

Page 58: ...s from inside the grill e g with a wooden spatula Cleanthe cooking grate Clean the grate at the latest after 3 to 5 uses recom mended after each cooking session with a brass bris tled grill brush with no steel bristles You can also re move the grate and wash it with soap and water Do not use sharp objects or ag gressive cleaning agents Coat the cooking grate with a little vegetable oil to pre vent...

Page 59: ...e g small flame the burner may not ignite or there may be a fire in the burner Gas smell spreads because the gas cannot get into the burner If the gas leaks to the front a fire may occur there Remove the main burner To clean and replace the main burners remove them as follows 1 2 3 ...

Page 60: ...Page GB 24 Care and maintenance Removing the side burner To clean and replace the side burner remove it as follows 4 5 1 2 ...

Page 61: ...er Damaged burners holes cracks etc must be replaced immediately Reinstall the burners in reverse order after cleaning The grill must be seasoned before the next use To do this grease the inside of the gas barbecue sparingly with heat resistant oil rapeseed oil sunflower oil etc Light one burner and set it to a small flame Light a second burner After 8 to 10 minutes set the burners to the largest ...

Page 62: ...the barbecue is clean free of grease dust and dry you can start painting Carefully tape off all parts of the barbecue that are not to be painted thermometer etc Use spray paint for painting or apply the paint with a brush or roller If possible only use spray paint as the surface will then be smoother than with a brush or roller Pay attention to the direction of spraying and tape off parts that are...

Page 63: ...ot reach all the way to the ground Remove the cover on sunny days for ven tilation even when the barbecue is not in use Storing in closed rooms If you store the barbecue in a closed room remove the gas tank and store it outdoors Transport When transporting gas tanks the national regulations are to be observed Returns If possible keep the original packaging at least for the duration of the right of...

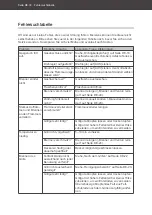
Page 64: ...nk valve Burners contaminated Clean the burner Clean burner and venturi on page GB 22 Ignition does not work Ignite burner manually Manual igniting on page GB 19 Severe flaring and burning at the flame tamers Flame tamer heavily soiled Clean the flame tamer Grilled food is very greasy Drain the food or dab dry Prepare food with a high fat content at low heat to avoid ignition Temperature too low G...

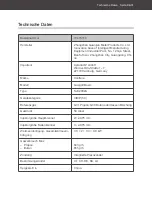
Page 65: ...ctZ GmbH Werner Otto Straße 1 7 22179 Hamburg Germany Brand Konifera Model Gas grill Basic Type SJX2002A Appliance category I3B P 50 Reference gas G31 Propane G30 Butane or a mixture thereof Gas pressure 50 mbar Injector size Main burner 2 ø0 75 mm Injector size Side burner 1 ø0 75 mm Heat input Total heat input 3 0 2 3 0 9 0 kW Gas consumption Max Propane Butane 643 g h 655 g h Ignition Integrate...

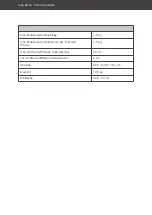
Page 66: ...ical data max load side shelf 1 5 kg max load side burner incl pot or pan 1 5 kg max size pot pan side burner 24 cm min size pot pan side burner 8 cm Dimensions 96 5 53 5 101 cm Weight 12 6 kg Grill surface 42 5 41 cm ...

Page 67: ...en you first buy one and you don t get it back when you no longer need the gas cylinder When you have used up the contents of the cylinder you can exchange it for a filled one at the retailer The usage fee includes the costs for maintenance and testing of the cylinder Bottles which are no longer needed do not belong in household waste instead they must be disposed of according to local regulations...

Page 68: ...act your mail order company s customer service centre or product advice centre Please note You are responsible for the condition of the appliance and its proper use in the household The statutory warranty of 24 months applies for this article The following complaints will not be accepted Damage to the burner as burners are wearing parts Damage to the appliance and other objects caused by fires Sur...

Page 69: ...Service page GB 33 ...

Page 70: ......

Reviews: