


Page GB-18 Operation
Operation
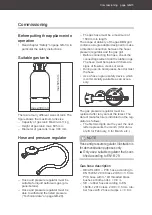
Before you begin
WARNING!
Risk of fire!
■
The appliance must be kept away from
flammable materials during operation.
Keep a minimum distance of 60 cm
from such materials in all directions.
Keep it at least 5 m away from gas
tanks not connected to the grill for use.
Keep it at least 10 m away from fuels or
other flammable vapours or liquids.
■
Never use the barbecue under a can-
opy, under bushes, trees, tents or sun-
shades, etc.
■
Do not operate in front of combustible
objects such as privacy fences, plants,
etc.
■
Always keep access to the barbecue
and especially the gas tank free, keep
escape routes open.
■
Do not line the barbecue chamber with
aluminium foil.
• Read chapter “Safety” on page GB-3 4, in
particular the safety instructions.
Check to make sure the device is in a safe
operating condition:
• Check to make sure there are no visible
defects.
• Check to make sure all device compo-
nents are correctly mounted.
• Check all gas connections for leaks.
• Check that all regulators are set to [OFF].
• Open the grill hood fully.
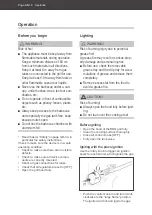
Lighting
WARNING!
Risk of burning injury due to potential
grease fire!
A grease fire may result in serious prop-
erty damage and personal injuries.
■
Before use, check the removable
grease tray and the drip tray for accu-
mulations of grease and remove them
completely.
■
Remove excess fat from the food to
avoid a grease fire.
CAUTION!
Risk of burning!
■
Always open the hood fully before ignit-
ing.
■
Do not lean over the cooking area!
Before igniting
• Open the hood of the BBQ grill fully.
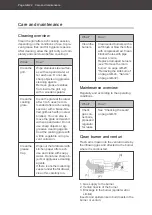
• Clean the cooking surface thoroughly.
• Close all control knobs [OFF].
• Fully open the tank valve.
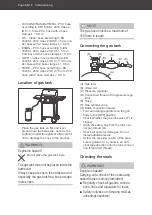
Igniting with the piezo ignition
Use the rotary knob to trigger an ignition
spark for each burner, which ignites the gas.
• Push the control knob in and turn it anti-
clockwise to the “large flame” position.
The igniter will click and ignite the gas.
[1]
[2]
Summary of Contents for 70415316
Page 11: ...Montage Seite DE 11 A x 12 6 7 9 12 6 8 A 10 A A 1 A x 8 5 5 A A 2 ...
Page 12: ...Seite DE 12 Montage 13 14 15 B C B x 2 C x 2 3 11 4 ...
Page 13: ...Montage Seite DE 13 A x 4 3 A A 5 16 4 A x 10 A A A A 6 ...
Page 15: ...Montage Seite DE 15 1 18 9 10 ...
Page 25: ...Pflege und Wartung Seite DE 25 3 4 5 ...
Page 35: ...Service Seite DE 35 ...
Page 36: ......
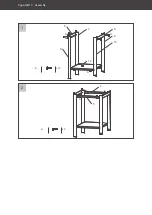
Page 46: ...Page GB 10 Assembly A x 12 6 7 9 12 6 8 A 10 A A 1 A x 8 5 5 A A 2 ...
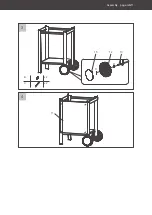
Page 47: ...Assembly page GB 11 13 14 15 B C B x 2 C x 2 3 11 4 ...
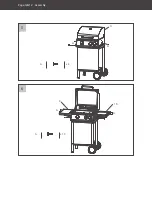
Page 48: ...Page GB 12 Assembly A x 4 3 A A 5 16 4 A x 10 A A A A 6 ...
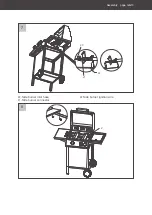
Page 50: ...Page GB 14 Assembly 1 18 9 10 ...
Page 69: ...Service page GB 33 ...
Page 70: ......