Operation page
GB-19
• If the gas does not ignite within a short
time, turn the control knobs clockwise as
far as they will go to close the gas supply.
• Wait 5 minutes and repeat the ignition
process.
• If the gas still does not ignite, close the
gas supply, wait 5 minutes and then look
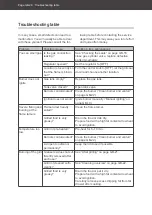
for the fault (“Troubleshooting table” on
page GB-28).
Manual igniting
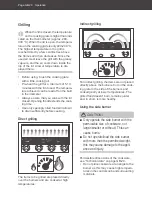
– You can light the two outer burners man-
ually using a suitably long stick lighter.
• Fully open the tank valve.
• Press the respective control knob and
turn it to the “large flame” position.
• Insert the lighter through the hole in the
side of the grill tray and ignite it.
• If the gas does not ignite within a short
time, turn the control knob clockwise as
far as they will go to close the gas supply.
• Wait 5 minutes and repeat the ignition
process.
• If the gas still does not ignite, close the
gas supply, wait 5 minutes and then look
for the fault (“Troubleshooting table” on
page GB-28).
• To light the burners directly next to the lit
burner, press the corresponding control
knob and set it to the “large flame” posi-
tion. The flame jumps over automatically.
Setting the flame height
– Turn the control knob anti-clockwise =
small flame
– Turn the control knob clockwise = large
flame
Flickering flames that are too large and
flames with yellow tips indicate dirty burner
nozzles (“Cleaning overview” on
page GB-22).
• Turn the control knob clockwise as far as
it will go to switch off the relevant burner.
• Fully close the tank valve.
Before the first cooking session
The barbecue must be seasoned before it is
used for the first time.
• To do this, grease the inside of the gas
barbecue sparingly with heat-resistant oil
(rapeseed oil, sunflower oil, etc.).
• Light one burner and set it to a small
flame.
• Light a second burner.
• After 8 to 10 minutes, set the burners to
the largest possible flame.
– The gas grill must be operated for about
25 minutes on the highest setting at a
minimum of 200 °C without cooking food
to remove any production residue.
• Switch off all burners and let the gas grill
cool down.
• Remove the residue (“Cleaning over-
– Cast-iron cooking grates and those made
of enamel can be seasoned inside the
grill in the same way.
Summary of Contents for 70415316
Page 11: ...Montage Seite DE 11 A x 12 6 7 9 12 6 8 A 10 A A 1 A x 8 5 5 A A 2 ...
Page 12: ...Seite DE 12 Montage 13 14 15 B C B x 2 C x 2 3 11 4 ...
Page 13: ...Montage Seite DE 13 A x 4 3 A A 5 16 4 A x 10 A A A A 6 ...
Page 15: ...Montage Seite DE 15 1 18 9 10 ...
Page 25: ...Pflege und Wartung Seite DE 25 3 4 5 ...
Page 35: ...Service Seite DE 35 ...
Page 36: ......
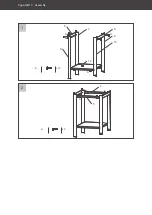
Page 46: ...Page GB 10 Assembly A x 12 6 7 9 12 6 8 A 10 A A 1 A x 8 5 5 A A 2 ...
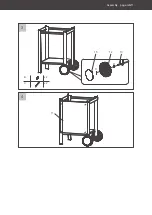
Page 47: ...Assembly page GB 11 13 14 15 B C B x 2 C x 2 3 11 4 ...
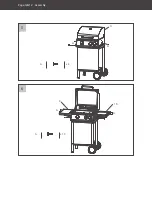
Page 48: ...Page GB 12 Assembly A x 4 3 A A 5 16 4 A x 10 A A A A 6 ...
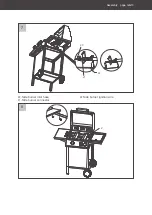
Page 50: ...Page GB 14 Assembly 1 18 9 10 ...
Page 69: ...Service page GB 33 ...
Page 70: ......

