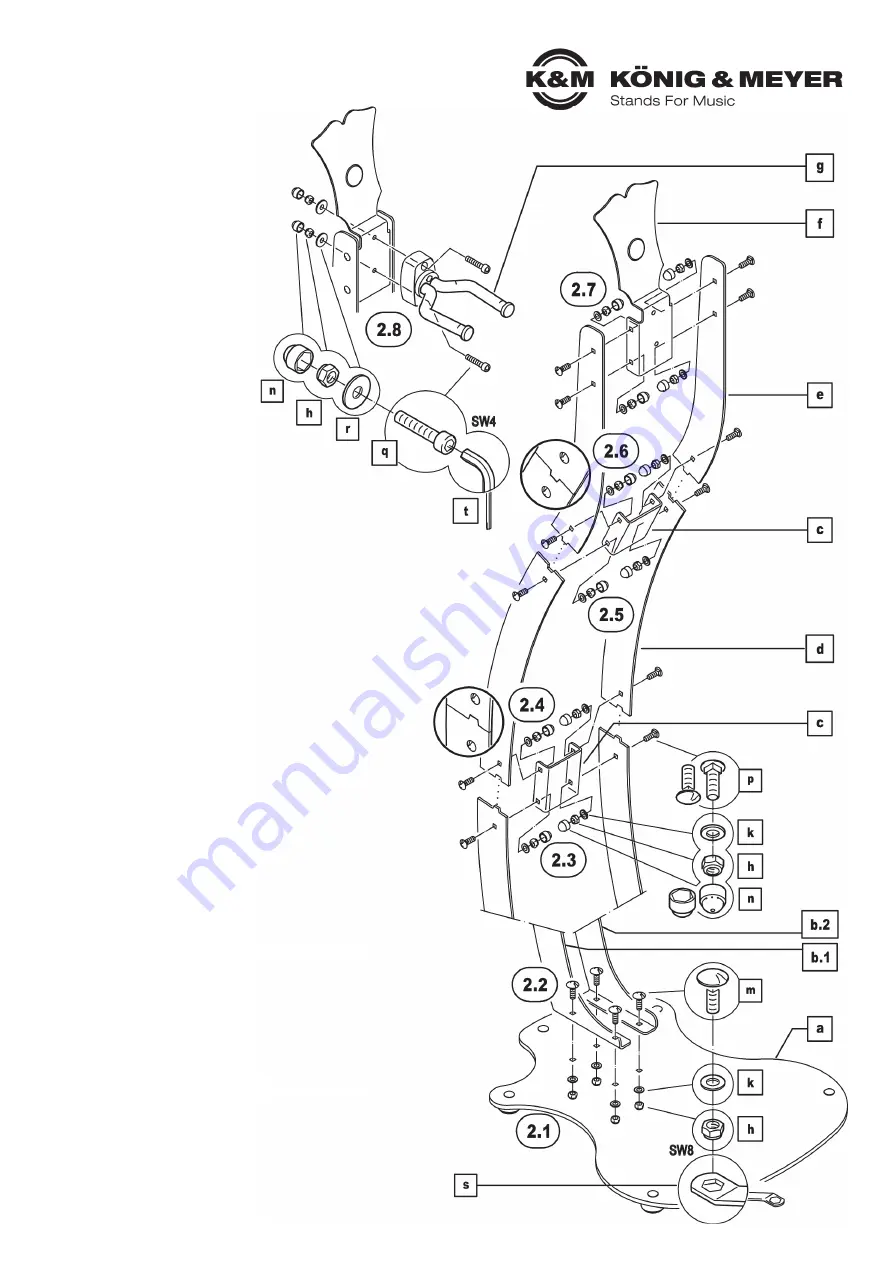
1. COMPONENTS
Please visually check that all
components are present and as
far as recognizable in good order:
COMPONENTS
a
Base plate with 5 legs
b
Pillar base
b.1
- left
b.2
- right
c
U-pillar connector (2x)
d
Pillar centre (2x)
e
Pillar top (2x)
f
Guitar head
g
Guitar yoke
SCREWING
h
Lock nut (18x) - M5 / SW8
k
Washer (16x) - ø 5,3 mm x ø 10 mm
m
Carriage bolt (4x)
- M5 x 16 mm / Kopf ø 13 mm
n
Protective cap (14x) - SW8 für M5
p
Carriage bolt (12x)
- M5 x 15 mm / Kopf ø 10 mm
q
Cylinder head screw (2x) - M5 x 30 mm
r
Washer (2x) - ø 5,3 mm x ø 15 mm
TOOLS
s
Hexagon spanner SW8
t
Allen key SW4
2. ASSEMBLY and MOUNTING
We recommend working with two people.
Please note the position of the components (see illustrations).
2.1
Place the base plate
a
on the floor
2.1
and then set it up vertically and screw…
2.2
…together with the two pillars at the bottom
b.1
,
b.2
2.2
using the two 13 mm ø carriage bolts
m
, washers
k
and lock nuts
h
.
2.2
Tool: hexagon spanner SW8
s
.
2.3
Now screw the upper ends of the pillars
b
with the pillar connector
c
2.3
using carriage bolts ø 10 mm
p
, washers
k
and lock nuts
h
.
2.3
Tool: hexagon spanner SW8
s
.
2.4
Screw the pillar centre (d) to the u-pillar connector (c) attaching it outside.
2.4
Use:
p
,
k
,
h
(see
2.3
) - hexagon spanner SW8
s
.
2.4
PLEASE NOTE:
2.4
Groove and tongue between the two pillars should interlock.
2.5
Fasten the upper ends of the pillars likewise with the
2.5
second u-pillar connector
d
,
c
using
p
,
k
,
h
(see
2.3
)
2.5
- hexagon spanner SW8
s
.
2.6
Screw the top pillars
e
to the u-pillar connector
c
attaching them outside.
2.6
Use:
p
,
k
,
h
(see
2.3
) - hexagon spanner SW8
s
.
2.6
PLEASE NOTE:
2.6
Groove and tongue between the two pillars should interlock.
2.7
The upper ends of the pillars at the top
e
should be screwed twice to
2.7
the guitar head
f
, using
p
,
k
,
h
(see
2.3
) - hexagon spanner SW8
s
2.8
Fasten the guitar yoke
g
(with the K&M logo on top) twice to the guitar head
f
2.8
using: Cylinder head screw
q
, washers ø 15 mm
r
and lock nuts
h
2.8
- Allen key SW4
t
+ hexagon spanner SW8
s
2.9
Now check the tightness of all the connections, if necessary, tighten loose
2.9
lock nuts
h
and finally press the protective caps
n
onto the lock nuts
h
2.9
(see
2.2
-
2.8
).
- Careful handling maintains the function and safety of the installation.
- Regularly check the proper condition of the components, replacing or repairing
-
defective parts.
- Before use, make sure that the parts are in the correct position and that the screw
-
connections are tight.
- Before carrying out maintenance work always remove the guitar first.
- For cleaning, use a slightly damp cloth and a non-abrasive detergent.
CHECK, MAINTENANCE, CLEANING
F: Stand wobbles
F:
R: Check if floor is uneven
F:
R: Ensure correct position of components
F:
R: Check tightness of screw connections
F: Instrument 'slips' out of the yoke
F:
R: Place the guitar carefully
F:
R: Adjust the position of the brackets to the instrument
F:
R: Check the shape of the guitar saddle (transition between neck and head of
F:
R:
the instrument) for suitability. Non-distinctive saddle thickening is unsuitable.
FAULT-FINDING (F) and REPAIR (R)


