SET UP INSTRUCTIONS
18818 Sheet music and document holder
- for K&M Keyboard Stands 18810, 18950 and 18953
- for individualists: height, direction, distance and angle are adjustable
- for practitioners: with a closed steel desk > excellent desk pad and is magnetic
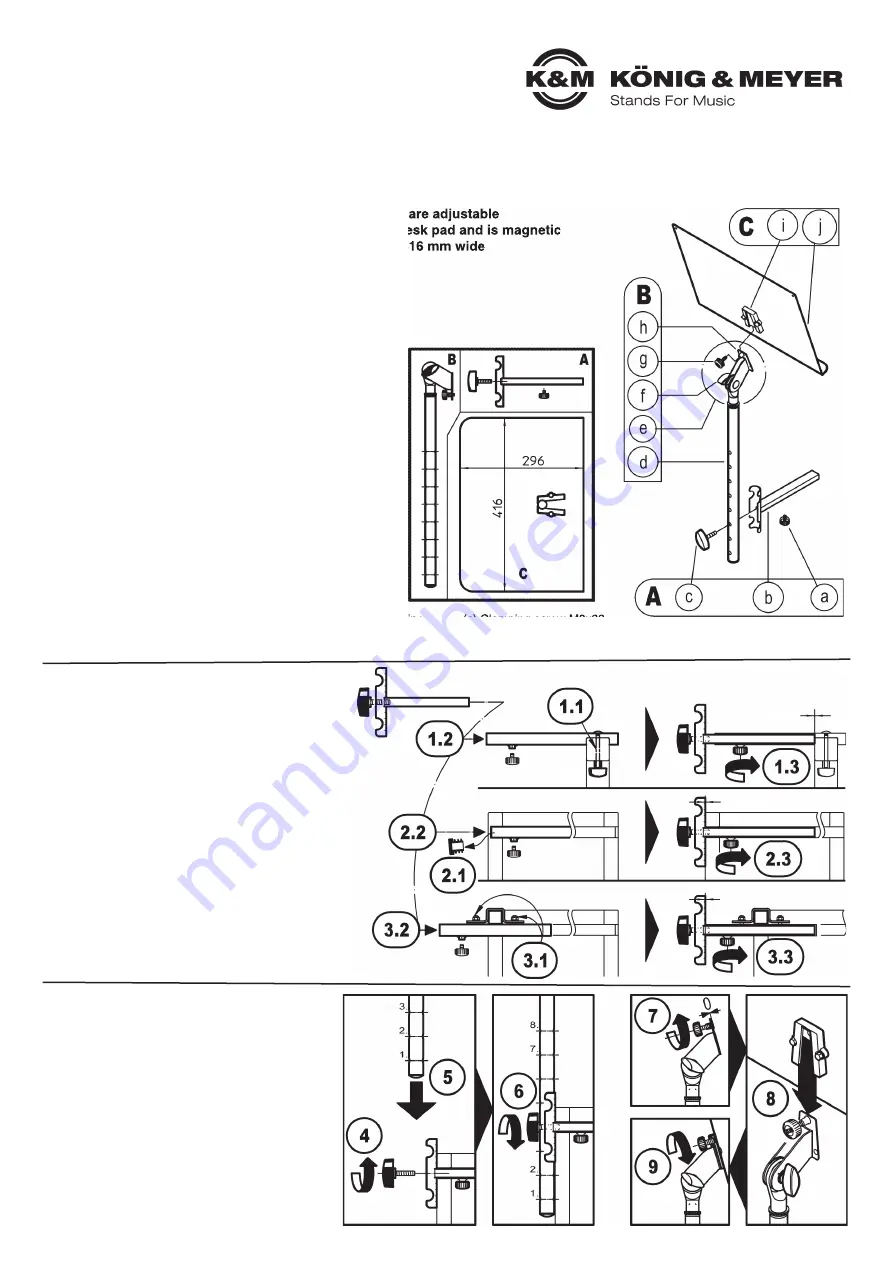
- for scores: the desk is 296 mm high, 30 mm deep and 416 mm wide
SAFETY NOTES
1. COMPONENTS
A
Horizontal support: (a) Knurled screw M6x12 (b) Insertion pipe (c) Clamping screw M8x33
B
Stand tube with joint: (d) Stand tube 3/8" (e) Swivel bearing (f) Wing nut M8 (g) Knurled screw M6x22 (h) pin board
C
Music desk: (i) Prisma holder (j) Music desk
- Please consider the information provided in the setup instructions
- Please also consider the safety and the assembly instructions of
-
the keyboard stand and possible adapter:
-
- 18810 Omega together with 18814 Adapter
-
- 18950/53 Table-style keyboard stand direct or with 18954 Adapter
- Ensure that the screws are tight on all of the involved products
- Protect against moisture
- In the event of workstation maintenance pay attention to possible
-
risks
- Damaged parts must be replaced
-
(e.g. pinching/wedging, possibility of the stand being knocked
-
into or falling over)
- To care for the product use a damp cloth and a non-abrasive
-
cleaning agent.
2. INSTALLATION of 18818 to the KEYBOARD STAND
There are three options:
1
18810 OMEGA - with 18814 ADAPTER
1
1.1
Install 18814 Adapter (see Instruction 18814)
1
1.2
Place the insertion pipe (b) into the adapter as far as it will go
1
1.3
Secure the position by tightening the knurled screw (a)
2
18950/18953 TABLE-STYLE KEYBOARD STAND - DIRECT
2
2.1
Remove the cap from the tube on the folding table
2
2.2
Place the insertion pipe (b) into the stand tube as far
2 2.2
as it will go
2
2.3
Secure the position by tightening the knurled screw (a)
3
18950/18953 TABLE-STYLE KEYBOARD STAND - with
3
18954 ADAPTER
3
3.1
Install 18954 Adapter (see Instruction 18954)
3
3.2
Place the insertion pipe (b) into the adapter tube as far
3 3.2
as it will go
3
3.3
Secure the position by tightening the knurled screw (a)
3. INSTALLATION of 18818
4
Unscrew the clamping screw (c) from the
4
insertion tube (b)
5
Hold the stand tube (d) at the desired height (8 levels)
5
to the half shell of the insertion tube (b) and...
6
...secure this position by tightening the
6
clamping screw (c)
7
Ensure that the threaded bolt of the knurled screw (g)
7
does not stick out
8
Mount the music desk (j) to the joint
8
Place the prisma holder (i) into the pin board (h)
8
as far as it will go
9
Tighten the knurled screw (g) which results in the
9
music desk (j) securely being in position The music
9
desk can only be removed if the screw is loosened
Thank you for choosing this product. The instructions provide directions to all of the important set up and
handling steps. We recommend you keep these instructions for future reference.
18814 Adapter
18810
Omega
18950
18953
table
18950
18953
table
Tube
Limit stop
Limit stop
Limit stop
18954 Adapter


