


SETUP (6-13)
19794 Tablet PC wall mount
- For tablets of all manufacturers - not bound to a specific brand
- Screen sizes (width: 163 - 242 mm, height: 102 - 189 mm, Depth: 5-11 mm)
- Helpful settings for quick setup and adjustment of the support arms
- Set it once and it stays in place until you choose to switch out the tablet.
- Easy to attach and detach thanks to the practical snap lock.
- The tablet can switch between portrait and landscape positions.
- Easy access to the connectors.
- With 3 drill holes to securely fasten it to the wall.
SAFETY NOTES
Thank you for choosing this product. This instruction manual informs you about the
important steps to set up and handle the product. We recommend to keep the manual
in a separate place for a possible later use.
When mounting the Tablet PC be sure to follow the instructions that come with
the mount and check that the Tablet is securely fastened. K&M is not liable for
improper use or any consequential damages!
- The holder is affixed to the wall with three screws.
-
NOTE:
-
a. Walls that are too weak or have electrical and water conduits or similar
- a.
are not suitable. If this is the case consult a qualified handyman.
-
b. Depending on the wall composition (Wood, Concrete, Bricks etc.) use
- b.
the appropriate mounting materials (not included in the delivery).
-
c. Ensure that the screws and nuts are tight after the product has been
- c.
installed and check that the screws are tight on a routine basis.
- Carefully position and place the Tablet PC using the clamp screws,
-
then check that the Tablet PC is securely in place
- Use the mount carefully; especially when switching from portrait to
-
landscape and adjusting the angle
FIRST TIME PLACEMENT of the Tablet (6-13)
* Scale settings are only examples (Selection: see INFO SHEET)
FIRST TIME PLACEMENT of the Tablet
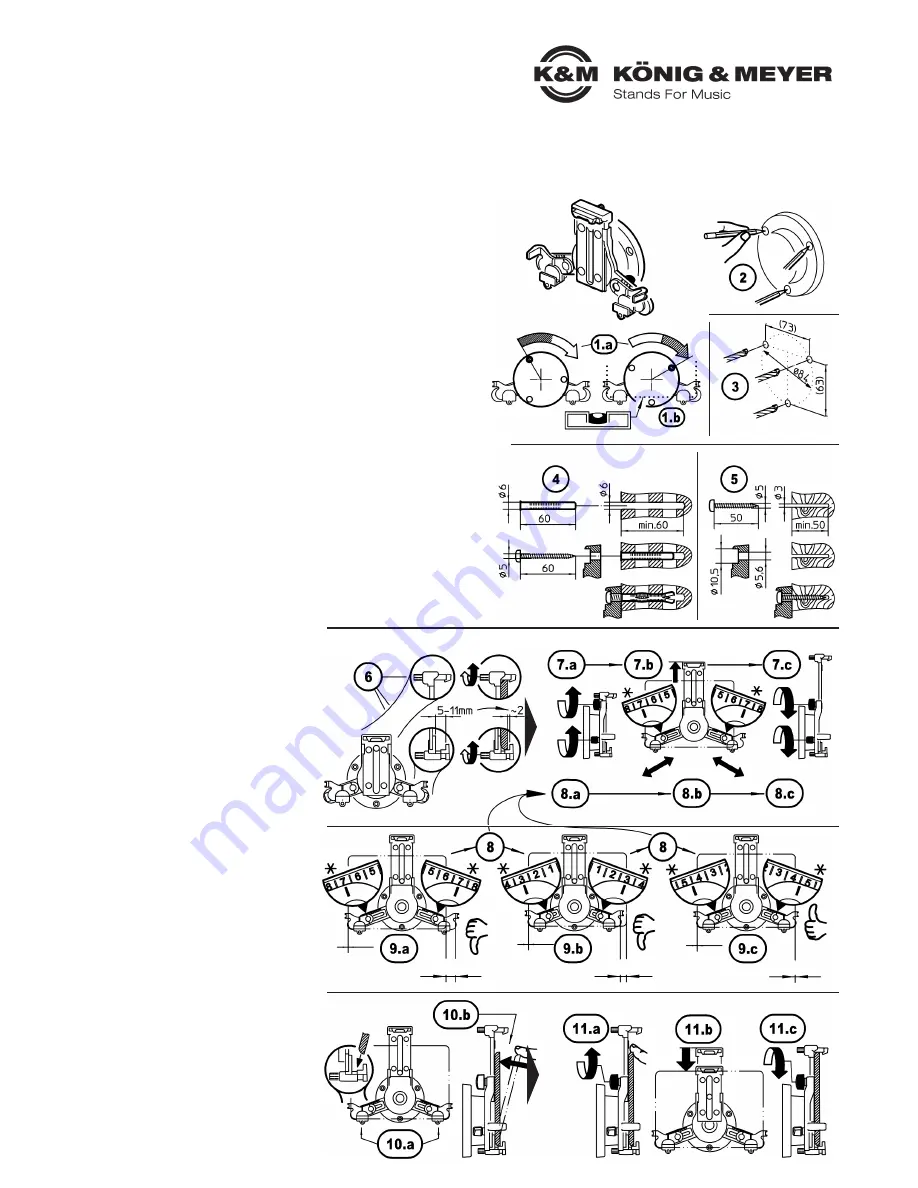
6
First open the three knurled pins until
6
there is enough depth to place the tablet
7
a. Release the upper support arm,
7
b. extend it out as far as it goes and
7
c. tighten the clamping screw
8
a. Release side support arms and...
8
b. ...with the help of the scale symmetrically
8
b.
extend to a rough position
8
c. Tighten both clamping screws
9
Place the tablet into the corner supports
9
to ensure that it fits
9
a. Tablet is too narrow: Retract the support
9
a.
arms a bit (symmetrically) until it fits.
9
b. Tablet is too wide: Extend the support
9
b.
arms (symmetrically) until it fits.
9
c. Tablet fits, if the corner supports do not
9
c.
show any space between the tablet and
9
c.
the holder when looking at it from the side.
10
a. Place the tablet in both corner supports...
10
b. ...and hold the tablet
11
Retract the upper support arm
11
a. Release the clamp screw and retract
11
a.
the support arm...
11
b. ...until the tablet is securely held in place.
11
c. Tighten the clamping screw
WALL MOUNT (1-5)
The wall mount comes pre-assembled
and can be mounted to the wall right away.
1.a
Hold the wall mount and turn the round
1.a
wall plate clockwise - as far as it will go.
1.b
Place the mount at the desired position
1.b
on the wall in a horizontal position...
2
...and mark the three drill holes with a marker
3
Drill the anchor holes
3
- ø 6 mm for plastic anchors
3
- if needed ø 3 mm for wood screws
4
Mounting example concrete wall
5
Mounting example wood wall
If the wall is made of aerated concrete,
plaster board etc. we recommend that
you purchase suitable anchors.
fits
fits
fits
Tab too narrow
Tab too wide
Tab fits
Mounting Examples (4-5)
WALL MOUNT Positioning (1-3)
Wood
Stone, concrete


