


KÖNIG & MEYER
GmbH & Co. KG
Kiesweg 2, 97877 Wertheim, www.k-m.de
19799-000-55 Rev.09 03-80-090-00 1/18
TECHNISCHE DATEN
Material
Holder, joint: Polyamid PA-6
Screws: Steel, galvanized
max. load
Tablets Height: min. 163 mm, max. 242 mm
Tablets
Width: min.102 mm, max. 189 mm
Tablets
Depth: min. 5 mm, max. 11 mm
Packagin
W x D x H: 232 x 55 x 154 mm
Weight
0.21 kg
USAGE NOTES and
FUNCTIONS (14-21)
FAULT-FINDING (F) and REPAIR (R)
F: Holder is unstable
F:
B: Check the wall screws
F:
B: Check the connection between the wall plate and holder plate (
3
-
5
)
F: Tablet is not securely in place
F:
B: Correct the position of the side support ams, so that the corner supports
F: B:
are properly set on the Tablet without any play (
7
-
9
)
F:
B: Ensure that the lower support arms setting are symmetrical (
8
,
9
)
F: B:
Asymmetric support arm settings looks bad and does not ensure that
F: B:
the Tablet is securely in place.
F:
B: Do not only place the Tablet on the upper support arm, but be sure it
F: B:
clicks into place (
11
,
12
,
20
).
F:
B: Observe the minimum i.e maximum dimensions (
14
)
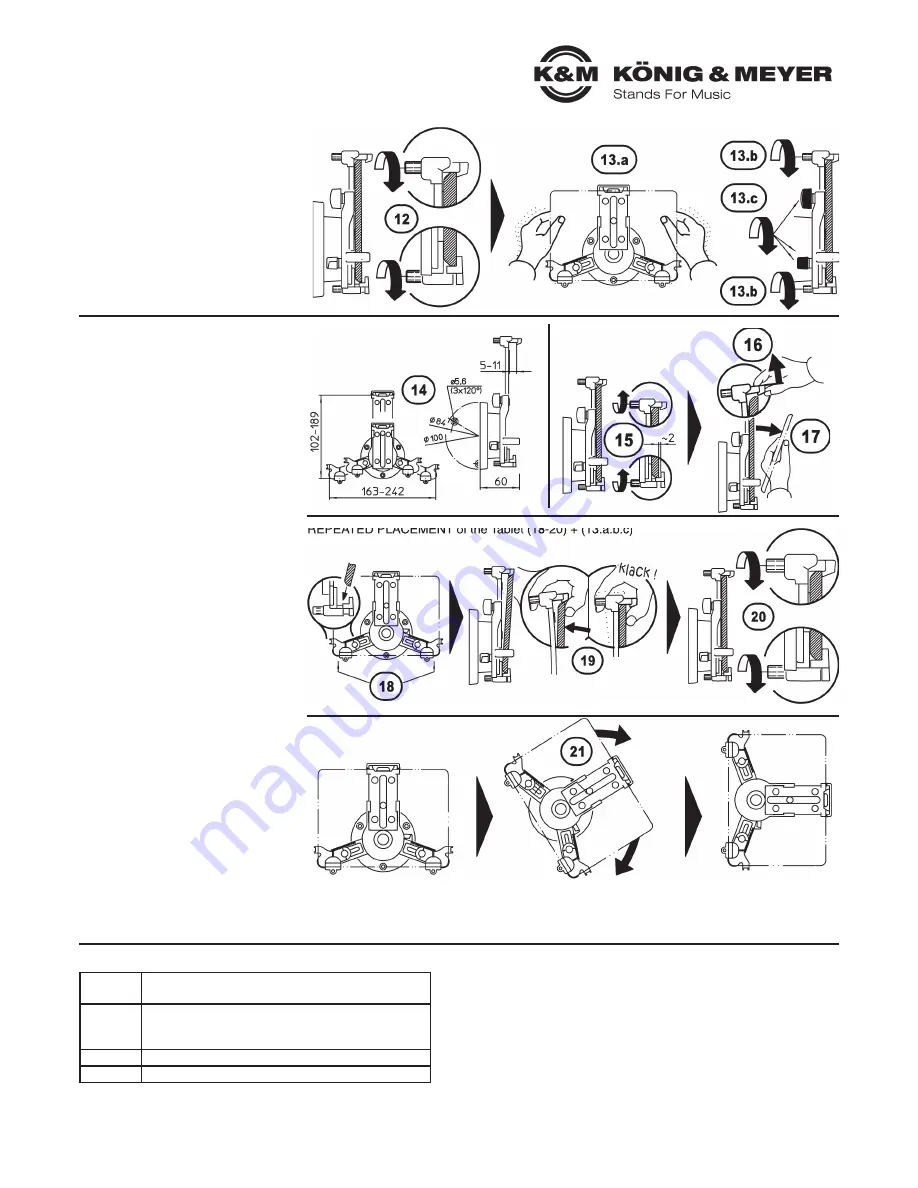
FIRST TIME PLACEMENT of the Tablet (6-13)
DIMENSIONS (14)
REMOVING the Tablet (15-17)
REPEATED PLACEMENT of the Tablet (18-20) + (13.a.b.c)
Final Position
- landscape
- clicked into place
Final Position
- portrait
- clicked into place
Twist (Interim Position):
- In between landscape and portrait
- not clicked into place, however
-
it does stay in the selected position
DIMENSIONS (14)
If the tablet’s dimensions are too large or too
small (atypical) for the mount it will not fit.
REMOVING the Tablet (15-17)
15
Loosen the knurled pins a bit
16
Hold the tablet and LIFT UP
16
the catch
17
Flip out the Tablet and REMOVE
If you always use the same Tablet PC
we recommend leaving the support
arm settings in this set position.
REPEATED PLACEMENT of the
Tablet (18-20)
for previously set support arms
18
Place the tablet in the lower corner
18
supports
19
Place the tablet into the upper catch and
19
gently press until it clicks into place
20
Tighten the knurled pins until the tablet
20
is gently pressed into place
Check to ensure that the Tablet PC is secure
13.a.b.c
.
FORMAT (21)
The mount and the Tablet can be turned 90°.
Do accomplish this the Tablet does not need to
be removed from the holder.
21
Take the holder and turn it to the
21
landscape, portrait,
21
- or tilted position!
21
NOTE:
21
Invisible stops on the holder limit how
21
far the holder can be turned.
SETUP (6-13)
12
Gently clamp the tablet in the corner
12
supports by tightening the knurled pins
13
Your Tablet should be securely positioned.
13
Please check that the following
13
is the case:
13
a. Is the Tablet securely mounted?
13
b. Are the three knurled handles
13
b.
properly tightened?
13
c. Are the three plastic finger screws
13
c.
properly tightened?
If not please take corrective action (
6-11
).
FORMAT (21)


