Material
Tubes: Steel, black powder coating
Screws, locking pin: Steel, galvanized, nickel plated
Handles, caps, clamp: Polyamid (PA)
max. weight
Maximum 35 kg / 5° (please refer to SAFETY NOTES: a)
Distance rod support by the internal 17 kg gas operated
pneumatic spring
Dimension
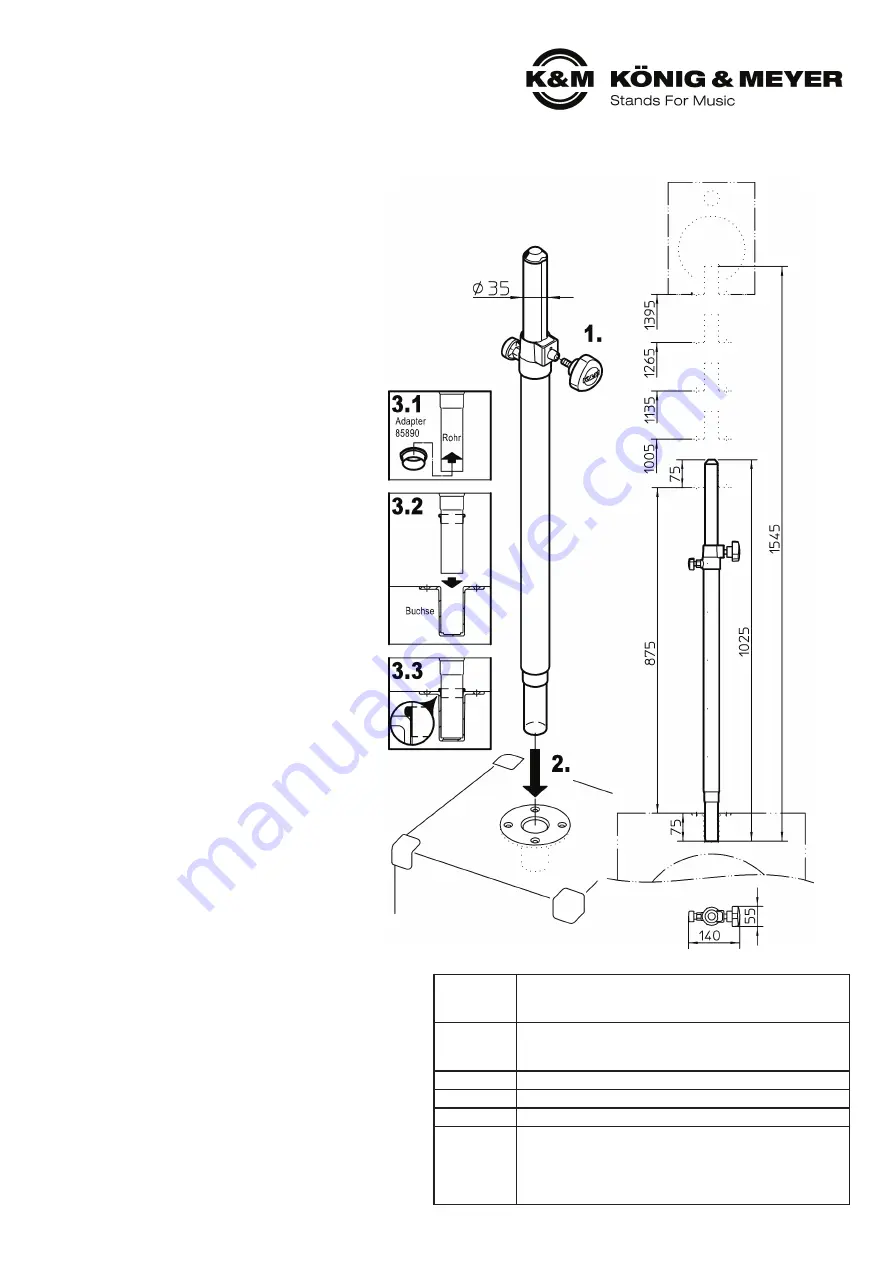
Height: min.1025 - max.1545 mm, Tube Diameter 42/35 mm
Box
W x D x H: 1160 x 90 x 80 mm
Weight
3.3 kg
Accessories
(optional)
Carrying case 21421 (for one of two rods 21356)
Flange adapters (z.B. 19580, 19654, 19656 etc.)
Screw on flange 24281
Adapter sleeve 21326: ø 38 mm (=US-System)
Leveling adapter 85890 for bore hole für leveling - see
3
SAFETY NOTES
USE & FUNCTIONALITY
Thank you for choosing this product. The instructions provide directions to all
of the important set up and handling steps. We recommend you keep these
instructions for future reference.
KÖNIG & MEYER
GmbH & Co. KG
Kiesweg 2, 97877 Wertheim, www.k-m.de
21356-000-55 Rev.05 03-80-356-00 5/14
a. LIMITATION OF THE LOAD BEARING WEIGHT:
a.
- Surface and base box must be stable enough to be able to
a. -
bear the weight.
a.
- 5°-Tilt Test: the properly assembled installation consisting of:
a. -
Base box, distance rod and weight bearing load (satellite box)
a. -
may not fall over at a 5° test angle.
a.
- Test weight maximum 35 kg (subject to the 5° tilt test).
b. PRIOR TO USE:
b.
- Be sure that the surface is weight bearing, sturdy and level.
b.
- Check if the distance rod, loudspeakers connectors and aids
b. -
(e.g. ladders) are in working order, in particular regarding:
b. -
- completeness, size relationship and quality
b. -
- in the case of identified defects the system may not be used
b.
- In the case of heavy loads the use of additional technicians is
b. -
required (we recommend 2 technicians that are physically fit).
b.
- It is possible that the distance rod leans somewhat in the
b. -
base box. This is due to the play between the tube support
b. -
and the loudspeaker connector, which depending on the
b. -
manufacturer can differ somewhat. A little play is required to
b. -
ensure continued usability. If needed, use Adapter Ring
b. -
85890: refer to
3
.
c. SAFETY DURING OPERATION:
c.
- Be sure the weight on the rod is centered: if the weight is not
c. -
centered - this has a negative affect on stability
c.
- Keep unauthorized individuals away from the installation
c.
- Ensure that the clamp screw
7
is tight and the locking pin
5
c. -
is always clicked into place
c.
- Never loosen the clamp screw or locking pin without having
c. -
someone hold the weight of the subwoofer, loudspeakers, or
c. -
satellite boxes
c.
- Protect against lateral forces, because these increase the risk of
c. -
the installation falling over and can negatively affect the
c. -
loudspeaker connector. Lateral forces can occur through:
c. -
- wind, impact, uneven surface, pulling on the installation
d. AFTER USE:
d.
- First remove the satellite box and then loosen the rod from
d. -
the base box
d.
- Careful and attentive handling is required: the adjustment
d. -
options can result in pinching or wedging your hand
21356 Distance rod
with Pneumatic Spring
- Height adjustable connector for satellite systems
- With integrated 17 kg pneumatic spring: easier extension and controlled retraction of the distance rod
- Professional quality, robust and durable
- Redundant security thanks to the clamping screw and locking pin
- Height: 1025-1545 mm, Weight: 3.3 kg
- Maximum weight bearing load 35 kg, subject to a 5° tilt test (please refer to the SAFETY NOTES)
1
Remove the distance rod from the box and screw the clamp screw
1
into the clamping bracket.
2
Place the base rod in the flange adapter of the base box.
3
As described in the SAFETY NOTES (b), there is a small gap
3
between the loudspeaker connector and the rod. In needed the K&M
3
Leveling Adapter 85890 (not included in the delivery) can all but
3
close the gap.
3
3.1
First place the adapter with the rim onto the tube support as far
3 3.1
as it will go,
3
3.2
place the tube support into the loudspeaker connector,
3
3.3
now place the adapter ring into the gap as far as it will go
TECHNICAL DATA / SPECIFICATIONS


