

TECHNICAL DATA
Material
- Telescope rods: Carbon fiber
- Clamp elements: Polyamid PA-6
- Base tube cap: Elastomer TPE
- Microphone thread: Aluminum
Carry case
with zipper, shoulder strap with carabiner hooks, cushioned
Rod combination: quintuplicate, ø 38 - 34 - 30 - 26 - 22 mm
Microphone connector thread: 3/8" x 12 mm
Cable, if internal: max. ø 6 mm (1/4")
23780 – short
23785 – medium
23790 – long
Range
600 - 1830 mm
800 - 2830 mm
1000 - 3830 mm
Packing size 6 x 48 x 610 mm
6 x 48 x 810 mm
6 x 48 x 1010 mm
Weight
0.58 kg
0.74 kg
0.9 kg
Carry case
ø 80 x 660 mm
0.15 kg
ø 80 x 860 mm
0.2 kg
ø 80 x 1060 mm
0.25 kg
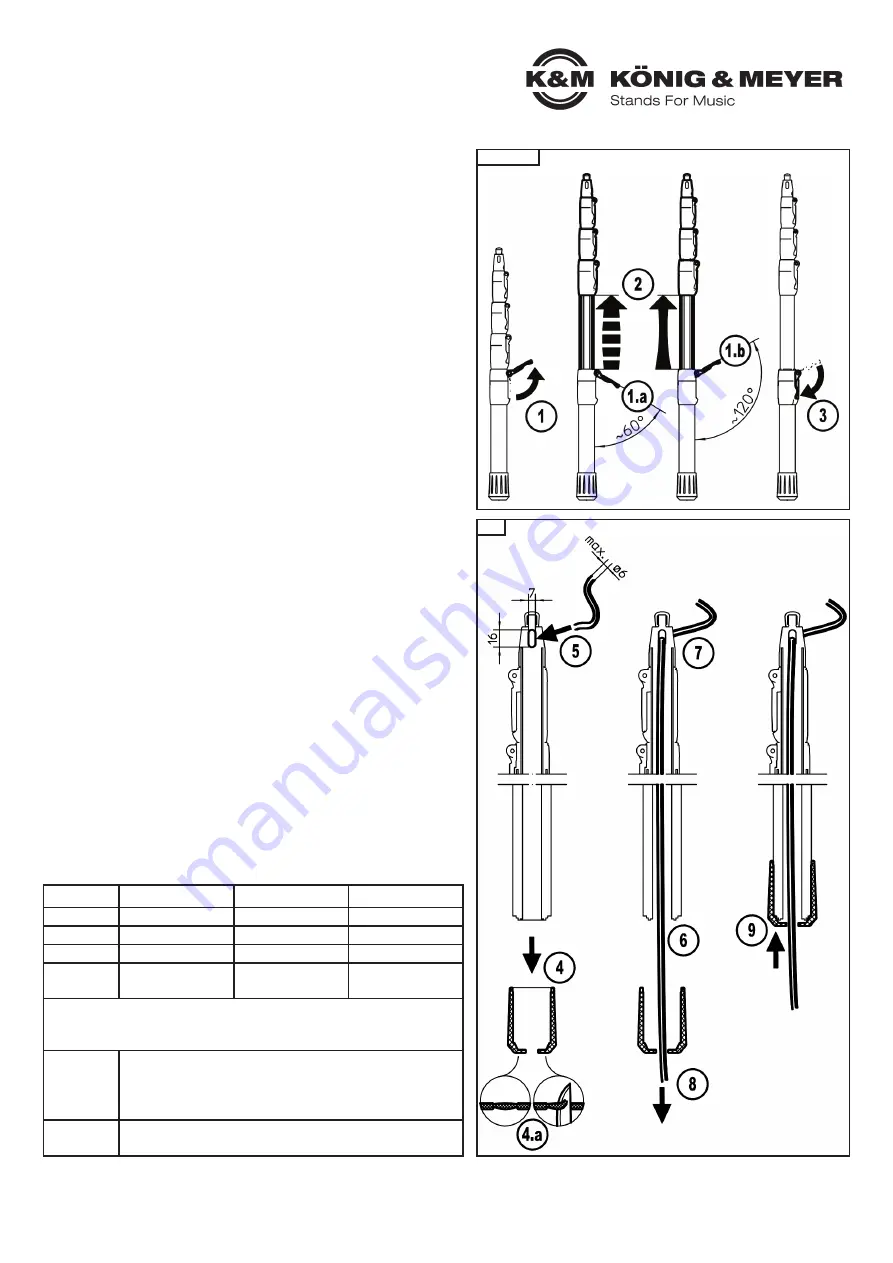
A.b / B.b
EXTEND THE TUBES
CABLE ASSEMBLY
B.a
A.a. CABLE ASSEMBLY
- is done when the tube combination is fully extended
- wrap the cable around the tube combination and secure it (e.g. with tape)
A.b. EXTEND THE TUBES
1
Open a clamp lever:
1
1.a
open a bit when it is difficult to adjust the tubes
1
1.b
open completely when it is easy to adjust the tubes
2
Extend the tube as far as desired,
3
Close the clamp lever (must touch the bracket)
NOTE: Never open all clamp levers at once
5
,
but repeat steps
1-3
for each clamp lever one after the other.
A.c. RETRACT TUBES
- first unscrew the microphone i.e. remove it from the clamp
- then remove/wind up the cable
- now open the clamp lever, retract the tube, close the clamp lever
- repeat these steps with the other clamp levers
5
A Handling - with a cable that is exposed / without cable
B.a. CABLE ASSEMBLY
- is done when the tube combination is fully retracted
4
Remove the base tube cap and remove the rubber skin
4.a
.
5
Thread the cable through the upper opening (on the microphone) and push the
cable through...
6
...until it shows up at the base tube - and can be carefully pulled through.
7
In the process carefully push the cable through the upper opening.
8
Push the cable through the base tube cap.
9
Place the base tube cap back on the tube.
- After the assembly is complete ensure that the cable at the upper opening
-
(Microphone) is secured against being pulled involuntarily and against bending
-
the cable. For this please use a strain reliever or suitable tape.
B.b. EXTEND THE TUBES
see
A.b.
B.c. RETRACT TUBES
- first unscrew the microphone i.e. remove it from the clamp
- then completely open the clamp lever
1.b
- Hold the cable at the lower cable opening and pull without any force to retract
-
the tube (if needed pull on the tube itself).
-
NOTE: The cable may not be crushed in the upper opening.
- Close the clamp lever
- Repeat these steps with the other tubes.
- Wind up the cable and store it.
B Handling - for internal cable
To care for the product use a damp cloth and a non-abrasive cleaning agent.
CHECK, MAINTENANCE, CLEANING


