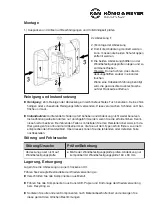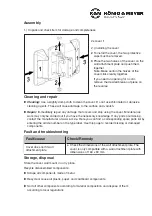
2x cover
1
2.) Installing the cover
2
To install the cover, the two protective
2
caps must be removed.
3
Place the two halves of the cover on the
3
wall attachment plate and push them
3
together.
3
Note: Make certain the halves of the
3
cover click cleanly together.
3
If you need an opening for a cord,
3
remove the desired break-out piece on
3
the reverse.
Assembly
1.) Unpack and check item for damage and completeness
Fault and troubleshooting
Fault/cause
Check/Remedy
Cover does not fit wall
attachment plate
● Check the dimensions of the wall attachment plate. The
●
cover is only compatible with a wall attachment plate with
●
dimensions of 160 x 90 mm.
Cleaning and repair
u
Cleaning:
Use a slightly damp cloth to clean the cover. Do not use chlorinated or abrasive
u
cleaning agents. These will cause damage to the surface and varnish.
u
Repair:
Immediately repair any damage that occurs and stop using the cover. Maintenance
u
work may only be carried out if you have the necessary knowledge. If any parts are missing,
u
contact the manufacturer at www.k-m.de. Here you can find a corresponding spare parts list by
u
entering the article number on the type label. Use this page to reorder missing or damaged
u
components.
Storage, disposal
Store the cover wall mount in a dry place.
Recycle disassembled components:
u
Scrape all components made of metal.
u
Recycle or reuse all plastic, paper, and cardboard components.
u
Sort all other components according to material composition and dispose of them
u
according to local regulations.


