background image

INSTALLATION INSTRUCTIONS

19744 Tablet PC stand holder 

19744

 »Biobased«

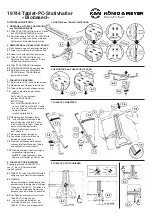
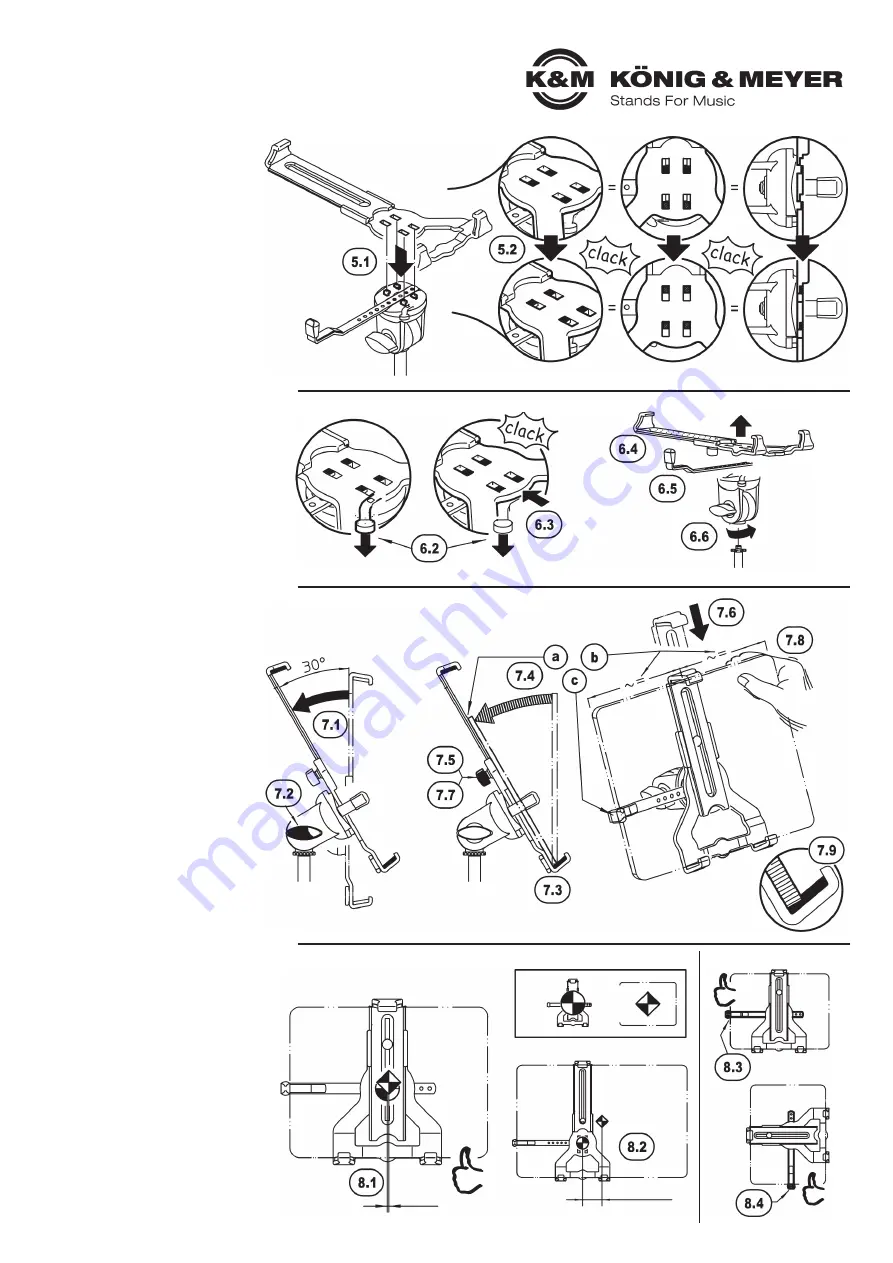
5. MOUNTING the TABLET CRADLE

6. DISASSEMBLY of the TABLET CRADLE

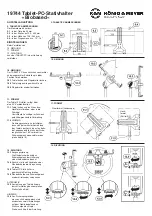
7. INSERT TABLET PC

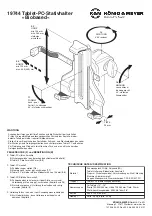
8. TABLET PC POSITIONING

5. MOUNTING the TABLET CRADLE  

5.

 to the SWIVEL JOINT


5.1

 PLACE THE TABLET CRADLE 

b

 on  

5.1

 the 4 hooks of the SWIVEL JOINT 

a


5.2

 Then push the TABLET CRADLE 

b


5.2

 down as far as it will go.  

5.2

 Pay attention to the clicking noise. 


6. DISASSEMBLY of the TABLET CRADLE


e.g. to adjust the Guard arm 

c


6.1

 Remove the tablet from the holder 

b

7.10 


6.2

 Push the lever down and hold 

6.3

 Shift the TABLET CRADLE 

b

 upwards   

6.3

 as far as it will go until the connection  

6.3

 disengages with an distinguishable click. 


6.4

 Lift TABLET CRADLE 

b


6.5

 Remove GUARD ARM 

c


6.6

 If required, the SWIVEL JOINT 

a

 can be  

6.6

 unscrewed from the SUPPORT ARM 

d


7. INSERT TABLET PC


7.1

 Tilt cradle 

b

 backwards approx. 30°… 

7.2

 Tighten clamp of swivel joint 

a


7.3

 Place Tablet on lower supports… 

7.4

 …and lean on cradle 

b


7.4

 NOTE:  

7.4

 The Tablet PC should rest:  

7.4


a

 at the BACK, 

7.4


b

 CENTERED and  

7.4


c

 against the GUARD ARM 

C

7.4


c

 Depending on the size of the Tablet PC,  

7.4


c

 the position of the guard arm 

c

 should  

7.4


c

 be corrected 

7.4


c

 (see Chapter 

6

 and 

4


7.5

 Loosen the clamping of the slider… 

7.6

 …and retract the slider until the upper  

7.6

 attachment of the Tablet PC is securely  

7.6

 fastened to the cradle 

b

. In this process,  

7.6

 the slightly compressed foam rubber  

7.6

 coating clamp the tablet. 

7.7

 Tighten the clamping again 

7.8

 Check firm seat of the tablet and  

7.8

 readjust, if necessary. 

7.9

 The foam rubber pads protect the  

7.9

 surface of the tablet and provide  

7.9

 additional clamping. 


7.10

 Remove the tablet in reverse order. 

7.10

 NOTE: Please hold the tablet securely,  

7.10

 especially when opening the clips. 


8. TABLET PC POSITIONING


Generally suitable for TABLET PCs  
from 10" to 16" screen size   
(see Chapter 

9

). 


8.1

 Always position the TABLET PC in the  

8.1

 CRADLE in a centered and balanced  

8.1

 position 


8.2

 NOTE:  

8.2

 Off-center positioning may be neces-  

8.2

 sary due to the size of the TABLET PC.  

8.2

 Please observe the balance of the  

8.2

 entire installation for safety reasons. 


8.3

 The Guard arm should always rest  

8.3

 against the TABLET PC and… 

8.4

 …must be at the bottom - as additio-  

8.4

 nal safety - if the TABLET PC is set  

8.4

 upright!

centered

Pivot 
point

Tablet 
center

off-center

Summary of Contents for Biobased

Page 1: ...cheren Halt des Tablets zu achten Vielen Dank dass Sie sich für dieses Projekt entschieden haben Bitte lesen und beachten Sie sorgfältig diese Anleitung Sie informiert Sie über alle wichtigen Schritte die für einen sicheren Aufbau und Betrieb erforderlich sind Wir empfehlen sie auch für den späteren Gebrauch aufzubewahren 1 BESTANDTEILE 2 MONTAGE des SCHWENKGELENKS am STATIV 3 HALTERUNG VOREINSTEL...

Page 2: ...e nach Größe des Tablet PC sollte 7 4 c die Position des Sicherungswinkels c 7 4 c korrigiert werden 7 4 c siehe Kapitel 6 und 4 7 5 Klemmung des Schiebers lösen 7 6 und Schieber einfahren bis die 7 6 obere Anlage den Tablet PC sicher 7 6 in der Halterung b fixiert Die dabei 7 6 etwas zusammengepressten 7 6 Schaumstoffanlagen spannen 7 6 das Tablet ein 7 7 Klemmung wieder festziehen 7 8 Festsitz d...

Page 3: ...im Schwenk 11 1 gelenk begrenzen die Verdrehung 11 2 HINWEIS 11 2 Sicherungswinkel c so installieren 11 2 dass sich bei vertikaler Ausrichtung 11 2 des Tablets der Anschlag unten befin 11 2 det gegebenenfalls muss der Siche 11 2 rungswinkel um 180 verdreht ins 11 2 Schwenkgelenk eingesetzt werden 11 2 siehe Kapitel 4 12 RICHTUNG 12 1 Ausgangsstellung 12 1 Die Rändelscheibe und das 12 1 Schwenkgele...

Page 4: ...gungsarbeiten zunächst immer den Tablet PC entnehmen Zur Reinigung und Pflege ein leicht feuchtes Tuch und ein nicht scheuerndes Reinigungsmittel benutzen WARTUNG FEHLERSUCHE F und BESEITIGUNG B F Tablet PC sitzt außermittig F B Sicherungswinkel c entsprechend positionieren Kapitel 4 F B Tablet PC breiter als 330 mm 9 2 F Tablet PC wackelt F B Schieber enger stellen 7 6 F B Klemmung zu locker ggf ...

Page 5: ...ngs inclination format and direction ensure that the Tablet has a secure hold PREPARE THE STAND see above Safety Instructions 1 COMPONENTS Please visually check whether all parts are present and in order as far as recognizable a SWIVEL JOINT a with stand connection thread b TABLET CRADLE b base slider clamp c GUARD ARM c with felt and rubber cap 2 MOUNTING the SWIVEL JOINT 2 to the STAND 2 1 If th...

Page 6: ...ARM C 7 4 c Depending on the size of the Tablet PC 7 4 c the position of the guard arm c should 7 4 c be corrected 7 4 c see Chapter 6 and 4 7 5 Loosen the clamping of the slider 7 6 and retract the slider until the upper 7 6 attachment of the Tablet PC is securely 7 6 fastened to the cradle b In this process 7 6 the slightly compressed foam rubber 7 6 coating clamp the tablet 7 7 Tighten the clam...

Page 7: ...11 1 at an angle 11 1 Invisible stops in the swivel joint 11 1 limit the rotation 11 2 NOTE 11 2 Install guard arm c so that the stop 11 2 is at the bottom when the tablet is 11 2 aligned vertically if necessary the 11 2 guard arm must be inserted into the 11 2 swivel joint rotated by 180 11 2 see Chapter 4 12 DIRECTION 12 1 Initial position 12 1 The knurled disc and the swivel joint of 12 1 the c...

Page 8: ...hen carrying out maintenance and cleaning work For cleaning and maintenance use a slightly damp cloth and a non abrasive cleaning agent MAINTENANCE FAULT FINDING F and REPAIR R F Tablet PC sits off centre F B Position Guard arm c accordingly Chapter 4 F B Tablet PC wider than 330 mm 9 2 F Tablet PC wobbles F B Set slider tighter 7 6 F B Clamping too loose tighten if necessary 7 7 F B Tablet PC is ...

Reviews: