background image

Material

Swivel joint, handles: Polyamid (PA) 
Tablet cradle: Bio-based plastic 
Support arm, guard arm, screw connections: steel, brass 
Clamp: Aluminum profile 
Caps, foam rubbers, rubber washers: TPE, EPDM, TPU

Load capacity

Tablet PCs (check dimensions)

Dimensions

for Tablets ~10" - 16" 
width 150-330/430 mm, height 158-280 mm, depth: 20 mm 
Connection thread stand: BSW 3/8" resp. 5/8" 

Cardboard

240 x 120 x 180 mm

Weight

net: 0.4 kg, gross: 0.5 kg

TECHNICAL DATA

KÖNIG & MEYER

 GmbH & Co. KG  

Kiesweg 2, 97877 Wertheim, www.k-m.de 

19744-000-55  Rev.05  03-80-502-00  3/21

19744 Tablet PC stand holder 

19744

 »Biobased«

- Careful handling maintains the function and safety of the installation 
- Regularly check the proper condition of the components; defective parts must be  

-

 replaced or repaired   

- Ensure that the screw and plug connections are firmly seated before use 
- Always remove the tablet PC first when carrying out maintenance and cleaning work 
- For cleaning and maintenance, use a slightly damp cloth and a non-abrasive  

-

 cleaning agent

MAINTENANCE

FAULT-FINDING (F) and REPAIR (R)

F: Tablet PC sits off-centre 

F:

 B: Position Guard arm 

c

 accordingly (Chapter 

4

F:

 B: Tablet PC wider than 330 mm (

9.2

 
F: Tablet PC wobbles 

F:

 B: Set slider tighter (

7.6

F:

 B: Clamping too loose, tighten if necessary (

7.7

F:

 B: Tablet PC is smaller than the min. dimension of 158 mm (

9.3

  
F: Tablet PC stand holder wobbles 

F:

 B: Swivel joint 

a

 screwed too loosely to the stand 

F:


B:

 Check connection and tighten if necessary  

F:


B:

 (Chapter 

2

 and 

12

)   

F:

 B: Not properly engaged? Place cradle 

b

 and engage it correctly  

F:


B:

 (Chapter 

5

    
F: Cradle 

b

 cannot be pulled off swivel joint 

a


F:

 B: First press lever, then unlock cradle 

a

 and pull off 

F:


B:

 (Chapter 

6

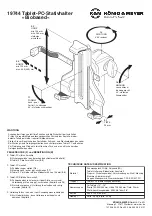
9.1


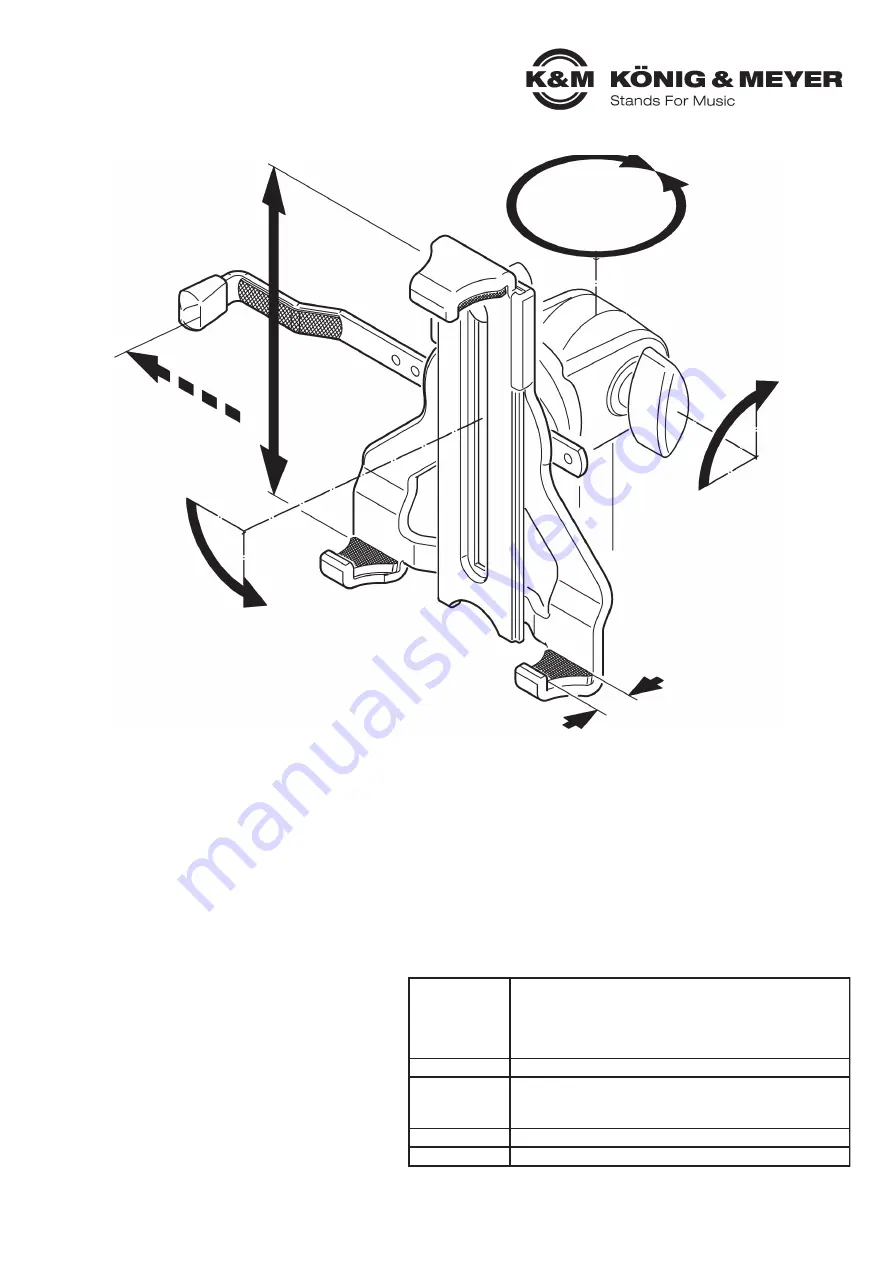
DEPTH 
20 mm 

9.2


WIDTH 
min.150 mm  
max. 330 (430) mm 

9.3


HEIGHT 
min.158 mm 
max. 280 mm 
infinitely 
variable 

10


TILT 
from vertical  
to horizontal: 
90°- stepless  
swiveling

11


FORMAT 
horizontal - vertical 
Portrait - Landscape 
90°- stepless swivelling

12


DIRECTION 

360° all around

Summary of Contents for Biobased

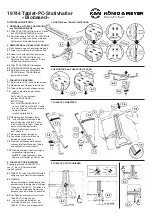
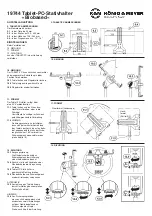
Page 1: ...cheren Halt des Tablets zu achten Vielen Dank dass Sie sich für dieses Projekt entschieden haben Bitte lesen und beachten Sie sorgfältig diese Anleitung Sie informiert Sie über alle wichtigen Schritte die für einen sicheren Aufbau und Betrieb erforderlich sind Wir empfehlen sie auch für den späteren Gebrauch aufzubewahren 1 BESTANDTEILE 2 MONTAGE des SCHWENKGELENKS am STATIV 3 HALTERUNG VOREINSTEL...

Page 2: ...e nach Größe des Tablet PC sollte 7 4 c die Position des Sicherungswinkels c 7 4 c korrigiert werden 7 4 c siehe Kapitel 6 und 4 7 5 Klemmung des Schiebers lösen 7 6 und Schieber einfahren bis die 7 6 obere Anlage den Tablet PC sicher 7 6 in der Halterung b fixiert Die dabei 7 6 etwas zusammengepressten 7 6 Schaumstoffanlagen spannen 7 6 das Tablet ein 7 7 Klemmung wieder festziehen 7 8 Festsitz d...

Page 3: ...im Schwenk 11 1 gelenk begrenzen die Verdrehung 11 2 HINWEIS 11 2 Sicherungswinkel c so installieren 11 2 dass sich bei vertikaler Ausrichtung 11 2 des Tablets der Anschlag unten befin 11 2 det gegebenenfalls muss der Siche 11 2 rungswinkel um 180 verdreht ins 11 2 Schwenkgelenk eingesetzt werden 11 2 siehe Kapitel 4 12 RICHTUNG 12 1 Ausgangsstellung 12 1 Die Rändelscheibe und das 12 1 Schwenkgele...

Page 4: ...gungsarbeiten zunächst immer den Tablet PC entnehmen Zur Reinigung und Pflege ein leicht feuchtes Tuch und ein nicht scheuerndes Reinigungsmittel benutzen WARTUNG FEHLERSUCHE F und BESEITIGUNG B F Tablet PC sitzt außermittig F B Sicherungswinkel c entsprechend positionieren Kapitel 4 F B Tablet PC breiter als 330 mm 9 2 F Tablet PC wackelt F B Schieber enger stellen 7 6 F B Klemmung zu locker ggf ...

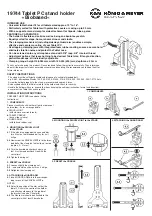
Page 5: ...ngs inclination format and direction ensure that the Tablet has a secure hold PREPARE THE STAND see above Safety Instructions 1 COMPONENTS Please visually check whether all parts are present and in order as far as recognizable a SWIVEL JOINT a with stand connection thread b TABLET CRADLE b base slider clamp c GUARD ARM c with felt and rubber cap 2 MOUNTING the SWIVEL JOINT 2 to the STAND 2 1 If th...

Page 6: ...ARM C 7 4 c Depending on the size of the Tablet PC 7 4 c the position of the guard arm c should 7 4 c be corrected 7 4 c see Chapter 6 and 4 7 5 Loosen the clamping of the slider 7 6 and retract the slider until the upper 7 6 attachment of the Tablet PC is securely 7 6 fastened to the cradle b In this process 7 6 the slightly compressed foam rubber 7 6 coating clamp the tablet 7 7 Tighten the clam...

Page 7: ...11 1 at an angle 11 1 Invisible stops in the swivel joint 11 1 limit the rotation 11 2 NOTE 11 2 Install guard arm c so that the stop 11 2 is at the bottom when the tablet is 11 2 aligned vertically if necessary the 11 2 guard arm must be inserted into the 11 2 swivel joint rotated by 180 11 2 see Chapter 4 12 DIRECTION 12 1 Initial position 12 1 The knurled disc and the swivel joint of 12 1 the c...

Page 8: ...hen carrying out maintenance and cleaning work For cleaning and maintenance use a slightly damp cloth and a non abrasive cleaning agent MAINTENANCE FAULT FINDING F and REPAIR R F Tablet PC sits off centre F B Position Guard arm c accordingly Chapter 4 F B Tablet PC wider than 330 mm 9 2 F Tablet PC wobbles F B Set slider tighter 7 6 F B Clamping too loose tighten if necessary 7 7 F B Tablet PC is ...

Reviews: