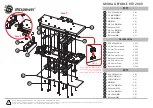

3
Hardware Installation:
1. Turn off the power to your computer and any other connected peripheral devices.
2. Unplug the power cord from the back of the computer.
3. Remove your computer’s cover.
4. Remove the slot bracket from an available PCI slot.
5. To install the card, carefully align the card’s bus connector with the selected PCI slot on the motherboard. Push the
board down firmly, but gently, until it is well seated.
6. Replace the slot bracket’s holding screw to secure the card.
Device Connection:
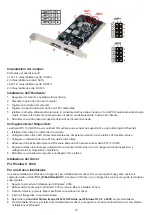
The S-ATA 150 PCI card is a two-channel serial ATA controller that supports up to two serial ATA hard disk drives.
1. Install your hard disk drive(s) in chassis.
2. Connect the serial ATA hard disk drive to the system power supply using the included serial ATA power cable.
3. Connect one end of the serial ATA cable to the hard drive.
4. Attach the other end of the serial ATA cable to the serial ATA port on the S-ATA 150 PCI card.
5. Follow the same instructions to connect up to two hard drives. After you have connected the second the device, you
have completed the device connections,
6. Replace the computer cover and reconnect the power cord.
Driver Installation
For Windows
®
2000
For A New Installation
A new installation requires a floppy disk for the driver installation. To make this floppy disk, copy the contents of the
“
PCI_IO\Sata\Non-RAID
” folder, found on the driver CD, onto a blank floppy disk then follow the directions below.
1. Follow the Windows
®
2000 installation procedure.
2. On the Windows
®
2000 setup screen, press
F6
to install the driver.
3. When prompted, press
S
to specify the location of the driver.
4. Insert the floppy disk, then press
Enter
.
5 Select Silicon Image
SiI 3x12 SATALink Controller for Windows NT 4.0 and 2000
, then press
Enter
.
6 Press
Enter
again to finish the driver installation, then follow the on-screen instructions to complete the Windows
®
installation.
For An Existing Installation
1. In the
Found New Hardware Wizard
, click
Next
.
2. Select
Search for a suitable driver for my device (recommend)
then click
Next
.
3. Insert the driver CD, check
CD-ROM drives
, uncheck the other boxes, click
Next
, then click
Next
again.
4. If the
Digital Signature Not Found
message appears, click
Yes
. Our driver has been thoroughly tested for stability
and compatibility.
5. Click
Finish
.
For Windows
®
XP/Server 2003
For New Installation
A new installation requires a floppy disk for the driver installation. To make this floppy disk, copy the contents of the
“PCI_IO\Sata\Non-RAID”
folder, found on the driver CD, onto a blank floppy disk then follow the directions below.
1. Follow Microsoft
®
Windows installation procedure.
2. In the Windows
®
setup screen, press
F6
to install the driver.
3. When prompted, press
S
to specify the location of the driver.
4. Insert the floppy disk, then press
Enter
.
5. Select Silicon Image
SiI 3x12 SATALink Controller for Windows
®
XP/Server 2003
, then press
Enter
.
6. Press
Enter
to finish the driver installation, then follow the on-screen instructions to complete the Windows installation.
Note:
If the
Security Alert
warning pops up, click
Yes
. Our driver has passed Microsoft
®
compatibility tests, this message
appears during any new installation.