background image

3

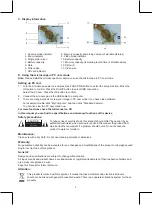
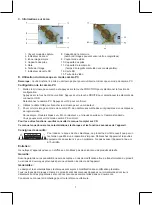
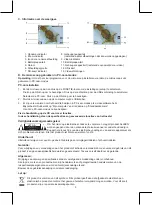
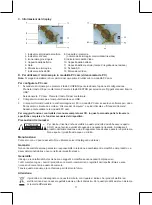
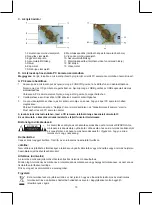
C.  Display information

1. Capture mode indicator

8. Memory capacity (remaining number of storable pictures)

2. Zoom indicator

9. Video mode indicator

3. Single picture icon

10. Battery capacity

4. Battery capacity

11. Memory capacity (remaining record time of storable video)

5. Date

12. SD card 

6. Picture size

13. Video size

7. SD card indicator

D.  Using the microscope in PC cam mode

Note: 

Please install the microscope driver before you use the microscope in PC cam mode.

Setting up PC cam

1.  Turn the microscope power on and press the FUNCTION button to select the setup function. Press the 

OK button to confirm. Press the RIGHT button to select USB connection.


Select the PC cam. Press the OK button to confirm.

2.  Connect the microscope via the USB cable to a computer.
3.  There are many methods to view your image in PC cam mode if you have video software.


For example: Double-click “My Computer”, and then click “Standard Camera”.


You can live view the PC cam mode now.

For more functions check the full manual on CD.

In this manual you can find the specifications and advanced functions of the device.

Safety precautions: 

RISK OF ELECTRIC SHOCK

DO NOT OPEN

CAUTION

 To reduce risk of electric shock, this product should ONLY be opened by an 

authorized technician when service is required. Disconnect the product from 

mains and other equipment if a problem should occur. Do not expose the 

product to water or moisture.

Maintenance:

Clean only with a dry cloth. Do not use cleaning solvents or abrasives.

Warranty:

No guarantee or liability can be accepted for any changes and modifications of the product or damage caused 

due to incorrect use of this product.

General:

Designs and specifications are subject to change without notice. 

All logos brands and product names are trademarks or registered trademarks of their respective holders and 

are hereby recognized as such.

Keep this manual for future reference.

Attention:

This product is marked with this symbol. It means that used electrical and electronic products 

should not be mixed with general household waste. There is a separate collections system for these 

products.

Summary of Contents for CMP-USBMICRO20

Page 1: ...COP USB CU ECRAN LCD BRUGERVEJLEDNING p 26 USB MIKROSKOP MED LCD SK RM HASZN LATI TMUTAT o 14 USB MICROSZK P LCD KIJELZ VEL K YTT OHJE s 16 USB MIKROSKOOPPI LCD N YT LL ANLEITUNG s 4 USB MIKROSKOP MIT...

Page 2: ...B Quick start Installing microscope batteries not included 1 Slide open the battery compartment cover 2 Insert the batteries Be sure to load the batteries with and terminals as shown on the microscope...

Page 3: ...now For more functions check the full manual on CD In this manual you can find the specifications and advanced functions of the device Safety precautions RISK OF ELECTRIC SHOCK DO NOT OPEN CAUTION To...

Page 4: ...ht im Lieferumfang in das Mikroskop 1 Schieben Sie die Abdeckung des Batteriefachs auf 2 Setzen Sie die Batterien ein Achten Sie darauf dass Sie die Pole und der Batterien wie am Mikroskop dargestellt...

Page 5: ...n Sie anschlie end auf Standard Kamera Sie k nnen nun die Bilder im Modus PC Kamera live ansehen Weitere Funktionen finden Sie im Kompletthandbuch auf der CD In diesem Handbuch finden Sie auch die Tec...

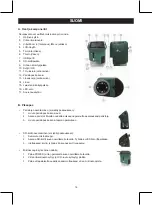
Page 6: ...partiment des piles 13 Cache en option 14 Objectif 15 Tr pied Emplacement vis 16 LED 17 S lecteur grossissement B D marrage rapide Installation des piles du microscope non fournies 1 Faites glisser le...

Page 7: ...ez sur Mon ordinateur et cliquez ensuite sur Cam ra standard Vous pouvez alors voir le mode cam ra PC en direct Pour les autres fonctions veuillez consulter le manuel complet sur CD Ce manuel vous don...

Page 8: ...batterijvak 13 Inspectievak optioneel 14 Lens 15 Statief schroefdraadbevestiging 16 LED 17 Vergrotingsschakelaar B Snel starten Plaatsen van de batterijen in de microscoop niet meegeleverd 1 Open het...

Page 9: ...deze handleiding staan de specificaties en geavanceerde functies van het toestel Veiligheidsvoorzorgsmaatregelen Om het risico op elektrische schokken te voorkomen mag dit product ALLEEN worden geopen...

Page 10: ...io Veloce Per installare le batterie nel microscopio non incluse 1 Fate scorrere ed aprite il coperchio del vano batterie 2 Inserite le batterie Assicuratevi di posizionare le batterie con i poli alli...

Page 11: ...Per maggiori funzioni controllate il manuale completo sul CD In questo manuale potrete trovare le specifiche complete e le funzioni avanzate del dispositivo Precauzioni di sicurezza Per ridurre il ri...

Page 12: ...a Instalaci n de las bater as del microscopio no suministradas 1 Deslice la tapa del compartimiento de las pilas para abrirla 2 Inserte las bater as Aseg rese de insertar las bater as con los terminal...

Page 13: ...tadora si tiene software de video Por ejemplo Haga doble clic en Mi computadora y a continuaci n haga clic en C mara est ndar Ahora puede ver en vivo en el modo de c mara de computadora Para conocer m...

Page 14: ...ke opcion lis 14 Lencse 15 H roml b csavarfurat 16 LED 17 Nagy t kapcsol B Gyors haszn lati tmutat A mikroszk p akkumul torainak nem r sze a csomagnak behelyez se 1 Cs sztassa el az akkumul tortart f...

Page 15: ...Most n zheti az l PC kamera n zetet A tov bbi funkci k tekintet ben l sd a CD lemezen tal lhat teljes haszn lati tmutat tF Ez az tmutat a k sz l k m szaki adatait s fejlett funkci it tartalmazza Bizt...

Page 16: ...Paristojen asentaminen ei sis lly pakkaukseen 1 Liu uta paristopes n kansi auki 2 Asenna paristot Muista noudattaa oikeaa napaisuutta asentaessasi paristoja 3 Liu uta paristopes n kansi takaisin paik...

Page 17: ...d Camera Voit nyt k ytt PC kameratilaa reaaliaikaisesti Saadaksesi lis tietoja eri toiminnoista katso CD ll oleva t ydellinen k ytt ohje T st k ytt ohjeesta l yd t laitteen tekniset tiedot sek lis toi...

Page 18: ...ngsomkopplare B Snabbstart St ller in batterier inte levererade 1 Glidreglage f r ppning av batterifacket 2 L gg i batterier Se till att l gga i batterierna med och polerna s som det visas p mikroskop...

Page 19: ...letta manualen p CD I denna manual kan du hitta specifikationer och avancerade funktioner f r apparaten S kerhetsanvisningar F r att minska risken f r elektriska st tar b r denna produkt ENDAST ppnas...

Page 20: ...ojan z vitov obj mka 16 LED 17 P ep na zv t en B Rychl spu t n Instalace bateri do mikroskopu nejsou sou st balen 1 Vysu te kryt prostoru pro baterie 2 Vlo te do n j baterie Dbejte na zachov n spr vn...

Page 21: ...m te v re imu p ipojen mikroskopu s po ta em iv obraz K z sk n informac o dal ch funkc ch si prostudujte podrobn manu l na CD V n m naleznete dal specifikace a pokro il funkce za zen Bezpe nostn opat...

Page 22: ...Ghid rapid Instalarea bateriilor microscopului nefurnizate 1 Deschide i capacul compartimentului bateriilor prin culisare 2 Introduce i bateriile Nu omite i s pune i baterii cu bornele i conform indic...

Page 23: ...suplimentare consulta i manualul complet de pe CD n acest manual pute i g si specifica iile i func iile avansate ale dispozitivului M suri de siguran Pentru a se reduce pericolul de electrocutare ace...

Page 24: ...24 A A 1 2 3 4 LCD 5 6 7 USB 8 SD 9 10 OK 11 12 13 14 15 16 LED 17 B 1 2 3 SD 1 2 SD 3 1 POWER 2 LCD 3 POWER...

Page 25: ...25 C 1 8 2 3 9 4 10 5 11 6 7 SD 12 SD 13 D PC Camera driver 1 FUNCTION OK RIGHT USB OK 2 USB 3 My Computer Standard Camera CD...

Page 26: ...godt i gang Il gning af batterier i mikroskopet medf lger ikke 1 Skub d kslet af batterirummet 2 L g batterierne i Kontroll r at batterierne vender i overensstemmelse med markeringerne for polaritet o...

Page 27: ...nger finder du i den fulde manual der ligger p CD en I manualen finder du ogs oplysninger om specifikationer og avancerede funktioner Sikkerhedsforholdsregler For at neds tte risikoen for elektrisk st...

Page 28: ...rrelsesbryter B Hurtigstart Innsetting av mikroskopbatterier medf lger ikke 1 Sky opp dekselet til batterirommet 2 Sett inn batterier Pass p sette inn batteriene med og terminalene som vist p mikrosko...

Page 29: ...jekk hele h ndboken p CD en for flere funksjoner I denne h ndboken finner du spesifikasjonene og avanserte funksjoner til enheten Sikkerhetsforholdsregler For redusere faren for str mst t skal dette p...

Page 30: ...ROSCOPIO USB CON PANTALLA LCD Megnevez se USB MICROSZK P LCD KIJELZ VEL Kuvaus USB MIKROSKOOPPI LCD N YT LL Beskrivning USB MIKROSKOP MED LCD BILDSK RM Popis USB MIKROSKOP S LCD OBRAZOVKOU Descriere M...

Reviews: