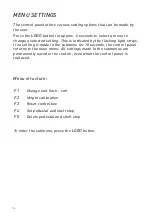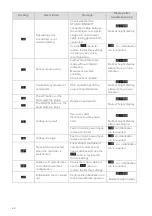
MENU SETTINGS
F 1
Change unit (inch - cm)
F 2
Height calibration
F 3
Reset control box
F 4
Set pedestal and shelf stop
F 5
Delete pedestal and shelf stop
To enter the submenu, press the
LOGO
button.
The control panel offers various setting options that can be made by
the user.
Press the
LOGO
button for approx. 6 seconds to select a menu to
change a selected setting. This is indicated by the flashing light strips.
If no setting is made in the submenu for 10 seconds, the control panel
returns to the main menu. All settings made in the submenus are
permanently saved in the control, even when the control panel is
replaced.
Menu structure:
54
Summary of Contents for TALO.YOU
Page 4: ...4 ...
Page 12: ...HÖHENAUSGLEICH max 10 mm max 10 mm max 10 mm max 10 mm 12 ...
Page 14: ...BEDIENUNG DER METALL KLAPPWANNE A A A B C C 14 ...
Page 15: ...BEDIENUNG DER KUNSTSTOFF KLAPPWANNE A A A B C C 15 ...
Page 32: ...32 ...
Page 44: ...LEVELLING ADJUSTMENT max 10 mm max 10 mm max 10 mm max 10 mm 44 ...
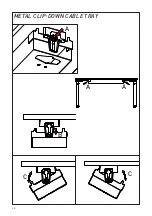
Page 46: ...METAL CLIP DOWN CABLE TRAY A A A B C C 46 ...
Page 47: ...PLASTIC CLIP DOWN CABLE TRAY A A B C C A 47 ...
Page 64: ...64 ...
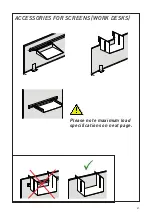
Page 65: ...ACCESSORIES FOR SCREENS WORK DESKS Please note maximum load specifications on next page 65 ...
Page 76: ...maxi 10 mm maxi 10 mm maxi 10 mm maxi 10 mm RATTRAPAGE EN HAUTEUR 76 ...
Page 78: ...A A A B C C UTILISATION DE LA GOULOTTE RABATTABLE EN MÉTAL 78 ...
Page 79: ...A A B C C A UTILISATION DE LA GOULOTTE RABATTABLE EN MATIÈRE PLASTIQUE 79 ...
Page 96: ...96 ...
Page 108: ...HOOGTEVERSTELLING max 10 mm max 10 mm max 10 mm max 10 mm 108 ...
Page 110: ...A A A B C C BEDIENING VAN DE METALEN KLAPGOOT 110 ...
Page 111: ...A A B C C A BEDIENING VAN DE KUNSTSTOF KLAPGOOT 111 ...
Page 128: ...128 ...
Page 133: ...133 ...

