background image

 Safety 

Instructions 

V Panel Express – User’s Manual 

Instructions for the Lithium Battery 

The installed board is equipped with a lithium battery. To replace this battery refer 
to the instructions described in the chapter  

Replacing the Lithium Battery

 ” 


Warning 

There is a danger of explosion if the wrong type of battery is used 
for replacement. Replace only with the same or equivalent type of 
battery as recommended by the manufacturer. Dispose of used 
batteries according to the manufacturers instructions. 


StockCheck.com

Summary of Contents for V Box Express II

Page 1: ...V Panel Express V Box Express II User s Manual Version 1 0 Kontron Embedded Computers GmbH 0 0096 3678 S t o c k C h e c k c o m ...

Page 2: ...ic Compatibility 10 Scope of Delivery 11 Optional Parts 11 Type Label and Product Identification 11 Product Description 12 Front Side View 14 Panel mount Front Plate 14 Display 15 Touch Screen 15 USB 2 0 Connector 17 Rear Side 18 Bottom Side with Interfaces 19 Interfaces on the Bottom Side Rear side of the System 20 Power Button 21 LED Control Indicators 21 Power LED Error codes This function disp...

Page 3: ...tallation Instructions 35 Operating System and Hardware Component Drivers 36 Main Specifications 37 Power Specifications 38 Electrical Specifications 38 Mechanical Specifications 38 Environmental Specifications 39 CE Directives and Standards 40 Technical Appendix Interfaces 41 Serial Port COM1 COM2 41 USB Port 42 DVI I Connector Single Link 43 Technical Support 44 Returning Defective Material 45 S...

Page 4: ...son Kontron Embedded Computers expressly informs the user that this manual only contains a general description of technical processes and instructions which may not be applicable in every individual case In cases of doubt please contact Kontron Embedded Computers This manual is protected by copyright All rights are reserved by Kontron Embedded Computers Copies of all or part of this manual or tran...

Page 5: ...arning notices are not observed This symbol indicates that the product or parts thereof may be damaged if the corresponding warning notices are not observed This symbol indicates general information about the product and the user manual This symbol indicates detail information about the specific product configuration This symbol precedes helpful hints and tips for daily use S t o c k C h e c k c o...

Page 6: ...aw This applies to batteries and display for example Exclusion of Accident Liability Obligation Kontron Embedded Computers shall be exempted from the statutory accident liability obligation if the user fails to observe the safety instructions Liability Limitation Exemption from the Warranty Obligation In the event of damage to the device caused by failure to observe the hints in this manual and on...

Page 7: ...ith the instructions for use The electrical installations in the room must correspond to the requirements of the respective regulations Take care that there are no cables particularly power cables in areas where persons can trip over them Do not use a power cable in sockets shared by a number of other power consumers Do not use an extension cable Only use the power cord supplied Do not place the d...

Page 8: ...tensions are made to the device the legal stipulations and the device specifications must be observed The device must be switched off before installation and removal of any PCI and CompactFlash cards Only original accessories approved by Kontron Embedded Computers may be used It must be assumed that safe operation is no longer possible if the device has visible damage or if the device no longer fu...

Page 9: ... mats Grounding Methods The following measures help to avoid electrostatic damages to the device 1 Cover workstations with approved antistatic material Always wear a wrist strap connected to workplace as well as properly grounded tools and equipment 2 Use antistatic mats heel straps or air ionizers for more protection 3 Always handle electrostatic sensitive components by their edge or by their cas...

Page 10: ...tery refer to the instructions described in the chapter Replacing the Lithium Battery Warning There is a danger of explosion if the wrong type of battery is used for replacement Replace only with the same or equivalent type of battery as recommended by the manufacturer Dispose of used batteries according to the manufacturers instructions S t o c k C h e c k c o m ...

Page 11: ...struction manual may cause harmful interference to radio communications Operation of this equipment in residential area is likely to cause harmful interference in which case the user will be required to correct the interference at his own expense Electromagnetic Compatibility This product has been designed for industrial commercial and office use including small business use The most recent versio...

Page 12: ... part number is at the rear right hand side of the system Type Label for Systems Kontron Product Identification V Panel Express 121 150 170 2 AOHA xxxx for V panel Express with ETXexpress PM Module V Panel Express 121 150 170 2 AOHA xxxx for V panel Express with ETXexpress CD Module On the type label of your system the XXXX group is replaced by Arabic numerals combination according to the ordered ...

Page 13: ...er that is very suitable for using in harsh industrial environment The system accommodates a baseboard with an ETXexpress module Depending on the ordered system configuration your V Panel Express can be equipped with the ETXexpress PM or CD ETX module Depending on the ordered system configuration the built in display can be as a 12 1 15 or 17 TFT LCD display In front of the display there is instal...

Page 14: ...e a USB 2 0 port The V Panel Express is designed to be powered from a DC high voltage external power sources The V Panel Express system ensures at the front side the IP65 NEMA 250 Type 12 and 13 protection class The V Panel Express I is a fan less system The cooling of the V Panel Express is performed by the heat sink surface of the chassis rear side When powering on the V Panel Express make sure ...

Page 15: ...overed Fig 2 V Panel Express shown with a 15 display 1 Front plate panel mount 2 TFT display 12 1 15 17 3 USB 2 0 connector covered Panel mount Front Plate This version of front plate is suitable for the installation in an instrument panel or other cabinets Therefore at the rear side of the front plate are twelve threaded M4 metric studs refer to the Rear Side chapter 1 2 3 S t o c k C h e c k c o...

Page 16: ...een The display unit is equipped with a resistive touch screen The touch screen is internally connected to the on board USB interface of the installed ETX baseboard The touch screen registers contacts of a finger or a pen and moves the mouse pointer Do not use a hard or a pointed object to operate the touch screen since it can damage the touch screen foil surface Install touch controller software ...

Page 17: ...tallation and calibration of touch you find a new icon in the control panel to set additional features Calibrating the Touch Screen Calibration serves two purposes Sets the active area of the touch screen Aligns the active area of the touch screen to the screen s image S t o c k C h e c k c o m ...

Page 18: ...n may not be aligned with the screen s image or may be unnecessarily small in size Use the calibration tool Align to recalibrate the touch screen as necessary The installed touch screen is calibrated at the factory Run the calibration routine when an alignment problem exists between the mouse pointer and the contact location on the screen Carefully touch the location of the markers with your stylu...

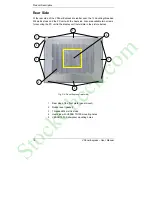
Page 19: ... with the heat sink Also are available two screws for securing the PC unit to the display unit not visible in the picture below Fig 3 V Panel Express rear side 1 Rear side of the front plate panel mount 2 Rubber seal gasket 3 Threaded M4 metric studs 4 Heat sink with VESA 75 100 mounting holes 5 VESA 75 100 compliant mounting holes 3 3 3 2 1 3 4 5 S t o c k C h e c k c o m ...

Page 20: ...utton ATX 5 LED control indicators 6 Free expansion slots for PCI cards 32bit 33MHz half size 7 COM2 RS232 port connector 8 DC power plug shown with DC terminal for the power cord 9 Reset switch 10 HDD drive cage with knurled screws 11 COM1 RS232 port connector 12 CF slot not equipped 13 Express Card slot 14 CF slot shown with installed CF card type I 15 DVI I VGA connector 16 Grounding Piont 17 C...

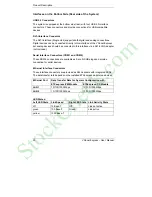
Page 21: ... DVI to VGA adapter not included Serial Interface Connectors COM1 and COM2 These RS232 connections are available as 9 pin D SUB plugs and provide connection for serial devices Ethernet Interface Connectors These interface connectors are provided as RJ45 sockets with integrated LEDs The data transfer rate depends on the installed ETXexpress module see below Data Transfer Rate for System Configurati...

Page 22: ...er source by turning it off via the ATX power button The unit is only completely disconnected from the main power source when the power cord is disconnected either from the power source or the unit Therefore the power cord and its connectors must always remain easily accessible LED Control Indicators The V panel Express is equipped with two LED indicators bottom rear side Lights up green when the ...

Page 23: ...ore than one fail condition occurs simultaneously only the highest priority error code will be shown The priority order is 1 most Voltage Error 2 less Temperature Error 3 less Fan Error 4 at least Battery Error E g is there a temperature error and a fan error only the temperature error will be displayed Error Good Error 12V 0 11 4V 11 4V 12 6V 12 6V 5V 0 4 7V 4 7V 5 2V 5 2V Voltage Error 3 3V 0 3 ...

Page 24: ...emovable HDD Drive Cage The V panel Express is equipped with a removable drive cage for a 2 5 SATA HDD The drive cage is secured to the system with two knurled screws It is allowed to remove replace the hard disk while the system is powered up In order to prevent the loss of data do not remove the hard disk during HDD read or write activities System operation is allowed only with closed HDD drive ...

Page 25: ...Product Description 24 V Panel Express User Manual 1 2 5 SATA hard disk 2 Removable drive cage 3 Knurled screws S t o c k C h e c k c o m ...

Page 26: ...stalled onto the ETX baseboard Install the expansion cards as described in the Installing Removing the expansion cards chapter Fig 7 Left side of V Panel Express When powering on the V Panel Express make sure that the air intake and exhaust openings are not obstructed 2 3 5 1 4 4 Heat sink with VESA 75 100 mounting holes 5 Expansion card access door with knurled screw 6 Front panel with display 7 ...

Page 27: ...Fig 8 Right side of V Panel Express When powering on the V Panel Express make sure that the air intake and exhaust openings are not obstructed 3 2 1 1 Front panel with display 2 Heat sink with VESA 75 100 mounting holes 3 Exhaust openings S t o c k C h e c k c o m ...

Page 28: ...e of V Panel Express 1 Heat sink with VESA 75 100 mounting holes 2 Screws for securing the PC unit to the display unit 3 Exhaust openings When powering on the V Panel Express make sure that the air intake and exhaust openings are not obstructed 1 3 2 3 S t o c k C h e c k c o m ...

Page 29: ...Module The user s manual of the installed board can be downloaded from our web page www kontron com Search for the name of the installed board Riser Card The V Panel Express accommodates a riser card with two 32 bit PCI slots You can expand your system with PCI extension cards as half size length To expand your system with additional cards please observe the power consumption specification specifi...

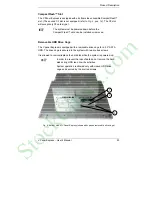
Page 30: ...not exceed 3m Strip and twist the connecting wire ends but do not tin it the with solder Fig 10 DC connector without Phoenix plug terminal Fig 10a DC Terminal Phoenix plug terminal AWG 28 16 For the DC connection prepare the connecting wires with the supplied Phoenix plug Pay attention to the right polarity of the wires refer to Fig 10 and 10a The second end of each wire will be prepared as requir...

Page 31: ...the cover to gain access to the internal components the system must be powered down and the power cord has to be disconnected from the power source To expand your system with additional cards please observe the power consumption specification specified in the Power Specifications chapter and that each additional card does not exceed 25 W power consumption Please observe the safety instruction for ...

Page 32: ...hing and damage 3 Loosen the knurled screw on the left side of the unit that secures the access door refer to Fig 7 pos 2 and open the expansion card access door 4 To remove install an expansion card you have to remove the corresponding expansion card slot bracket Loosen the corresponding fastening screw on the internal side which secures the slot bracket and remove it Retain the screws for later ...

Page 33: ... 32 V Panel Express User Manual 1 Screws to secure the expansion cars slot brackets 2 Front panel detail 3 Free PCI slots 32bit 32 MHz 4 Expansion cards access door with knurled screw 5 Changeable Batterie S t o c k C h e c k c o m ...

Page 34: ...pter steps 1 3 2 If your system is equipped with expansion cards please remove them first as described in the Installing Removing the Expansion Cards chapter steps 5 6 3 Remove the battery by pressing outwards the ejector spring 4 Insert the new battery into the socket 5 Make sure that you insert the battery correctly The plus pole must be on top 6 Reinstall the removed expansion cards and reconne...

Page 35: ...ere is a danger of explosion if the wrong type of battery is used for replacement Replace only with the same or equivalent type of battery as recommended by the manufacturer Dispose of used batteries according to the manufacturers instructions S t o c k C h e c k c o m ...

Page 36: ... for air intake and exhaust on the device must not be obstructed Leave at least 5 cm approx 2 of free space around the PC unit to prevent the device from possibly overheating The voltage feeds must not be overloaded Adjust the cabling and the external overcharge protection to correspond with the electrical data indicated on the type label The type label is located on the rear right hand side of th...

Page 37: ...me If you have ordered your V Panel Express without pre installed operating system you have to install the operating system and the corresponding drivers for the ordered computer configuration optional hardware components The needed drivers can be downloaded from our web page www kontron com Search for the product name Consider the manufacturer specifications of the operating system and the integr...

Page 38: ...ink or 1x external DVI to VGA Adapter 4x USB 2 0 1 0 1x LAN2 10 100 1000 Mbps 1x LAN1 10 100Mbps for ETXexpress CD or 1x LAN1 10 100 1000 Mbps for ETXexpress PM 2x serial Port RS232 Free Expansion Slots 2x PCI 32 bit 33MHz half size Removable HDD external accessible 1x SATA I 150Mbps for config with ETXexpress PM or 1x SATA II 300Mbps for config with ETXexpress CD Drive Bay external accessible 1x ...

Page 39: ...stomized applications Power consumption at 3 3 VDC 5 VDC and 12 VDC combined max 75W Electrical Specifications System Type Input voltage Input current V Panel Express 121 24 VDC PSU 20 A max 5 4A V Panel Express 150 24 VDC PSU 20 A max 5 4A V Panel Express 170 24 VDC PSU 20 A max 5 4A Mechanical Specifications Weight without packaging 11 kg 24 25 lbs max Housing Zinc coated steel Aluminum front be...

Page 40: ...on condensing Storage Transit Temp relative Humidity 0 40 C at 90 r H non condensing 0 45 C max at 70 r H non condensing Operating Altitude 3000 m 10 000 ft Storage Transit Altitude 4 500 m 15 000 ft Operating Shock 15 G 11 ms duration half sine Storage Transit Shock 30 G 11 ms duration half sine Operating Vibration 10 500 Hz 1 0 G Storage Transit Vibration 10 500 Hz 2 0 G S t o c k C h e c k c o ...

Page 41: ...Directive 2006 95 EC 2004 108 EC CE Marking 93 68 EEC Electrical Safety Standards EUROPE EN 60950 1 U S A to meet UL 60950 1 First Edition EMC Standards EUROPE Generic emission standard for industrial environments Emission EN 61000 6 4 Generic standards Immunity for industrial environments Immunity EN 61000 6 2 U S A FCC 47 CFR Part 15 Class A S t o c k C h e c k c o m ...

Page 42: ...onnections of the V Panel Express Low active signals are indicated by a minus sign Serial Port COM1 COM2 Pin Signal Name 9 pin D SUB Plug male 1 DCD Data Carrier Detect 2 RXD Receive Data 3 TXD Transmit Data 4 DTR Data Terminal Ready 5 GND Signal Ground 6 DSR Data Set Ready 7 RTS Request to Send 8 CTS Clear to Send 9 RI Ring Indicator S t o c k C h e c k c o m ...

Page 43: ...Technical Appendix Interfaces 42 V Panel Express User Manual USB Port Pin Signal Name 4 pin USB Socket Type A Version 2 0 1 1 1 VCC 2 Data 3 Data 4 GND S t o c k C h e c k c o m ...

Page 44: ...g VSYNC 9 TMDS1 Differential TMDS Data 1 10 TMDS1 Differential TMDS Data 1 11 GND TMDS Shield 12 13 NC 14 DVI_5V 5V 100mA Power Supply 15 GND Ground 16 DISPDET Hot Plug Detection 17 TMDS0 Differential TMDS Data 0 18 TMDS0 Differential TMDS Data 0 19 GND TMDS Shield 20 21 NC 22 GND TMDS Shield 23 TMDSSCL Differential TMDS Clock 24 TMDSSCL Differential TMDS Clock C1 DVI_R Analog red C2 DVI_G Analog ...

Page 45: ...unit part id number P No and the serial number S No of the unit provide the serial number found on the type label placed on the rear right hand side of the system Be ready to explain the nature of your problem to the service technician If you have questions about Kontron Embedded Computers or our products and services you may reach us at the aforementioned numbers or at www kontron com or by writi...

Page 46: ...ice before returning any material Clearly write or mark this number on the outside of the package you are returning 3 Describe the device failure behavior 4 When returning goods include the name and telephone number of a person whom we can contact for further explanations if necessary Where applicable always include all duty papers and invoice s associated with the item s in question 5 When return...

Reviews: