background image

“Go-To” Maksutov-Cassegrain

D I G I M A X - 9 0


90mm (3.6”)  F. 1250 f/13.8

INSTRUCTIONS

Summary of Contents for DIGIMAX - 90

Page 1: ... Go To Maksutov Cassegrain D I G I M A X 9 0 90mm 3 6 F 1250 f 13 8 INSTRUCTIONS ...

Page 2: ...int your telescope at a specific object or even tour the skies at the touch of a button The user friendly menu system allows automatic slewing to over 42 900 objects POWERING THE SKYSCAN AZ The Skyscan Az should be powered by 11 15V DC power supply tip positive ca pable of producing continuous current of minimum 1 amps Correctly plug the power cord into the 12V DC outlet on the mount For Multi func...

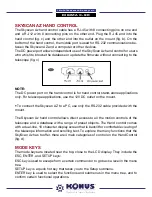
Page 3: ...ations use the 12V DC outlet on the mount To connect the Skyscan AZ to a PC use only the RS 232 cable provided with the mount The Skyscan Az hand control allows direct access to all the motion controls of the telescope and a database with a range of preset objects The Hand control comes with a dual line 16 character display screen that is backlit for comfortable viewing of the telescope informatio...

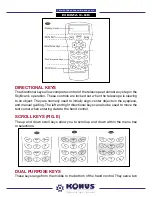
Page 4: ...o an object They are normally used to initially align center objects in the eyepiece and manual guiding The left and right directional keys can also be used to move the text curser when entering data to the hand control SCROLL KEYS FIG E The up and down scroll keys allow you to scroll up and down within the menu tree or selections DUAL PURPOSE KEYS These keys range from the middle to the bottom of...

Page 5: ... hand control will display a warning concerning pointing of telescope at the sun without proper equipment If you have read the message already pressing ESC will bypass the message and skip to the next step The hand control s red light will become dimmer and the backlight of the key pads will turn off if idle for 30 seconds Pressing any key turns it back on 6 Enter the telescope s current latitudin...

Page 6: ...tar alignment If you are using the Skyscan AZ for the first time and you are not familiar with the celestial object in the sky we recommend that you begin with the Brightest Alignment The Brightest star alignment will prompt and help you find the brightest star of a specific direction in the sky at your current site It is convenient for user to identify the brightest star in the sky Before performing...

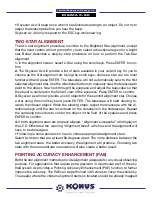
Page 7: ...fig H 4 For the first alignment star the mount will not slew to the star automatically use the directional buttons to manually slew the telescope to point to the object in the finder and then center it in the eyepiece You may change the sweling speed by pressing the RATE button and then choose a number between 0 slowest 9 fastest 5 Once the star has been centered in the eyepiece if it is a planet the...

Page 8: ...t of objects for the second alignment star Choose a star using the scroll keys and press ENTER The telescope will start slewing to wards the chosen object When the slewing stops adjust the telescope with the di rectional keys until the star is centered on the crosshairs in the finderscope Repeat the centering procedure to center the object in the field of the eyepiece and press ENTER to confirm 4 If ...

Page 9: ...hut off You will only need to perform the star alignment once as long as these two criteria are met 1 The telescope is moved to its home position Park the telescope before turning off the power 2 The telescope setup including the mount has not been moved Accessory change is acceptable as long as it is done with great caution When the hand control is turned on for the next time make sure that the t...

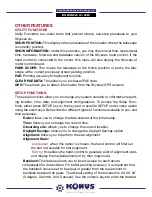
Page 10: ...ct an object by entering its number Pressing ENTER will display its coordinate Primary information such as size mag nitude and constellation are obtained by pressing the scroll keys Pressing ENTER once more will cause the telescope to slew the object PLANET This shortcut key takes you straight to the Plan ets sub menu in the database Use the scroll keys to scroll through the list of planets in our...

Page 11: ...te and alignment configurations To access the Setup Func tions either press SETUP key on the key pad or scroll to SETUP under menu option using the scroll keys Below lists the different types of functions available to you and their purposes Date Allows you to change the date entered at the initial setup Time Allows you to change the current time Observing site Allows you to change the current locat...

Page 12: ...INED DATABASE Skyscan AZ allows you to save up to 25 objects in the user defined database SAVING AN OBJECT TO THE DATABASE 1 In the main Menu use the scroll keys to scroll down the list until you find Object Catalog Press ENTER 2 Select User Defined in the Object Catalog scroll list and press ENTER NOTE The User Defined menu can also be accessed by pressing the quick reference hot key USER number 9 Fi...

Page 13: ...layed may not be a vacant one If you are unsure which numbers are vacant it is recommended that you first check for the available numbers by recalling the saved user objects RECALLING AN USER DEFINED OBJECT 1 See Step 1 4 of Saving an object to the database for details on how to access to the User Defined menu Select Recall Object and press ENTER 2 Use the scroll keys to browse through the User Obje...

Page 14: ...n 2 star alignment Alignment stars Auto Select Sort by Backlash Tracking Sidereal Rate Lunar Rate Solar Rate Stop Tracking Handset Setting Factory setting UTILITY FUNC Show Position Show Information Time Version Temperature Power voltage Park Scope PAE Clear PAE Data GPS PC Direct Mode TOUR OBJECT CATALOG Solar System Mercury Venus Mars Jupiter Saturn Uranus Neptune Pluto Moon Named Star Messier C...

Page 15: ... rev AZ 80 Slew speeds Rate 0 1 0X Rate 1 2 0X Rate 2 16X Rate 3 32X Rate 4 64X Rate 5 128X Rate 6 400X Rate 7 500X Rate 8 600X Rate 9 800X Tracking rates Sidereal Lunar Solar Tracking mode Dual Axes Tracking Alignment Method Brightest Star Alignment Two star Alignment Database 25 user defined objects Complete M NGC and IC and SAO catalogues total 42 900 objects Pointing Accuracy Up to 10 arc Min w...

Reviews: