background image

www.konvision.com

Summary of Contents for KUM 4K Series

Page 1: ...www konvision com ...

Page 2: ...V1 0 3 Konvision Monitor USER MANUAL KXM KUM 4K 8K LCD Monitors w w w k o n v i s i o n c o m ...

Page 3: ... Manual The instructions in this manual are for KXM KUM Series 4K 8K LCD monitors The following description uses model KUM 2720QD pictures Please confirm the model number of the device before reading this manual ...

Page 4: ... Description 10 Function Settings 11 Scene Settings 12 Function Settings 13 Waveform 14 Aux settings 15 Color Settings 16 Color Settings 16 Video Settings 18 Source Settings 18 Audio Settings 19 CC Settings 20 IMD Settings 20 OSD Settings 21 Video Settings 21 SDI or HDMI Input Source Switching 22 Scene Settings 22 S1 S2 S3 Button Switching 23 Configuration 23 S MODE Button Switching 23 Configurati...

Page 5: ... cabinet hard Use a soft lint free cloth to clean If the cabinet cleaning is more difficult use lint free cloth that has been very lightly dampened with detergent and then dry it to wipe 1 Please use the power cord recommended by the manufacturer 2 Please do not place heavy objects on the power cord 3 Please do not expose the monitors to rain humid dusty places 4 Please do not place vessels with l...

Page 6: ...al with it in a timely manner 1 This product smells of smoke and off flavor 2 When this product displays abnormal operating conditions such as there is no picture or sound 3 When any liquid is splashed into the product or product dropped 4 When the product soaked or fell into the water 5 When the product has been damaged or under other easy to get damaged circumstances 6 When the power cord or plu...

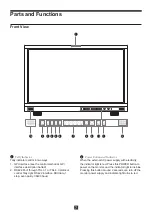
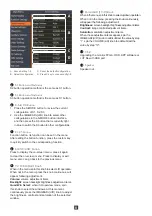
Page 7: ...ough TSL 3 1 or TSL 4 0 protocol control Tally light RS422 interface 8Bit data 1 stop even parity 38400 baud 1 Power Button and Indicator When the external AC power supply with electricity the indicator light is red Press this POWER button to power on the monitor and the indicator light turns blue Pressing this button around 2 seconds can turn off the monitor power supply and indicate light turns ...

Page 8: ...saturation adjustment items When those adjustment items appear spin the IMAGEADJ U D knob to add subtract the value by step 1 spin the VOLUME L R knob to add subtract the value by step 10 Function button its function can be set in the menu After setting the button function press the custom key to quickly switch to the corresponding function Press to display the on screen menu press it again to cle...

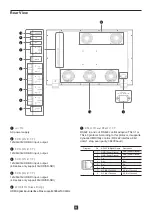
Page 9: ...rface Max support 4096x2160 60Hz 1 2 3 4 5 6 RS422 IN and RS422 OUT RS422 in and out RS422 control adoptive TSL3 1 or TSL4 0 protocol According to this protocol it supports dynamic UMD Tally control RS 422 interface 8bit data 1 stop even parity 38400 baud 7 Rear View 12 10 11 12 1 9 8 7 6 2 3 4 5 Diagram Pin RS422 IN Signal Name Description 1 GND Power Ground GND Power Ground 2 GND Power Ground GN...

Page 10: ...MENU EXIT key KNOB press the KNOB key are frequently used when setting parameters The role of the keys is MENU EXIT enter the menu or return to the previous menu Exit main menu shortcut key menu S1 S2 S3 S MODE menu etc IMAGEADJ U D KNOB or VOLUME L R in the same menu switch the options or adjust the value of the parameters Press the knob select to confirm or enter the next menu Analog stereo audi...

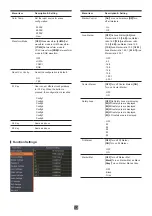
Page 11: ...t of the screen It helps to view the dark details of the picture SDI 1 SDI 2 HDMI Video F2 F3 F4 F5 Menu item Description Setting F1 Undefined W Form Mode Vector Histogram HDR Quick Sel Color Space EOTF Audio Meter Audio Source Audio Source Focus Assist False Color Zebra Blue Only Mono Only Red Only Green Only Time Code Freeze Audio Mute Marker Control Pattern Gen Black Lift F2 F3 F4 F5 GPI 1 GPI ...

Page 12: ... SFP Image Division Set the input source for scene configuration Auto Quad 2 SI SQD Single Menu item Description Setting Audio Source Set the input source for scene configuration Undefined SDI 1 SDI 2 SDI 3 SDI 4 HDMI SFP Data Levels Set the input source for scene configuration Limited 64 940 Extended 64 1023 Full 0 1023 SMPTE Full 4 1019 Color Space Set the input source for scene configuration By...

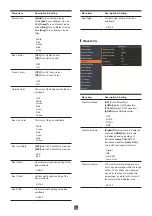
Page 13: ...rn on all markers Off Turn off all markers On Off Area Marker OFF No Area Marker 4 3 Area Marker ratio 4 3 16 9 Area Marker ratio 16 9 15 9 Area Marker ratio 15 9 14 9 Area Marker ratio 14 9 13 9 Area Marker ratio 13 9 1 85 1 Area Marker ratio 1 85 1 2 35 1 Area Marker ratio 2 35 1 OFF 4 3 16 9 15 9 14 9 13 9 1 85 1 2 35 1 Center Marker OFF Turn off Center Marker ON Turn on Center Marker OFF ON Sa...

Page 14: ...n setting of the Box wireframe 0 3840 Box VStart Vertical start position setting of the Box wireframe 0 2160 Box Width Horizontal width setting of the Box wireframe 0 3840 Menu item Description Setting Box Height Vertical height setting of the Box wireframe 0 2160 Menu item Description Setting Waveform Mode OFF Turn off waveform LUMA Display LUMA waveform YCbCr Display YCbCr waveform RGB Display R...

Page 15: ...urn off False Color ON OFF Menu item Turn on Time Code Time Code Display as VITC1 Time Code Display as VITC2 T i m e C o d e D i s p l a y a s LTCDescription Setting Focus Assist OFF Turn off Focus Assist Red Turn on Focus Assist as Red Green Turn on Focus Assist as Green Blue Turn on Focus Assist as Blue OFF Red Green Blue Focus Gain Focus Gain 0 100 0 100 Zebra ON Turn on Zebra OFF Turn off Zebr...

Page 16: ...ll occur and the alarm part will be overlaid with a red zebra crossing 0 100 H Flip ON Turn on H Flip OFF Turn off H Flip ON OFF Menu item Description Setting Time Code OFF Turn on Time Code VITC1 Time Code Display as VITC1 VITC2 Time Code Display as VITC2 LTC Time Code Display as LTC OFF VITC1 VITC2 LTC Remark HDMI signal without Time Code Display Menu item Description Setting Data Levels Limited...

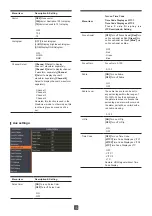
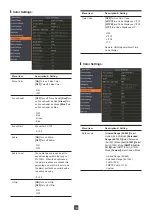
Page 17: ...on the HDR Auto Setting OFF ON Remark HDR Auto Setting is only supported for REC709 and REC2020 Menu item Description Setting Left HDR The left half of the screen can select different HDR to compare with the right screen Rec 2100 HLG 1 1 Rec 2100 HLG 1 2 Rec 2100 HLG 1 3 Rec 2100 HLG 1 4 Rec 2100 HLG 1 5 SDR Note This function is only supported in SQD mode of SDI 4x3G 4x12G Right HDR The right hal...

Page 18: ...age Red Full red mode display image Green Full green mode display image OFF Mono Blue Red Green Menu item Description Setting Quad Mode Win1 When the recalled scene configuration is input source Quad link input image division Quad at this time the window split into four and enter Quad Mode User can select different input signal source in window 1 SDI1 HDMI SDI2 SDI3 SDI4 Quad Mode Win2 Same as abo...

Page 19: ... CH6 CH7 CH8 CH9 CH10 CH11 CH12 CH13 CH14 CH15 CH16 Audio Mode Normal Left Channel Right Channel Normal Output Right Channel Mute Right Channel Mute Left Channel Output Left Channel Mute Left Channel Mute Right Channel Output Normal Right Channel Mute Left Channel Mute Menu item Description Setting Volume Volume Adjustment 0 31 Audio Meter OFF Turn off Audio Meter ON Turn on Audio Meter OFF ON Met...

Page 20: ...08 select Service 5 type Service 6 708 select Service 6 type Service 1 Service 2 Service 3 Service 4 Service 5 Service 6 Menu item Description Setting IMD Display ON Turn on IMD display OFF Turn off IMD display ON OFF IMD Color Green IMD character display green Red IMD character display red White IMD character display white Black IMD character display black Green Red White Black IMD protocol TSL3 ...

Page 21: ... Select GPI Select TSL Select TSL protocol control GPI TSL Menu item Description Setting Language Chinese Menu language selection Chinese English Menu language selection English Chinese English OSD time Setting menu display time 5 60 USB Mode USB Flash Disk Upgrading the monitor with USB Flash Disk USB VCP Upgrading the monitor with USB connect with computer USB Flash Disk USB VCP USB Upgrade NO T...

Page 22: ...splay Config 4 Single Input 4 Switch to Config 4 and select SDI 4 Single input display Config 5 Quad Input Quad Switch to Config 5 and select Quad Input with SDI1 SDI2 SDI3 SDI4 inputs These 4 SDI can inputs the same different signal resolution Config 6 Quad Input 2 SI Switch to Config 6 and select Quad Input with SDI1 SDI2 SDI3 SDI4 inputs It can compose 4K 2 SI or 8K 2 SI signal display Remark o...

Page 23: ...lect whether to restore the factory settings Select Yes and the monitor will be restored to factory settings Note 1 Please hold the plug tight when you pull out the power cord 2 Please do not connect the power supply before you insert the cable well 3 Please use power cord match to monitors 1 The left side is S1 S2 S3 Key bar 2 The right side shows the Config corresponding to the currently selecte...

Page 24: ...ddress Postal Code Model No Serial Number Warranty Date Purchase Date No Item Contents of Reparation Replacement parts name Replacement parts quantity Remark 1 2 3 4 5 6 7 8 9 10 11 12 13 14 15 Repairer Signature Service hotline User Signature ...

Reviews: