background image

取扱説明書

Instruction Manual

2015年05月版

Summary of Contents for BC-GLOSBE

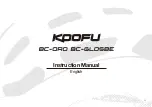
Page 1: ...取扱説明書 Instruction Manual 2015年05月版 ...
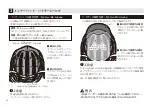
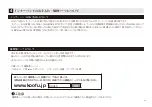
Page 2: ...ト の下に 帽子 フー ド バイザー ヘ ッ ドフ ォ ン等を着用しないで く ださい ヘルメ ッ トがズ レた り 脱落するおそれがあ り ます 大きな衝撃を受けたヘルメ ッ トは外観上に損傷がなく ても ご使用にならないでく ださい ヘルメ ッ ト はシ ェルおよび衝撃吸収ラ イナーが潰れる こ とで 衝撃エネルギーを吸収し ます 大き な衝撃を受けたヘルメ ッ ト は 既にラ イナーが潰れている こ と が多く そのま ま使用する と 再度衝撃吸収エネルギーを吸収で きず非常に危険です 外観にキズがな く て も使用しないで く ださい ヘルメ ッ トの改造および分解は絶対にしないでく ださい ヘルメ ッ ト に穴を開けた り 内部の衝撃吸収材を削った り またチンス ト ラ ッ プな どは絶対に改造しないで く ださい ヘルメ ッ ト本来の性能が発揮で き な く な り非常に危険...

Page 3: ...かじめ貼付されているステ ッ カーをはがすと 表面のマ ッ ト つや消し 処理がはがれる事があ り ますので ステ ッ カー は絶対にはがさないで く ださい またお客様がご購入後にご自身で貼付したステ ッ カーを再度はがし取る場合も 同様のこ とが考え られますので ステ ッ カー を貼付される際は十分にご注意く ださい 瞬間消臭素材 MOFF について 汗を素早く蒸散し いつもサラッと快適 当製品のチンス ト ラ ッ プ本体およびA I ネ ッ ト のメ ッ シュ部分には ナノ テク技術を利用した従来とは全く 異なる新しい消臭方法を採用した素材 MOFF を使用して います MOFF は瞬間消臭 抗菌効果 安全性を合わせ持った次世代の消臭繊維です MOFF素材のお手入れについて 汗などで汚れた場合のお手入れは 水も し く はぬる ま湯 35 以下 のみで軽く すすいで汚れを落と し ...

Page 4: ...場合は 正しく装着 できていません 装着の際は鏡を見ながら調整してください また チンストラップの長さやアジャストロックの調整もヘルメッ トを正しくかぶ るうえで大変重要な部分です 当説明書の該当項目をよ くお読みのうえ 正しくかぶって ください ヘルメッ トは正しい位置で正しくかぶり チンストラップを正確に締める事で はじめてヘルメッ ト本来の安全性能を発揮します ヘルメッ トは走行前にしっかり正しく装着しましょう 正しい かぶり方の例 ヘルメッ トの先が まゆ毛のすぐ上に ある ヘルメットの先が上 を向き 前頭部が見 えている 誤った かぶり方の例 03 ...

Page 5: ...01 使用素材について BC Oroのみ 02 正しい位置でヘルメットを装着する 03 部位名称ともくじ 04 ワンタッチバックルの脱着 05 チンストラップの長さを調整する 05 アジャストロックの高さを調整する 06 アジャスターの調整方法 07 アジャスターの角度調整 08 アジャスターの脱着方法 08 インナーパッ ドの取付位置 09 バイザーの脱着方法 09 インナーパッ ドのお手入れについて 10 補修用パーツについて 10 シェル シェル ライナー アジャスター バイザー ライナー アジャストロック イラストはBC Oro イラストはBC Oro チンストラップ ワンタッチバックル BC Glosbe BC Oroは同梱 BC Glosbe 04 ...

Page 6: ...頭にぴったりフィッ トする ようにして ください アジャスター の調整については 2 アジャスターの調整 を参照 ご使用前に必ず試着し 調整しましょう リリースボタンを押すと ワン タッチバックルが外れます ワンタッチバックルの留め方 チンストラップの長さ調整 ワンタッチ バックル ワンタッチ バックル リリースボタン 外れる リリースボタン ワンタッチバックルの外し方 チンストラップは正しくしっかり締めてください 締めないままの走行は 万一転倒した際に大変危険ですので 絶対におやめください ワンタッチバックルは必ず最後まで カチッと音がするまで きっちり留めてください 留めかたが不完全ですと 万一転倒した際にワンタッチバックルが外れてしまいヘルメッ トが脱落してしまうおそれがあります ワンタッチバックルを留める ときは お肌を挟まないよう ご注意ください 1 ワンタッチバックルの脱着 チ...

Page 7: ...開き ます アジャ ス ト ロ ッ ク を正しい高さに調整し ます 高さが決ま ったら アジャ ス ト ロ ッ クのカバーを 元通り に閉じます アジャスト ロック カバー カバー アジャストロック アジャストロック 正しい チンストラップの位置 チンストラップをワンタッチバックルに通す際 図以外の通しかたをすると 転倒などで強い力が加わった際 ワンタッチバックルからチン ストラップが滑り抜けてしまい ヘルメッ トが脱落するおそれがあり大変危険です バックルへは必ず図の通り正確に通してください ワンタッチバックル 差し込む側 の表裏を間違えると 転倒などで強い力が加わった際 ワンタッチバックルからチンストラップが滑り抜 けてしまい ヘルメッ トが脱落するおそれがあり大変危険です 警 告 アジャストロックの高さを調整する BC Oro BC Glosbe ご注意 アジャストロックの調整後は ...

Page 8: ...で アジャスターベル トの長さを調節し 最後にバ ッ ク ルを しっか り閉じます 2 アジャスターの調整方法 レザーアジャスターの調整 BC Oroのみ 緩める ダイヤルを左へ回す 締める TRIFIT 2アジャスターの調整 BC Glosbe BC Oro 付け替えた場合 ダイヤルを右へ回す ご注意 TRIFIT 2アジャスターの調整時は必ずダイヤルをご使用ください ダイヤルを使わず無理に広げるなどすると内部の機構が破損します 長髪のかたなどは特にアジャスター部に毛髪が絡まないようご注意のうえ調整を行って ください 前を押さえながらダイヤルを回す レザーアジャスターについて BC Oro レザーアジャスターは 帽子感覚で気軽にか ぶれる という コンセプ ト をも とにルーズフ ィ ッ ト で設計されています しっかり と したホール ド感 をお求めの方は 同梱の TRIFIT 2アジ...

Page 9: ...ャ ス ターの 4つ目の穴 を合わせて強く押さえながら手前 方向にスラ イ ドさせる と取り付けで き ます 図4 次にアーム先端にある突起をヘ ルメ ッ ト前部左右にある取り付け穴 バスケ ッ ト に強く 押し込みます 取り付け後はチンス ト ラ ップがア ジャ ス ターへ 図5 のよ う になる よ う 整えて く ださい 取り外しかた 取り付けかた 固定部 チンストラップ チンストラップ 固定部 親指を差し込 んで少し持ち 上げる 突起 アジャスター 4つ目の穴は着脱用 3段階で 調整可能 図 1 図 2 ご注意 アジャスターの角度を調整する際は 必ずアジャスターの固定部付近を 持って調整して く ださい また調整の際 アジャスターをね じった り無理に 移動させた り する と破損の原因と な り ますのでご注意く ださい アジャスターの脱着方法 BC Oro BC Glosbe ...

Page 10: ...競技においてのバイザー使用 は マウ ンテンバイ ク ク ロスカ ン ト リー シク ロク ロス の競技種目 のみに 認められています 詳し く は競技主催者にお問い合わせく ださい インナーパッドの取付位置 BC Oro BC Glosbe バイザーの取付位置 BC Oro BC Glosbe 取り外しかた 取り付けて使用する場合 取り外して使用する場合 取り付けかた イ ンナーパ ッ ドはマジ ッ ク テー プで付いています イ ンナー パッ ドをゆっ く り引っ張る と 取り外せます フロ ン トパッ ドを取り外し 同じ 場所にバイザーを しっかり取 り付けます バイザーを取り外し 同じ場 所にフ ロ ン ト パ ッ ド を しっか り 取 り付けます フロ ン トパ ッ ド とA I ネ ッ ト も し く はWinterイ ンナーパッ ド を左図位置にしっかり取り 付けます 走行...

Page 11: ...い風通しのよい場所で陰干しを行って く ださい BC Oroに関する MOFF素材 のお手入れについては 02ページ を ご覧く ださい 常日 ごろ よ り使用されている イ ンナーパ ッ ドやアジャ ス ターは消耗品です 傷んだパーツ をそのま ま使い続ける と フ ィ ッ ト感な どに悪影響をおよぼすおそれがあ り ます 古く なったパーツは 早期に交換される こ と をお薦めし ます BCシ リ ーズ 補修用パーツ A I ネ ッ ト Winterイ ンナーパ ッ ド アジャ ス ター各種 バイザー各種 BCシリーズの補修用パーツ各種についてさらに詳しくは 当製品掲載のカタログもしくはKOOFU WEBサイ トに掲載のパーツリス トをご覧ください www koofu jp KOOFU 検索 インナーパッドのお手入れについて 補修用パーツについて ご注意 補修用パーツ をお買い求めの際...

Page 12: ...11 ...

Page 13: ...Instruction Manual English 12 ...

Page 14: ...helmet can protect the wearer against all injuries or foreseeable impacts Your helmet is effective as protection only when it is worn properly Never put anything on your head that prevents you from wearing the helmet properly Before riding a bicycle make sure to adjust the helmet so it fits your head correctly The strap should be positioned not to cover the ears the buckle positioned away from the...

Page 15: ...tte processing on the surface of this product could be peeled off if the attached sticker is removed from the surface To prevent this never remove the sticker The same problem may occur also when other sticker are attached and removed If you attach stickers on the product please be aware of the risk MOFF the instant deodorizing fibre COOLMAX for quick sweat evaporation and constant dry comfort The...

Page 16: ...ke sure to read these Instructions thoroughly before use Your helmet is only effective as protection in case of an accident if it is positioned correctly on your head and the strap is fastened correctly Be sure you are wearing the helmet correctly before riding RIGHT WRONG Make sure the front edge of the helmet is just above your eyebrows Wear helmet level from front to back 15 The front of the he...

Page 17: ...ts 16 Fasten Release the Strap Buckle 17 Adjusting the Chinstrap 17 Adjusting the Adjustment Locks 18 Adjusting the Adjuster 19 Arranging the Adjuster Position 20 Detach Attach the Adjusters 20 Replacing the Inner Pad 21 Detach Attach the Visor 21 How to Clean the Linings 22 Replacement Parts 22 Shell Shell Adjuster Visor Liner Liner Adjustment Lock BC Oro overview BC Oro overview Chinstrap Strap ...

Page 18: ...helmet to your head See 2 Adjuster for how to adjust Adjuster Strap buckles will be released by pushing the release button Fastening the strap buckle Adjusting the Chinstrap Strap Buckle Strap Buckle Release Release button Release button Releasing the strap buckle Make sure to fasten the strap firmly It is dangerous to ride a bicycle without fastening the chinstrap If the strap buckle is not faste...

Page 19: ...e cover securely Adjustment lock Cover Cover Adjustment lock Adjustment lock Correct positions of the chinstraps It is very dangerous if the chinstrap is not inserted into the strap buckles the way as illustrated It can be slipped out when subjected to a strong pressure such as fall and the helmet may come off Make sure to insert the chinstraps into the buckles properly as the illustration It is v...

Page 20: ...oosen Tighten Turn the dial to the left Turn the dial to the right How to Adjust the TRIFIT 2 Adjuster Standard for BC Glosbe Option for BC Oro Use the Adjuster dial for adjustment Do not forcibly loosen tighten the adjuster without using the dial It may break the mechanical system inside the dial Be careful with your hair especially long hair so it does not get tangled in the TRIFIT 2 Adjuster Ho...

Page 21: ...n the mounting part press the Adjuster hard and slide it down Press the bump on the tip of the adjuster arm into the fixing hole basket on each side After mounting the Adjuster make sure the chinstrap relative position to the Adjuster as illustrated in Fig 5 Detach Attach Mounting part Chinstrap Chinstrap Mounting part Place the thumb under the part and lift the Adjuster a little bump アジャスター The f...

Page 22: ...ficial races only for MTB Cross country and Cyclocross Please contact to the promoter for details Replacing the Inner Pad BC Oro BC Glosbe Detach Attach the Visor BC Oro BC Glosbe Detach Attaching the Visor Detaching the Visor Attach Inner Pad is kept in its position by the hook and loop fastener Pull the pad slowly to remove it Remove the Front pad and replace it with the visor firmly in position...

Page 23: ...ht Please refer to the page 14 for the treatment of the MOFF fabric Linings used every day will wear out over time Continuing to use worn linings may lead them to break and cause poor fit Old linings should be replaced at an early stage BC series Replacement Parts A I Net Winter Inner Pad Adjusters Visors Please refer to Parts List on our website for more information about replacement www koofu jp...

Page 24: ...OGK KABUTO CO LTD 6 3 4 NAGATANISHI HIGASHIOSAKA OSAKA 577 0016 JAPAN TEL 06 6747 8031 www koofu jp No J BCJE 2015 01 AE ...

Reviews: