Instruction manual
85
Step 7 (optional):
Optional securing for the KORAVENT 100 device
The KORASVENT 100 device can be secured by an additional screw (not enclosed in the
package), e.g. in case you want to mount the device in a reverse position of 180°:
• rilling out optional fixing holes
using
the drilling template:
Take the device away from its position and perform steps 1 and 2 (see pages 78 and 79).
• Drilling out optional fixing holes
without
the drilling template:
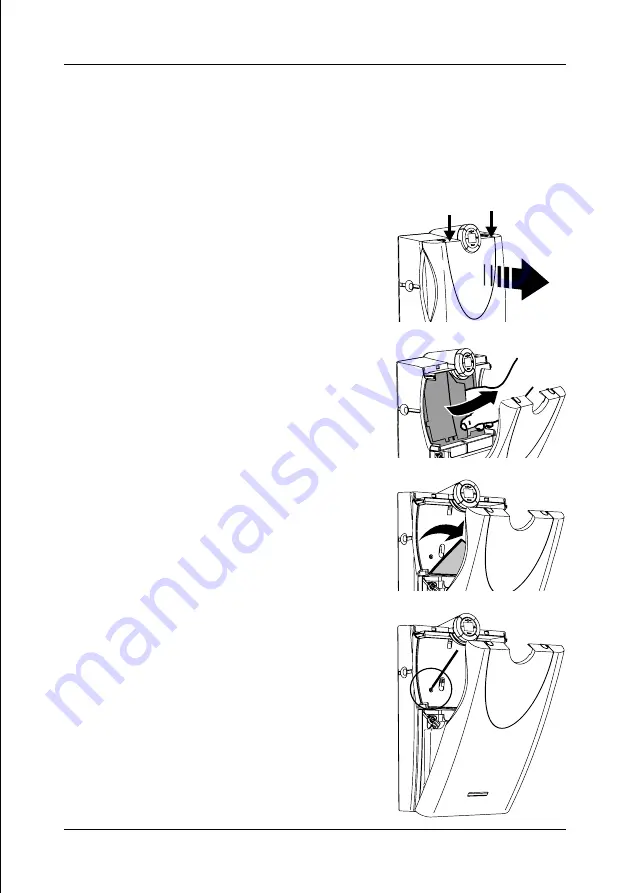
Check if the device is seated firmly and carry out the following actions:
1.
Press the front panel in places shown by the two
upper marking arrows and pull it towards you (see
picture). Tip the front panel out until you start feeling
perceptible resistance .
2.
Get hold of the filter’s frame situated down on the
partition and take it out of its holder .
3.
Fold the insulation mat placed inside .
4.
Use a sharp object in order to deepen a mark in the
back side of the device (
∅
8 mm) .
5.
Take the device away, drill a complementary hole
serving for securing the device (
∅
8 mm) and insert
an appropriate dowel (not enclosed in the package).
6.
Place the device back on both fixing screws and
check it is seated firmly.
7.
Use an appropriate screw and stick it through the
deepened mark (in the back of the device) into the
dowel and screw it in.
8.
Assemble the device again, following the instructions
in the reverse order .
Summary of Contents for KORAVENT 100
Page 23: ...N vod k pou it 23...
Page 47: ...N vod na pou itie 47...
Page 71: ...Bedienungsanleitung 71...
Page 95: ...Instruction manual 95...


