6
Installing batteries
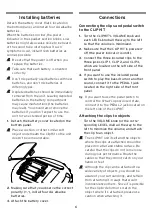
Detach the battery cover that’s located on
the bottom panel, and install four AA alkaline
batteries.
When the batteries run low, the power
indicator in the speaker section blinks. Low
batteries might also cause noise to be heard,
or the sound to be interrupted. If such
symptoms occur, install fresh batteries as
soon as possible.
Be sure that the power is off when you
replace the batteries.
Take care that each battery is oriented
correctly.
Don’t mix partially-used batteries with new
batteries, and don’t mix batteries of
differing types.
Depleted batteries should be immediately
removed from the unit. Leaving depleted
batteries in the battery compartment
may cause malfunctions (the batteries
may leak). You should also remove the
batteries if you don’t expect to use the
unit for an extended period of time.
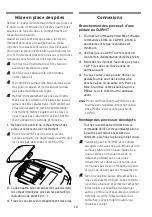
1.
Detach the battery cover located on the
bottom panel.
Place a cushion or other similar soft
object underneath the ClipHit so the unit
doesn’t become unstable.
2.
Making sure that you observe the correct
polarity (+, -), install four AA alkaline
batteries.
3.
Attach the battery cover.
Connections
Connecting the clips and pedal switch
to the CLIPHIT
1.
Turn the CLIPHIT's VOLUME knob and
each LEVEL knob all the way to the left
so that the volume is minimized.
2.
Make sure that the CLIPHIT is powered-
off (the power indicator is unlit).
3.
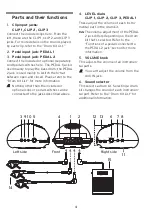
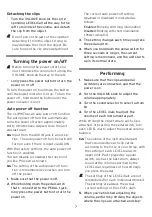
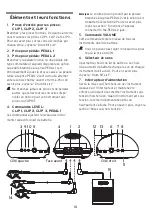
Connect the three included clips to the
three jacks CLIP 1, CLIP 2, and CLIP 3,
which are located on the left side of the
front panel.
4.
If you want to use the included pedal
switch to play the bass drum or another
sound, connect it to the PEDAL 1 jack
located on the right side of the front
panel.
Tip
If you want to use the pedal switch to
control the hi-hat's open/closed state,
connect it to the PEDAL 2 jack located on
the left side of the CLIPHIT.
Attaching the clips to objects
·
Turn the VOLUME knob (or the corre-
sponding LEVEL dial) all the way to the
left to minimize the volume, and attach
the clip to an object.
The CLIPHIT unit itself and the objects
where the clips are attached should be
placed on a flat and stable surface. Be
careful that the clips do not come loose
during your performance. Route the
cables so that they do not catch on your
hands or feet.
Although the clip can be attached to a
wide variety of objects, you should be
aware of your surroundings, and refrain
from attaching it in ways that would
inconvenience others. Since it is possible
for the clip to deform or scratch the
object where it’s attached, please use
caution when attaching it.


