


English
Français
Deutsch
Español
TouchView user interface
En-
13
TouchView user interface
The
KRONOS
uses
Korg’s
TouchView
graphical
user
interface.
By
touching
objects
displayed
in
the
LCD
screen,
you
can
select
pages,
set
parameter
values,
enter
text,
connect
virtual
patch
cables,
and
more.
Important - calibrate before using!
Make
sure
to
calibrate
the
touch
‐
screen
before
using,
or
when
you
change
the
angle
of
view
(for
instance,
when
you
move
between
sitting
and
standing):
1. Press
the
GLOBAL
button
to
go
to
the
GLOBAL
P0:BASIC
SETUP
page.
2. Press
the
page
menu
button
to
open
the
menu,
and
select
the
Touch
Panel
Calibration
command.
3. Follow
the
on
‐
screen
instructions.
For
best
results,
calibrate
using
a
stylus
or
fingernail,
and
press
the
exact
centers
of
the
calibration
boxes.
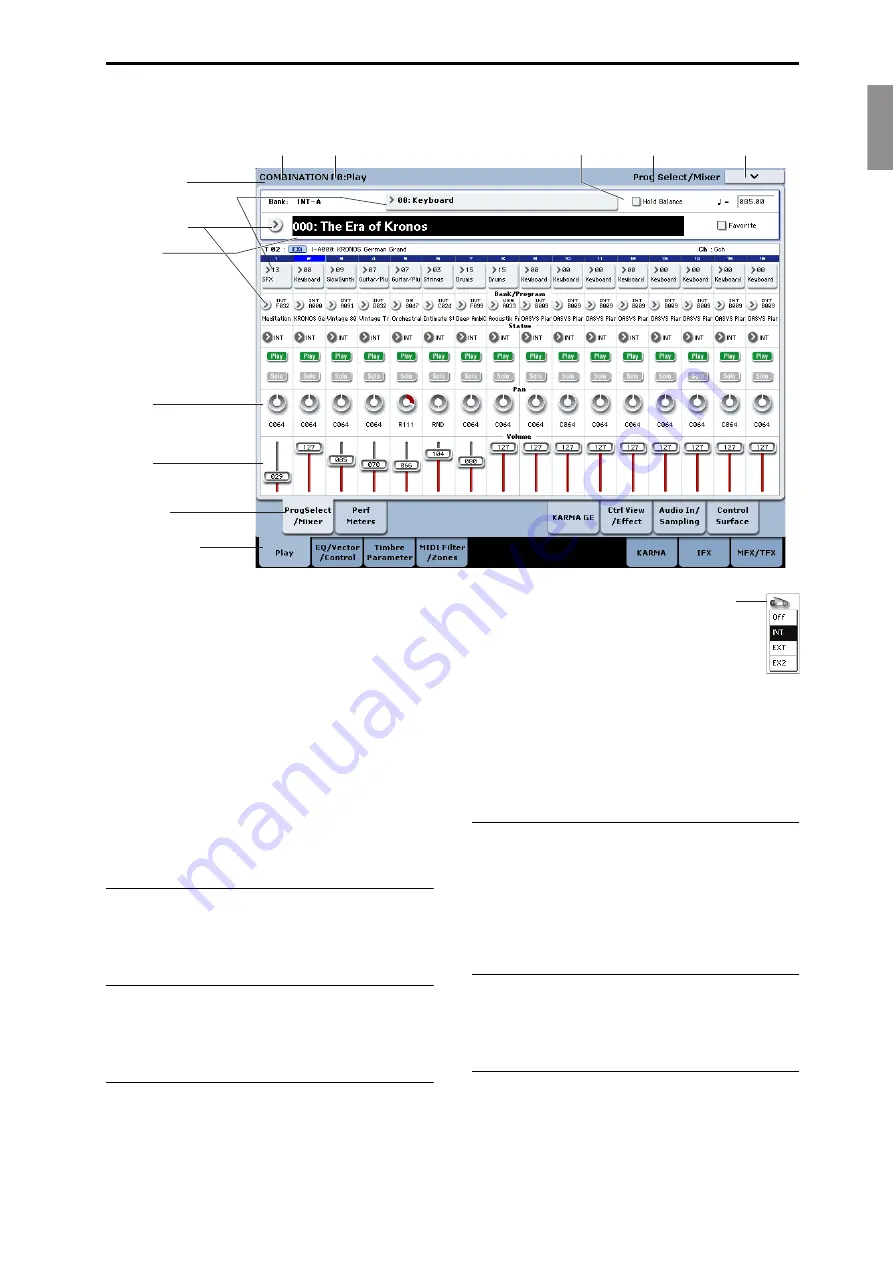
a: Current page
From
the
left,
the
top
of
the
display
shows
the
current
mode,
the
number
and
name
of
the
page
group,
and
finally
the
name
of
the
individual
page.
b: Category popup button
When
you
press
this
button,
a
tabbed
popup
menu
will
appear,
allowing
you
to
select
Programs,
Combinations,
or
GEs
organized
by
category.
c: Popup button & menu
When
this
button
is
pressed,
a
popup
menu
will
appear,
showing
a
list
of
options.
In
some
cases,
these
will
be
parameter
values.
In
others,
they
may
be
lists
of
items,
such
as
Multisamples
or
FX
Presets.
To
enter
a
parameter
value,
touch
the
desired
value.
Pin
Many
popup
menus
have
a
“Pin”
in
the
upper
left.
This
controls
what
happens
after
you
select
a
value.
Touch
the
pin
graphic
to
switch
between
open
(unlocked)
and
closed
(locked).
When
locked
(pin
closed),
the
popup
menu
will
remain
displayed
even
after
you
select
a
parameter
value.
To
close
the
popup,
either
unlock
the
pin,
or
press
EXIT.
When
unlocked
(pin
open),
the
popup
menu
will
close
immediately
when
you
press
a
parameter
value,
or
when
you
touch
the
screen
outside
the
menu.
d: Edit cell
When
you
touch
a
parameter
in
the
LCD
screen,
the
parameter
or
its
value
will
usually
be
highlighted
(displayed
in
inverse
video).
This
is
called
the
edit
cell
,
and
the
highlighted
item
is
now
selected
for
editing.
The
parameter
value
of
the
edit
cell
can
be
modified
using
the
VALUE
controllers.
e & f: On-screen sliders and knobs
To
modify
the
value
of
an
on
‐
screen
slider
or
knob,
first
touch
the
object,
and
then
use
the
VALUE
controllers
to
modify
the
value.
g & h: Page group tabs and Page tabs
Press
the
lower
row
of
tabs
to
select
the
page
group,
and
then
press
the
upper
row
of
tabs
to
select
the
page.
The
top
of
the
screen
shows
the
name
of
the
current
page
and
group;
see
h: Page group tab
e: Knob
f: Slider
g: Page tab
a: Current page
d: Edit cell
b: Category popup button
c: Popup button
i: Check box
j: Page menu button
Mode name
Page name
Page group number and name
Pin


