background image

Parameter Guide

59

6. MIDI parameters

MIDI

Here you can adjust MIDI-related settings for the 

microKORG XL+

.

MIDI CH (MIDI Channel)..............................................................[01...16]

Specifies the MIDI channel. When you wish to transmit program changes or 
system exclusive messages via MIDI, set the global MIDI channel to match 
the MIDI channel of the connected MIDI device.

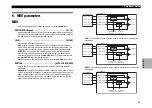
LOCAL...................................................................................... [OFF, ON]

Switches the local setting on and off.

OFF:

 With this setting, controllers such as the keyboard and modulation 

wheel will be internally disconnected from the tone generator section. This 
setting prevents notes from being sounded in duplicate when the 

micro-

KORG XL+

 is connected to a sequencer and the performance data is 

echoed back from the sequencer. (Echo back is when the performance 
data transmitted by playing the 

microKORG XL+

 is re-transmitted back to 

the 

microKORG XL+

 from the sequencer.)

ON:

 Select this setting when you are using the 

microKORG XL+

 by itself.

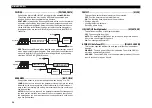
ROUTING..............................................................[MIDI+USB, USB, MIDI]

MIDI OUT

MIDI IN

TG OUTPUT
DUMP IN etc...

KBD/KNOB OUT
DUMP OUT etc...

USB MIDI RX (EXT)

USB MIDI TX (INT)

USB MIDI TX (EXT)

USB MIDI RX (INT)

microKORG XL+ MIDI OUT 

microKORG XL+ KBD/KNOB

microKORG XL+ MIDI IN

microKORG XL+ SOUND

microKORG XL+

PC USB-MIDI Port

Selects the connector(s) that will be used to transmit and receive MIDI 
messages.

MIDI+USB:

 The MIDI connectors and USB connector will be used to trans-

mit and receive MIDI messages. When receiving MIDI messages, the mes-
sages from both types of connector will be mixed, and MIDI messages 
received later will be given priority. For transmission, the same MIDI mes-
sages will be transmitted from both connectors.

USB:

 Only the USB connector will be used to transmit and receive MIDI 

messages.

MIDI:

 Only the MIDI connectors will be used to transmit and receive MIDI 

messages.

MIDI OUT

MIDI IN

TG OUTPUT
DUMP IN etc...

KBD/KNOB OUT
DUMP OUT etc...

USB MIDI RX (EXT)

USB MIDI TX (INT)

USB MIDI TX (EXT)

USB MIDI RX (INT)

microKORG XL+ MIDI OUT 

microKORG XL+ KBD/KNOB

microKORG XL+ MIDI IN

microKORG XL+ SOUND

microKORG XL+

PC USB-MIDI Port

MIDI OUT

MIDI IN

TG OUTPUT
DUMP IN etc...

KBD/KNOB OUT
DUMP OUT etc...

USB MIDI RX (EXT)

USB MIDI TX (INT)

USB MIDI TX (EXT)

USB MIDI RX (INT)

microKORG XL+ MIDI OUT 

microKORG XL+ KBD/KNOB

microKORG XL+ MIDI IN

microKORG XL+ SOUND

microKORG XL+

PC USB-MIDI Port

Parameter Guide

Summary of Contents for microKORG XL+

Page 1: ...1 E ...

Page 2: ...d found to com ply with the limits for a Class B digital device pursuant to Part 15 of the FCC Rules These limits are designed to provide reasonable protection against harmful interference in a residential installation This equipment generates uses and can radiate radio frequency energy and if not installed and used in accordance with the instructions may cause harmful interference to radio commun...

Page 3: ... modify the sound 14 Using the knobs to modify the sound 16 4 Playing arpeggios 18 Using the arpeggiator 18 Editing the sound 19 1 How a program is organized 19 Synthesizer 19 Vocoder 21 2 Basic editing procedure 22 Editing a program 22 3 Full Edit mode 23 Editing in Full Edit mode 23 Editing the two timbres 24 Editing the vocoder 25 Processing an external audio input 25 Editing the arpeggiator 26...

Page 4: ...ng the microKORG XL with other MIDI devices MIDI 80 Connecting MIDI devices computers 80 MIDI related settings 81 2 MIDI messages 83 MIDI channels 83 Note on off 83 Program change Bank select 84 Pitch bend 84 Control changes 84 3 Parameters transmitted and received via NRPN 86 Controlling the arpeggiator 86 Controlling the Timbre parameters 87 Controlling the vocoder parameters 88 Other controls 8...

Page 5: ...s The microKORG XL contains a total of 128 programs organized into two banks A and B Each bank contains eight genres such as 70 Vintage and Rock and eight categories in each genre 5 Modify external audio input The sound of an instrument or other audio source received at the AUDIO IN jack can be processed in the same way as the internal waveforms 6 Virtual Patch functionality Controllers such as EG...

Page 6: ...oard upward or down ward in one octave steps over a range of 3 octaves p 15 NOTE If you want to make fine changes to this setting you can hold down the EXIT SHIFT button and use the OCTAVE lever to change the value in steps of one 4 BANK SELECT lever This selects the program bank 5 PROGRAM GENRE dial This dial selects the genre of program 6 PROGRAM CATEGORY dial This dial selects the category of p...

Page 7: ...ULL EDIT the knobs will operate in full edit mode allowing you to select a page and parameter and to edit the value of that parameter p 23 13 1 2 3 knobs Use these knobs for performance editing and in full edit mode to select the page parameter and parameter value 14 ORIGINAL VALUE LED This LED will light when the value of the parameter you re editing matches the value stored in the program 15 Dis...

Page 8: ...IN MIC jack on the front panel 5 AUDIO IN LEVEL knob This adjusts the input level from the AUDIO IN MIC or LINE jacks 6 MIDI These connectors allow the microKORG XL to exchange MIDI messages with an external MIDI device MIDI IN connector This connector receives MIDI data MIDI OUT connector This connector transmits MIDI data 7 USB connector This connector allows the microKORG XL to exchange MIDI me...

Page 9: ...e microKORG XL to process the sound of a synthesizer or sampler connect the output of your external device to the microKORG XL s AUDIO IN LINE jack NOTE The AUDIO IN LINE jack is monaural Connecting the included mic The microKORG XL comes with a mic for use with the vocoder If you want to connect the included mic plug it into the front panel AUDIO IN MIC jack To disconnect it grasp the base of the...

Page 10: ...his state the indicator will begin blinking and the Write Protect setting will automatically be enabled making it impossible to save programs or global settings We recommend that you replace the batteries as soon as possible or use the AC adapter If you are in the middle of editing when this state occurs and need to save the changes you ve made you ll need to connect the AC adapter so that you can...

Page 11: ...on If there is no user input for approx 4 hours the auto power off function which automatically turns off the microKORG XL will be activated This function can be disabled so that the microKORG XL is not automati cally turned off NOTE With the factory settings the auto power off function is enabled When the microKORG XL is turned off any edited settings will be lost If you want To use the settings ...

Page 12: ...lect the sound according to its musical style Program Genre or by its musical role Program Category simply start with the dial that you find most convenient Try out the various programs and listen to the sounds that they offer As an example here s how to select a sound from the BASS category for use in a song in the ROCK genre 1 Turn the PROGRAM GENRE dial to ROCK 2 Turn the PROGRAM CATEGORY dial ...

Page 13: ...CODER button LED will light 5 Adjust the mic input level While vocalizing into the mic turn the AUDIO IN LEVEL knob toward the right as far as possible without allowing the CLIP indication to appear in the level meter shown to the right of the display NOTE If you want to audition the audio input directly hold down the EXIT SHIFT button and press the VOCODER button p 13 6 While vocalizing into the ...

Page 14: ...e wheel is all the way toward yourself This wheel is typically used to vary the vibrato depth or to modify the tone by changing the cutoff frequency NOTE You can use the PITCH and MOD wheels as virtual patch sources They can be used to control a wide variety of effects in addition to those described above p 49 Using the keyboard to modify the sound Velocity The effect will vary depending on the am...

Page 15: ...er operation Lever operation Move toward DOWN Move toward UP C3 C6 dark C2 C5 DOWN LED lit green C1 C4 DOWN LED lit orange C0 C3 DOWN LED lit red Keyboard range Key LED Middle C on a piano is C4 MIDI note number 60 Octave Shift settings and note numbers C7 96 C8 108 C9 120 G9 127 C 8 116 C9 120 C5 72 C6 84 C3 48 C4 60 C1 24 C2 36 C 1 0 C0 12 Octave Shift not used 1 octave 2 octaves 3 octaves 3 oct...

Page 16: ...ive character to the sound NOTE You can save the sound you ve modified using performance edit Some of the main parameters you can control using performance edit are described below CUTOFF This adjusts the cutoff frequency of filter 1 varying the brightness of the sound Normally turning the knob toward the left will darken the sound and turning the knob toward the right will brighten the sound RESO...

Page 17: ...ogram will be assigned to the knobs Knob 1 FX1 DRY WET knob 2 FX2 DRY WET These adjust the balance between the effect sound and direct sound of the FX1 and FX2 effects Turn the knob all the way to the left for a sound without any effect applied dry or all the way to the right for the maximum effect sound wet NOTE These knobs won t do anything if the FX TYPE of the selected program is set to FX OFF...

Page 18: ...tatus for up to eight steps giving you a wide range of performance possibilities 1 Select a program You can use the arpeggiator with both synth programs and vocoder pro grams but in this example we ll select a synth program such as A24 PRAY ARP in order to try out this function 2 Press the ARP ON button to make the LED light turning the arpeggiator on 3 Hold down a chord on the keyboard an arpeggi...

Page 19: ...rms in the OSC1 and OSC2 pages The waveforms generated by this oscillator section are mixed together by the mixer The filter settings are located in the FILTER page On this page you can modify the tone by applying filters to the sound produced by the oscillator Finally the amp parameters are located in the AMP page On this page you can modify the volume You can create a basic program by editing th...

Page 20: ...WS Drive and waveshaping both give the tone a hard edged character Adjust ing the cutoff or resonance of the filter can produce significant changes Envelope generators EG1 EG2 EG3 An envelope generator applies time variant change to parameters that make up the sound Each envelope generator defines the shape of the time variant change using four parameters attack time decay time sustain level and r...

Page 21: ...ixteen band vocoder that can simulate not only the classic vocoder sounds of the past but also create original vocoder sounds where the tonal character or the level of each band can be controlled As shown in the illustration below the vocoder consists of the carrier the signal being modified the modulator the signal that controls the modify ing and the vocoder section itself Vocoder section VOCODE...

Page 22: ... and playing your own sounds Editing a program Performance editing 1 Select the program that you want to edit 2 Use the KNOB FUNCTION SELECT dial to choose the section that you want to edit Take a moment to consider how the original program is different than what you have in mind and choose the appropriate parameter to edit NOTE Use the TIMBRE SELECT lever or the VOCODER button to select the part ...

Page 23: ...ill be lost About the display in Full Edit mode PAGE NAME PARAMETER NAME PARAMETER NAME VALUE When you turn knob 1 to select the OSC1 page the upper line of the dis play will indicate the name of the page and the lower line will indicate the name of a parameter Now when you turn knob 2 the display will change the upper line will show the parameter name and the lower line will show the value that c...

Page 24: ...ue is toward the right of the knob position a symbol will appear in the display Restoring an edited program value to its original setting When you set a value to the same value stored in the original preset pro gram or saved program the ORIGINAL VALUE LED will light After editing a value you can restore that value to its original setting by turning knobs 1 3 to the value that makes the ORIGINAL VA...

Page 25: ...ct it for editing 1 Select a synth program 2 Press the VOCODER button The LED above the VOCODER button will light up and the vocoder func tion will turn on The vocoder will also be selected as the object of your edit ing 3 Set the KNOB FUNCTION SELECT dial to FULL EDIT 4 Use knob 1 to select one of the VC CARRI VC BAND pages and then use knobs 2 and 3 to edit the vocoder parameters 2 4 3 When the ...

Page 26: ...n select the timbre s that will be played by the arpeggiator This is specified by the ARP page ASSIGN parameter You can make the arpeggiator play both timbres or just one of them Synchronizing the arpeggiator Synchronizing LFO1 2 frequency or effect delay time to the arpeggio You can synchronize the frequency of LFO1 or LFO2 to the arpeggio tempo This lets you apply modulation that s synchronized ...

Page 27: ... pitch of each program but the pitch settings in this GLOBAL page MST TUNE and TRANS POS will affect the pitch of all programs If you re playing together with other instruments set MST TUNE to match the microKORG XL s pitch with the other instruments and use TRANS POS if you need to transpose the song you re playing When you use mul tiple programs within a single song it s convenient to change jus...

Page 28: ...the WRITE button The copy will be executed and the display will indicate COMPLETE NOTE If VOIC MODE is SINGLE you can t select TIMBRE2 as the copy destination NOTE If you decide not to execute the copy press the EXIT SHIFT button Transmitting programs and other data Data Dump Program data and global data can be transmitted from the microKORG XL as MIDI exclusive data The action of transmitting MID...

Page 29: ...er micro KORG XL unit 1 Connect the microKORG XL s MIDI IN connector to the MIDI OUT of the device that will be transmitting the MIDI data dump If you re using a USB connection connect the microKORG XL to your computer via a USB cable 2 Set both the transmitting device and the microKORG XL to the same MIDI channel If you want the microKORG XL to receive data that was previously trans mitted to an ...

Page 30: ...gs of the front panel buttons and knobs ALL PROG All program data will be loaded GLOBAL Global data will be loaded the parameters of the GLOBAL USR SCALE pages ALL DATA All program data and global data will be loaded 3 Press the WRITE button to execute the operation The preload data will be loaded and the display will indicate COMPLETE NOTE If you decide not to execute press the EXIT SHIFT button ...

Page 31: ...en you press the WRITE button the Write operation will apply to the global parameters Use knob 1 to select PROGRAM 2 Press the WRITE button once again 3 Use knob 1 to select the writing destination program num ber 4 Press the WRITE button to write the data The display will indicate COMPLETE at this point the Write operation will be completed and the microKORG XL will return to its normal state If ...

Page 32: ...phonically and specify how retriggering will occur NOTE If you simultaneously play more keys than the maximum number of voic es that can be sounded according to these settings the last played keys will take priority VOIC MODE SINGLE LAYER SPLIT MULTI This parameter determines how many timbres a program will use and how those timbres will be allocated SINGLE Only one timbre will be used LAYER Two t...

Page 33: ...ent scale types SCALE KEY C B Specifies the tonic key or root note for the scale you selected in SCALE KNOB Here you can assign the parameter that will be controlled by knobs 1 3 when you set the KNOB FUNCTION SELECT dial to ASSIGN EQUAL Equal temperament which is the most com monly used scale Every semitone is spaced an equal pitch distance from the next MAJOR Pure major scale Major chords in the...

Page 34: ... 1 Cutoff RESO1 Filter 1 Resonance FILT1 BAL Filter 1 Balance EG1 INT1 Filter 1 EG 1 Intensity CUTOFF2 Filter 2 Cutoff RESO2 Filter 2 Resonance EG1 INT2 Filter 2 EG 1 Intensity LEVEL Level PANPOT Panpot WS DEPTH Wave Shape Depth ATTACK1 Attack Time EG 1 DECAY1 Decay Time EG 1 SUSTAIN1 Sustain Level EG 1 RELEASE1 Release Time EG 1 ATTACK2 Attack Time EG 2 DECAY2 Decay Time EG 2 SUSTAIN2 Sustain Lev...

Page 35: ...hen Unison is on i e if MODE is 2 4 Voice It controls the width of the stereo spread panning of the stacked voices The number of voices specified by MODE will be panned apart at equal spacing according to this setting PITCH Here you can adjust settings that affect the pitch of the oscillators These settings are common to oscillators 1 and 2 Set the transpose and tuning parameters to obtain the des...

Page 36: ...scillators On this page you can make settings for oscillator 1 Use knob 2 to select the parameter that you want to edit and knob 3 to edit the value WAVE Waveform Select SAW PULSE TRIANGLE SINE FORMANT NOISE PCM DWGS AUDIO IN Selects the waveform for oscillator 1 The Saw Pulse square Triangle and Sine are traditional waves associated with analog synthesizers OSC MOD Oscillator 1 Modulation Type WA...

Page 37: ...roduce noise NOTE For OSC1 C1 and OSC1 C2 the parameter and settings will depend on the selected WAVE and OSC MOD You should also refer to the fol lowing table when assigning OSC1 C1 or OSC1 C2 to virtual patch KNOB or GLOBAL CC MAP WAVE OSC MOD C1 OSC1 Control 1 C2 OSC1 Control 2 SAW WAVEFORM C1 WAVFRM C2 LFO1 MD CROSS C1 MOD DPT C2 LFO1 MD UNISON C1 DETUNE C2 PHASE VPM C1 MOD DPT C2 HRMNIC PULSE...

Page 38: ...monic content A set ting of 000 produces a simple triangle wave Higher setting stress different harmonics a setting of 127 produces a triangle wave that is one octave and a fifth higher i e the third harmonic WAVE SINE 000 063 127 Sine wave is a mild tone that contains only the fundamental frequency with no overtones A setting of 000 produces a simple sine wave Increasing this value will modify th...

Page 39: ...w long you continue playing the notes C D E F G A B C D E upward 5 WhenWave AudioInandOSC1Mod Waveform Control1 Gain 63 63 This parameter adjusts the volume of the audio input Control2 HAS NO EFFECT 6 WhenWave Saw Pulse Triangle SineandOSC1Mod Cross Control1 Modulation Depth 000 127 This parameter adjusts the cross modulation depth No PCM DWGS Name No PCM DWGS Name 1 SG PIANO 33 SYNSINE5 2 ROSE EP...

Page 40: ...in a variety of sounds For example by adjust ing OSC2 SEMITONE and OSC2 TUNE you can make one oscillator act as an overtone of the other oscillator Alternatively you can create a musi cal interval by setting each oscillator to a different pitch or create a detuned effect by setting the two oscillators to slightly different pitches You can also apply ring modulation or oscillator sync to generate c...

Page 41: ... use the sound of oscillator 2 as a component in the oscilla tor 1 overtone structure try setting it one octave or a fifth higher than os cillator 1 If you want to use oscillator 2 in harmony you can try intervals such as a third fourth or fifth TUNE Oscillator 2 Tuning 63 63 Specifies the amount of detune for OSC2 relative to OSC1 A setting of 63 produces a pitch difference of 2 octaves and 48 pr...

Page 42: ... value will increase the effect Since move ment of the CUTOFF knob will affect the overtones that are boosted by resonance it is best to adjust CUTOFF and RESO in conjunction with each other Depending on the cutoff frequency or the input audio increasing this value may cause distortion TYPE BAL Filter1 Balance LPF24 LPF12 HPF BPF THRU Selects the filter type Intermediate settings will produce a re...

Page 43: ...an use this to create a sound that gradually begins to brighten when you press the key and then gradually becomes darker EG1 INT parameter specifies the depth sensitivity to which the EG1 will affect the cutoff frequency With a setting of 0 the EG1 will not affect the cutoff frequency Increasingly positive settings will allow the EG1 to have a correspond ingly greater effect on the cutoff frequenc...

Page 44: ...ffect the cutoff fre quency Positive values will cause the cutoff frequency to rise as you play more strongly Negative values will cause the cutoff frequency to fall as you play more strongly FILTER2 Here you can adjust the settings of the filter 2 parameters The FILTER1 page ROUTING parameter specifies how filter 2 and filter 1 will be con nected The filter 2 parameters are not shown if ROUTING i...

Page 45: ... depth of this effect Some settings may produce noise OFF DRIVE NOTE Only the Drive setting differs from the wave shape effect DECIMATR HARD CLIP OCT SAW MULTI TRI MULTI SIN SB OSC SAW SB OSC SQU SB OSC TRI SB OSC SIN LVLBOOST NOTE This may produce high output volumes than other wave shape types Wave Shape Drive is off Drive will be applied The amount of distortion is adjusted by the output level ...

Page 46: ... Strings To a significant extent each sound has its own distinctive volume curve For example when you play a note on a piano the note begins at the maxi mum volume and gradually diminishes When you release your finger from the key the sound will disappear quickly with a brief decay Volume curves such as this are an important aspect of how we identify the sound of a spe cific instrument This type o...

Page 47: ...lding the key RELEASE Release time EG2 000 127 Specifies the time from note off when the key is released until the level reaches 0 VEL INT Velocity Intensity 63 63 This specifies how your keyboard velocity playing strength will affect the amplitude of EG2 Higher settings of this parameter will allow changes in your keyboard velocity to produce greater differences in EG amplitude EG3 Here you can a...

Page 48: ...VE LFO2 SAW SQUARE SINE S H RANDOM TRIANGLE SINE SAW SQUARE SQUARE S H Amplitude changes irregularly Sample Hold RANDOM Selects the LFO waveform KEY SYNC OFF TIMBRE VOICE Note on Note on Note on Note all off Note on Note on 1VOICE 2VOICE Specifies how the LFO will be applied to a voice when note on occurs OFF The LFO phase will not be reset when note on occurs TIMBRE The phase of the LFO will be r...

Page 49: ...ng the sound The Korg MS Series MS 20 MS 50 MS 10 etc went on sale in 1978 and featured this type of patch ing The microKORG XL lets you perform this patching virtually i e without using physical patch cords so you can assign sources such as EG or LFO to the most important parameters destinations SOURCE EG1 MIDI3 Selects a modulation source DEST Destination PITCH P INT6 Selects the parameter desti...

Page 50: ...ACK DECAY3 The EG3 page DECAY SUSTAIN3 The EG3 page SUSTAIN RELEASE3 The EG3 page RELEASE P INT1 The PATCH1 page INTENSTY P INT2 The PATCH2 page INTENSTY P INT3 The PATCH3 page INTENSTY P INT4 The PATCH4 page INTENSTY P INT5 The PATCH5 page INTENSTY P INT6 The PATCH6 page INTENSTY EG1 EG2 PITCH The EG1 or EG2 will vary the pitch of the entire timbre over time EG1 EG2 PANPOT The EG1 or EG2 will var...

Page 51: ...olled by knobs 1 3 when you set the KNOB FUNCTION SELECT dial to ASSIGN or EFFECT For details on knob assignments for effect parameters refer to page 63 Effect knob assignments 2 Arpeggio parameters Front Panel Arpeggio Parameters TEMPO knob Specifies the playback tempo of the arpeggiator NOTE The speed of modulation sequences and LFOs for which BPM Sync is On will be synchronized to the tempo you...

Page 52: ...re the lowest pitches you are holding down will be played up to the maximum polyphony LATCH OFF ON This specifies how the arpeggiator will behave when you take your hand off the keyboard OFF The arpeggiator will stop when you take your hand off the keyboard ON The arpeggiator will continue playing even if you take your hand off the keyboard OCT RANGE Octave Range 1 2 3 4 Specifies the range of oct...

Page 53: ...ed tempo 1 1 The arpeggio will be played as whole notes at the specified tempo KEY SYNC OFF ON Specifies whether the arpeggiator will be synchronized to the keyboard If this is On the arpeggiator will always start from the beginning of the arpeggio pattern when you play the keyboard If you are performing together with other instruments you can use this function to ensure that the arpeggio pattern ...

Page 54: ...er On this page you can set the input level of the audio signal being used as the carrier TMBR1 LVL Timbre1 Level 000 127 Specifies the output level of Timbre1 carrier INPUT2 LVL Timbre2 Level 000 127 Specifies the output level of Timbre2 VC MOD Vocoder Modulator In this page you can adjust settings for the modulator which applies its character to the carrier audio For the modulator you can use an...

Page 55: ...the modulator ENABLE The high frequency portion of the audio source will be mixed only when the internal sound generator Timbre1 is producing sound HPF LVL HPF Level 000 127 This adjusts the output level from the HPF High Pass Filter that extracts the high frequency components from the modulator input source these high frequency components are then mixed into the output of the vocoder Increase thi...

Page 56: ...of the input signal to be detected more rapidly If you set this to Hold the character of the signal that is being input at that moment will be held Formant Freeze Subsequently the sound will retain that character regardless of whether there is any input If you set this to Hold when there is no input signal present there will be no output even if an audio signal is subsequently input NOTE If you wr...

Page 57: ...esponse of the keyboard to your own playing style Lighter curves are best for heavy handed players higher curves may work better for players with a light touch NOTE Curves 7 and 8 produce little change for medium strength playing How ever these curves will produce a great deal of change with softly played notes so they may be more difficult to control Choose the curve that is most appropriate for ...

Page 58: ...nd that you use this set ting when editing CATCH When you turn the knob the parameter value will not change until the knob position matches the stored value We recommend that you use this setting when you don t want the sound to change abruptly such as dur ing a live performance PROTECT OFF ON This specifies whether internal memory will be protected OFF You ll be able to write to internal memory O...

Page 59: ...INT USB MIDI TX EXT USB MIDI RX INT microKORG XL MIDI OUT microKORG XL KBD KNOB microKORG XL MIDI IN microKORG XL SOUND microKORG XL PC USB MIDI Port Selects the connector s that will be used to transmit and receive MIDI messages MIDI USB The MIDI connectors and USB connector will be used to trans mit and receive MIDI messages When receiving MIDI messages the mes sages from both types of connector...

Page 60: ...ceived DISABLE Program changes will not be transmitted or received ENABLE Program changes will be transmitted and received CTRL CHG Control Change DISABLE ENABLE Selects whether MIDI control changes will be transmitted and received DISABLE MIDI control changes will not be transmitted or received ENABLE MIDI control changes will be transmitted and received P BEND Pitch Bend DISABLE ENABLE Selects w...

Page 61: ...erformance editing or program editing using the knob for these parameters will transmit the control change message that is assigned here When the assigned control change message is received the value of the corresponding parameter will change p 83 2 MIDI messages Parameter PORTMNTO VC EF SENS Selects the knob parameter p 33 KNOB Value NO ASSIGN CC 119 Specifies a MIDI control change number CC for ...

Page 62: ... parameters of the GLOBAL USR SCALE page ALL DATA All program data and global data will be transmitted Do not touch the microKORG XL s knobs or keyboard while data is being transmitted Never turn off the power during this time Some MIDI interface devices may be unable to transmit or receive the microKORG XL s MIDI exclusive data PRELOAD 1 PROG ALL PROG GLOBAL ALL DATA This function restores the mi...

Page 63: ...input level will cause clipping Controlling effect parameters You can use the front panel knobs 1 2 and 3 to control effect parame ters in realtime The parameters assigned to knobs can also be controlled from an external MIDI device Effect knob assignments When the KNOB FUNCTION SELECT dial is set to EFFECT or ASSIGN you can use the performance edit function p 16 to control the parame ters assigne...

Page 64: ...O and the delay time value and the delay time will be set to the maximum possible value Delay time when BPM SYNC is On If BPM SYNC is On the delay time will synchronize with the tempo speci fied by the TEMPO knob or by an external MIDI clock Since the tempo will follow the arpeggiator this is useful for a live performance If BPM SYNC is On you ll be able to set the delay time as a note value For e...

Page 65: ...ht channels are linked to control the Limiter using the mixed signal With L R individually the left and right channels control the Limiter individu ally SENS Sensitivity 001 127 Sensitivity 100 Sensitivity 40 Dry Wet Time Level Compressor Sensitivity Louder The SENS parameter sets the sensitivity of the compressor If this param eter is set to a higher value lower level sounds will be boosted With ...

Page 66: ...Internal the LFO will synchronize to the tempo specified by the TEMPO knob If the setting is External the LFO will synchronize to the MIDI clock received from an ex ternal MIDI device LFO FREQ LFO Frequency 0 01 100 0Hz Sets the LFO speed Increasing this value will result in a faster frequency NOTE This parameter will be displayed and can be set if MOD SRC is LFO and LFO SYNC is Off If this parame...

Page 67: ...ill start from the mid point of its cycle at note on NOTE This parameter will be displayed and can be set if KEY SYNC is Tim bre CTRL SRC Control Source OFF VELOCITY MIDI3 Selects the control source The filter will be controlled by the selected source NOTE This parameter will be displayed and can be set if MOD SRC is CTRL Source Explanation 3 BAND EQ 4Band EQ Left Right Dry Wet Dry Wet Stereo In S...

Page 68: ...0Hz 20kHz Sets the center frequency of Band 4 B4 Q 00 5 10 0 Sets the bandwidth of Band 4 B4 GAIN 18 0 18 0dB Sets the gain of Band 4 4 DISTORT Distortion Left Right Dry Wet Dry Wet Wet Mono In Mono Out Dry Stereo In Stereo Out 3 Band PEQ Output Level Pre EQ Distortion This is a distortion effect with a three band EQ giving you a broad range of variations DRY WET DRY 99 1 1 99 WET Sets the balance...

Page 69: ...sampling frequency and data bit length You can also simulate noise unique to a sampler aliasing DRY WET DRY 99 1 1 99 WET Sets the balance between the effect and dry sounds PRE LPF OFF ON Selects whether the harmonic noise caused by a decrease in sampling fre quency is generated or not If a sampler with a very low sampling frequency receives very high pitched sound that could not be heard during p...

Page 70: ...o In Stereo Out Trim Trim High Damp High Damp Spread Stereo Cross This is a stereo delay and can by used as a cross feedback delay effect in which the delay sounds cross over between the left and right by changing the feedback routing DRY WET DRY 99 1 1 99 WET Sets the balance between the effect and dry sounds TYPE STEREO CROSS Selects the delay type With the STEREO setting this will be a conventi...

Page 71: ... the balance between the effect and dry sounds BPM SYNC DelayTime Tempo Sync OFF ON Specifies whether the delay time will be synchronized If this is On the delay time will synchronize to the tempo or MIDI clock TM RATIO BPM SYNC OFF 000 5 400 0 OVER BPM SYNC ON 012 5 400 0 OVER Sets each delay time as a proportion relative to the L DELAY C DELAY and R DELAY values p 70 TM RATIO L DELAY C DELAY R D...

Page 72: ...quency 0 01 100 0Hz Sets the LFO speed p 66 LFO FREQ LFO Frequency SYNC NOTE LFO Sync Note 8 1 1 64 Sets the LFO frequency as a proportion of the tempo set by the TEMPO knob NOTE This parameter will be displayed and can be set if LFO Sync is On p 66 SYNC NOTE LFO Sync Note LFO WAVE LFO Waveform SAW SQUARE TRIANGLE SINE S H Selects the LFO waveform p 66 LFO WAVE LFO Waveform LFO SHAPE 63 63 p 66 LF...

Page 73: ...Tape Saturation Left Right Dry Wet Trim Tap1 Level Dry Wet Wet Mono In Stereo Out Dry Stereo In Stereo Out Feedback High Low Damp Pre Tone Delay Spread This effect simulates a tape echo unit The distortion and tonal change typi cal of magnetic tape are also reproduced DRY WET DRY 99 1 1 99 WET Sets the balance between the effect and dry sounds BPM SYNC DelayTime Tempo Sync OFF ON p 70 BPM SYNC Del...

Page 74: ... DEPTH Modulation Depth 000 127 Sets the depth of LFO modulation LFO FREQ LFO Frequency 0 01 100 0Hz Sets the LFO speed Increasing this value will result in a faster frequency LFO SPRD LFO Spread 180 180 Sets the LFO phase difference between the left and right PRE DLY L PRE DLY R Pre Delay L Pre Delay R 00 0 50 0ms Sets the delay times for the left and right channels TRIM 000 127 Sets the input le...

Page 75: ...splayed and can be set if KEY SYNC is ON LFO SPRD LFO Spread 180 180 Sets the LFO phase difference between the left and right channels HI DAMP High Damp 000 100 Sets the feedback damping amount in the high range 13 VIBRATO Stereo Vibrato Vibrato Vibrato Left Right Dry Wet Dry Wet Stereo In Stereo Out LFO LFO Shape LFO Spread This effect causes the pitch of the input signal to shimmer Using the Aut...

Page 76: ...e effect is applied MOD DEPTH Modulation Depth 000 127 Sets the depth of LFO modulation RESO Resonance 000 127 Sets the resonance amount PHASE Switches the phase of the output and feedback LFO SYNC LFO Tempo Sync OFF ON Specifies whether the LFO cycle will be synchronized with the tempo speci fied by the TEMPO knob or MIDI clock p 66 LFO SYNC LFO Tempo Sync LFO FREQ LFO Frequency 0 01 100 0Hz Sets...

Page 77: ...FREQ LFO Frequency SYNC NOTE LFO Sync Note 8 1 1 64 Sets the LFO frequency as a proportion of the tempo set by the TEMPO knob NOTE This parameter will be displayed and can be set if LFO SYNC is ON p 66 SYNC NOTE LFO Sync Note LFO WAVE LFO Waveform SAW SQUARE TRIANGLE SINE S H Selects the LFO waveform p 66 LFO WAVE LFO Waveform LFO SHAPE 63 63 p 66 LFO SHAPE KEY SYNC LFO KeySync OFF ON Specifies wh...

Page 78: ...t with a correct scale OSC WAVE OSC Waveform SAW TRIANGLE SINE Selects the ocsillator waveform LFO INT LFO Intensity 63 63 Sets the depth of LFO modulation LFO SYNC LFO Tempo Sync OFF ON Specifies whether the LFO cycle will be synchronized with the tempo speci fied by the TEMPO knob or MIDI clock p 66 LFO SYNC LFO Tempo Sync LFO FREQ LFO Frequency 0 01 100 0Hz Sets the LFO speed p 66 LFO FREQ LFO ...

Page 79: ...o specified by the TEMPO knob or MIDI clock If the DURATION and TM RATIO settings exceed the limit an indication of will appear for the TM RATIO LFO SYNC LFO Tempo Sync OFF ON Specifies whether the LFO cycle will be synchronized with the tempo speci fied by the TEMPO knob or MIDI clock p 66 LFO SYNC LFO Tempo Sync LFO FREQ LFO Frequency 0 01 100 0Hz In Out LFO Cycle Duration LFO Cycle Duration If ...

Page 80: ... the delay effect to the MIDI Clock of an external MIDI sequencer Connecting MIDI devices computers Controlling an external MIDI tone generator from the microKORG XL When you want to use the microKORG XL s keyboard controllers and arpeggiator etc to play an external MIDI tone generator use a MIDI cable to connect the microKORG XL s MIDI OUT connector to the MIDI IN con nector of the external MIDI ...

Page 81: ...nel setting In order to exchange data with a connected external MIDI device you must set the microKORG XL s MIDI channel to match the MIDI channel of the external MIDI device Setting the microKORG XL s MIDI channel 1 Use knob 1 to select the MIDI page 2 Use knob 2 to select MIDI CH and then use knob 3 to specify the MIDI channel 3 Set the MIDI channel of the connected external MIDI device NOTE For...

Page 82: ... sent to the external MIDI sequencer and will also be echoed back to sound the microKORG XL s tone generator a second time To prevent each note from being sounded twice once directly from the keyboard and once from the echoed back note you must turn the microKORG XL s Local Control setting off Recording the MIDI output from the microKORG XL s arpeggiator onto an external MIDI sequencer or computer...

Page 83: ... sixteen channels 1 16 MIDI messages can be transmitted and received when the channel of the receiving device matches the channel of the transmitting device This setting will affect the way in which channels are handled If VOIC MODE is SINGLE LAYER or SPLIT If the COMMON page VOIC MODE setting is SINGLE LAYER or SPLIT MIDI data is transmitted received on the global MIDI channel If VOIC MODE is Mul...

Page 84: ...ges to be transmitted and received set the MIDI FLT page P BEND to ENABLE If this is set to DISABLE pitch bend change messages will not be transmitted or received Control changes Control changes Bn cc vv n channel cc control change no vv value When you use knobs 1 3 to edit certain parameters or when you oper ate certain buttons or the MOD wheel the assigned control change will be transmitted Conv...

Page 85: ...mmediately How ever this message is intended for use in emergencies and is not for use during a performance Reset all controllers CC 121 Bn 79 00 value is 00 When a Reset All Controllers message is received all controller values cur rently operating on that channel will be reset Some parameters assigned using Virtual Patch will not be reset Using a control change as a virtual patch modulation sour...

Page 86: ... mes sages are received the corresponding arpeggiator settings will change accordingly These messages are transmitted and received on the Global MIDI channel For the correspondence between the values of the message and the values of the microKORG XL parameter refer to the table ON OFF Bn 63 00 Bn 62 02 Bn 06 mm LATCH Bn 63 00 Bn 62 04 Bn 06 mm TYPE Bn 63 00 Bn 62 07 Bn 06 mm GATE Bn 63 00 Bn 62 0A...

Page 87: ...1 12 009 44 45 035 77 78 061 110 111 087 13 010 46 036 79 062 112 088 14 011 47 037 80 063 113 089 15 012 48 038 81 064 114 90 16 17 013 49 50 039 82 83 065 115 116 91 18 014 51 040 84 066 117 92 19 015 52 041 85 067 118 93 20 21 016 53 042 86 068 119 94 22 017 54 55 043 87 88 069 120 121 95 23 018 56 044 89 070 122 96 24 019 57 045 90 071 123 97 25 26 020 58 59 046 91 92 072 124 98 27 021 60 047 ...

Page 88: ... Attack 74 76 EG1 Decay 77 79 EG1 Sustain 80 82 EG1 Release 83 85 EG2 Attack 86 89 EG2 Decay 90 92 EG2 Sustain 93 95 EG2 Release 96 98 EG3 Attack 99 101 EG3 Decay 102 105 EG3 Sustain 106 108 EG3 Release 109 111 Patch1 Int 112 114 Patch2 Int 115 117 Patch3 Int 118 121 Patch4 Int 122 124 Patch5 Int 125 127 Patch6 Int 0 2 Pitch 3 5 OSC2 Tune 6 9 OSC1 Control 1 10 12 OSC1 Level 13 15 OSC2 Level 16 18 ...

Page 89: ...XL will adjust its overall volume Master fine tuning F0 7F nn 04 03 vv mm F7 A value of 8192 mm vv 40 00 is center 0 cent A4 440 0Hz 4096 mm vv 20 00 is 50 cents and 12288 mm vv 60 00 is 50 cents When master fine tuning is received the value specified for the micro KORG XL s GLOBAL page MST TUNE will be ignored and the overall pitch will be specified by the data that was received Realtime Messages...

Page 90: ...0 95 NOISE 96 111 PCM DWGS 112 127 AUDIO IN 0 15 SAW 16 31 PULSE 32 47 TRIANGLE 48 63 SINE 64 79 FORMANT 80 95 NOISE 96 111 PCM DWGS 112 127 AUDIO IN OSC MOD CC 09 0 31 WAVEFORM 32 63 CROSS 64 95 UNISON 96 127 VPM 0 31 WAVEFORM 32 63 CROSS 64 95 UNISON 96 127 VPM OSC1 C1 CC 15 0 127 0 127 OSC1 C2 CC 17 0 127 0 127 OSC MOD VPM 1 32 0 127 OSC2 WAVE CC 18 0 31 SAW 32 63 PULSE 64 95 TRIANGLE 96 127 SI...

Page 91: ... 51 76 SINE 77 101 S H 102 127 RAMDOM FREQ CC 76 0 127 BPM SYNC ON p 93 0 127 BPM SYNC ON p 93 PATCH1 INTENSTY CC 103 0 1 63 2 62 63 1 64 0 65 1 127 63 0 1 63 2 62 63 1 64 0 65 1 127 63 PATCH2 INTENSTY CC 104 0 1 63 2 62 63 1 64 0 65 1 127 63 0 1 63 2 62 63 1 64 0 65 1 127 63 PATCH3 INTENSTY CC 105 0 1 63 2 62 63 1 64 0 65 1 127 63 0 1 63 2 62 63 1 64 0 65 1 127 63 PATCH4 INTENSTY CC 106 0 1 63 2 ...

Page 92: ... 127 HOLD VC AMP VC LEVEL off 0 127 0 127 DIRCT LVL off 0 127 0 127 Value transmitted received SEMITONE Value transmitted received SEMITONE 0 2 24 66 67 1 3 5 23 68 70 2 6 7 22 71 73 3 8 10 21 74 75 4 11 13 20 76 78 5 14 15 19 79 80 6 16 18 18 81 83 7 19 20 17 84 86 8 21 23 16 87 88 9 24 26 15 89 91 10 27 28 14 92 94 11 29 31 13 95 96 12 32 33 12 97 99 13 34 36 11 100 101 14 37 39 10 102 104 15 40...

Page 93: ...1 3 1 3 60 67 1 4 1 4 68 74 3 16 3 16 75 82 1 6 1 6 83 89 1 8 1 8 90 97 1 12 1 12 98 104 1 16 1 16 105 112 1 24 1 24 113 119 1 32 1 32 120 127 1 64 1 64 Value transmitted received EQ Gain dB Value transmitted received EQ Gain dB 0 2 15 0 66 67 0 5 3 4 14 5 68 69 1 0 5 6 14 0 70 71 1 5 7 8 13 5 72 73 2 0 9 10 13 0 74 75 2 5 11 12 12 5 76 77 3 0 13 14 12 0 78 79 3 5 15 16 11 5 80 81 4 0 17 18 11 0 8...

Page 94: ... is the XLR LINE switch set to LINE Is the AUDIO IN VOLUME knob level raised For a vocoder program is the audio source you re using as the modula tor connected to the AUDIO IN LINE jack Alternatively have you connected a mic to the AUDIO IN MIC jack Can t edit Can t use performance editing by turning knobs 1 3 Could you be in Full Edit mode Turning the knobs 1 3 does not modify the edit parameters...

Page 95: ...Does the MIDI channel of the data transmitted from the external MIDI device match the MIDI channel of the microKORG XL Does not respond correctly to MIDI messages sent from an exter nal device Is the MIDI FLT page parameter for that type of MIDI message set to Enable Transpose velocity curve and arpeggiator data is not recognized correctly Is the GLOBAL page POSITION set appropriately Can t contro...

Page 96: ...48 GALAKTIC HIPHOP VOCODER AUDIO IN Off A51 SLIP PAD DANCE POLY SYNTH Off A52 SATISFAC DANCE BASS Off A53 8VESAW DANCE LEAD Off A54 BUILDER DANCE ARP MOTION Off A55 EVOLTION DANCE PAD STRINGS Off A56 M1 ORGAN DANCE KEYBOARD BELL Off A57 CHORDHIT DANCE S E HIT Off A58 ROBOTVOC DANCE VOCODER AUDIO IN Off A61 FILLER DUBSTEP POLY SYNTH Off A62 EVILSTEP DUBSTEP BASS Off A63 SCARY LD DUBSTEP LEAD Off A6...

Page 97: ... Off B44 TLKVOXER HIPHOP ARP MOTION On B45 LOW PAD HIPHOP PAD STRINGS Off B46 PLAYTHAT HIPHOP KEYBOARD BELL Off B47 FROM2036 HIPHOP S E HIT Off B48 WISPAVOC HIPHOP VOCODER AUDIO IN Off B51 TRANCER DANCE POLY SYNTH Off B52 DEE I EM DANCE BASS Off B53 SCREAMLD DANCE LEAD Off B54 DIGIPUMP DANCE ARP MOTION On B55 FLASHPAD DANCE PAD STRINGS Off B56 ORGAN DANCE KEYBOARD BELL Off No Program Name Genre Ca...

Page 98: ...KORG Inc 5 CLUBSTAR Henning Verlage 6 SNOW KORG Inc 7 RADIOTEK KORG Inc 8 TLKBOXER KORG Inc 9 EVOLTION Henning Verlage 10 PREVIEW4 H V x KORG Inc All Demo Songs 2012 KORG Inc All rights reserved For more information about the authors please visit Katsuyuki Mito http mito310 seesaa net Henning Verlage www facebook com henningverlage ...

Page 99: ...Q Master Master effects 17 effect algorithms Arpeggiator UP DOWN ALT1 2 Random Trigger 6 types Step Arpeggiator function Programs 128 programs banks A B x 8 genres x 8 catego ries Input output Input AUDIO IN LINE jack AUDIO IN MIC jack AUDIO IN LINE jack Maximum input level 17 dBu GAIN Max Input impedance 7k ohms Connector 1 4 phone jack unbalanced AUDIO IN MIC jack Maximum input level 34 dBu GAIN...

Page 100: ... Local setting ON OFF 59 M Master effect MASTER FX 20 51 MIDI 80 MIDI channel 81 MIDI Filter 60 82 MIDI message 83 MIDI parameter 59 Mixer 20 Modulator MODULATOR 21 22 25 MULTI 32 Multi timbral 81 N Noise generator 20 NRPN 86 O OSC 20 36 Oscillator 19 20 P Parameter 23 Performance edit 22 Pitch 35 Portamento 36 PRELOAD 30 62 Program 19 Initializing a program 28 Program name 32 Program List 96 PROT...

Page 101: ...Appendices 101 Appendices ...

Page 102: ...microKORG XL 102 ...

Page 103: ...purchased thisproduct via the internet through mail order and or via a telephone sale you must verify that this product isintended to be used in the country in which you reside WARNING Use of this product in any country other than that for which it is intended could be dangerousand could invalidate the manufacturer s or distributor s warranty Please also retain your receipt as proof of purchase ot...

Reviews: