background image

Reproducción y grabación de estilos rítmicos

33

Cambio de variaciones e inserción de un 

relleno o final

Cada estilo rítmico proporciona dos variaciones. Cada variación 

tiene tres patrones rítmicos: básico, relleno 1 y relleno 2.

2

1

4

1

3

1.  Seleccione un estilo rítmico y reprodúzcalo.

Consulte la página 32 “Selección y reproducción de un estilo 

rítmico”.

2.  Pulse el botón [VAR] para cambiar la variación del estilo rítmico.

Cambiará a la variación B cuando comience el siguiente compás. 

El LED situado encima del botón [VAR] se ilumina para indicar 

que se ha seleccionado la variación B. Vuelva a pulsar el botón 

para volver a la variación A (el LED se oscurece).

3.  Durante la reproducción, pulse el botón [F1] o [F2].

Se reproduce un relleno cuando el compás cambia (el LED se 

ilumina) y, a continuación, se regresa al patrón rítmico básico.

Consejo: 

Con la reproducción detenida, puede pulsar el botón 

[F1] o [F2] para iniciar la reproducción con un relleno.

4.  Durante la reproducción, pulse el botón [TAP/END].

En el siguiente compás, se reproduce un final y, a continuación, 

el estilo rítmico se detiene.

Grabación de su propia interpretación 

junto con el estilo rítmico

En el modo de ritmo puede grabar sus propias interpretaciones junto 

con el estilo rítmico.

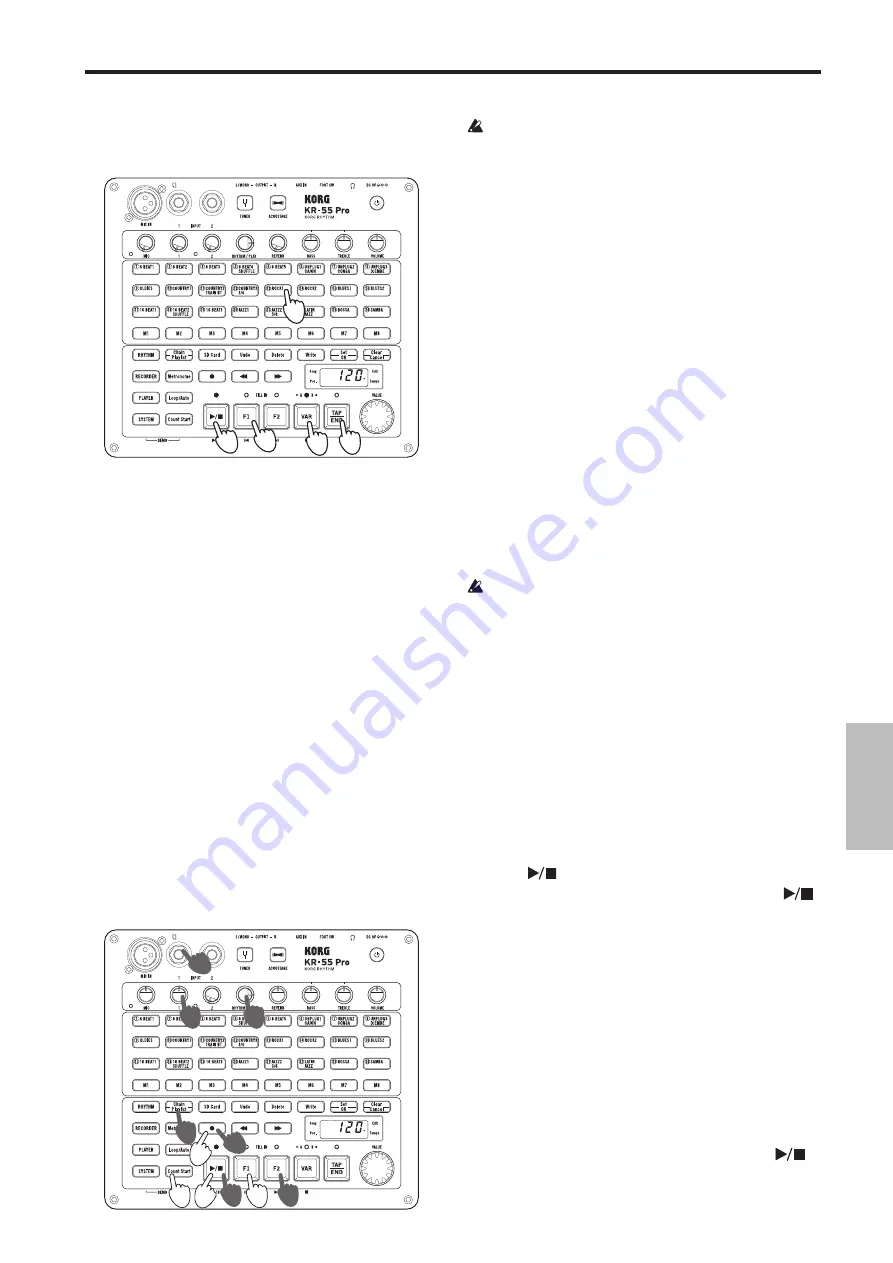
Cree una cadena de estilos rítmicos con antelación para la canción 

que desee interpretar (consulte la 

página 14 

“Creación de una 

cadena”). Nuestro ejemplo aquí explica cómo grabar utilizando una 

cadena ya registrada.

4

1,4

4

2

2

4

3

5,7

3

3

1

Preparativos para grabar

  Los datos grabados se guardan en una tarjeta SD insertada en la 

ranura para tarjetas SD. Para grabar, inserte la tarjeta SD en la 

ranura para tarjetas SD antes de activar la alimentación (consulte 

la página 30 “Inserción o extracción de una tarjeta SD”).

1.  Conecte el micrófono o el instrumento.

Consulte la página 31 “Conexión y reproducción de instrumentos”

Nota: 

La función Acoustage no se puede utilizar mientras se graba.

2.  Seleccione una cadena. 

Pulse el botón [Chain/Playlist] para activar la función de cadena 

(el botón se ilumina). Utilice el botón [F1] o [F2] para seleccionar 

la cadena que desea reproducir.

En este ejemplo, pulse el botón [F1] para seleccionar la cadena 

C01. Especifique el tempo como desee.

3.  Ponga el KR-55 Pro en estado de grabación-espera y seleccione 

el número de canción destino de la grabación.
Pulse el botón [ 

 ] para entrar en el estado de grabación-

espera (el botón parpadea).


La pantalla indica el número de canción (d01, d02...). Los 

números de las canciones sin grabar parpadean y los números 

de las canciones ya grabadas se iluminan fijos.

Utilice el botón [F1] o [F2] para seleccionar el número de 

canción que desea grabar.
Consejo: 

Consejo: Si hay alguna canción sin grabar (canción 

nueva), se selecciona automáticamente el número de canción 

nueva más bajo disponible.

  Si selecciona el número de una canción que ya está grabada (el 

número de canción se ilumina fijo) y después inicia la grabación, 

los datos previamente grabados se perderán y se sobrescribirán 

los nuevos datos grabados.

4.  Ajuste el nivel de grabación del estilo rítmico y del micrófono 

o instrumento.

Ajuste el volumen del estilo rítmico girando el mando 

RHYTHM/PLAY a la posición de las 3 en punto. Utilice el 

mando MIC y los mandos (INPUT) 1 y 2 para ajustar el nivel de 

volumen del micro o del instrumento según corresponda.

Nota: 

En el estado de grabación-espera o durante la grabación 

(cuando el botón [ 

 ] está parpadeando o iluminado), los tres 

LED situados a la izquierda de la pantalla funcionan como si 

fuesen el medidor del nivel de grabación. Ajuste los mandos 

referidos anteriormente de manera que el LED superior 

parpadee ocasionalmente.

Para comprobar el nivel de grabación del estilo rítmico, pulse el 

botón 

 ]

 y haga ajustes mientras graba.

Cuando haya terminado de hacer ajustes, pulse el botón 

 ]


para detener el estilo rítmico.

Nota: 

El mando VOLUME no afecta al nivel de grabación. Si se 

produce realimentación acústica (acoples), use este mando para 

bajar el volumen general.

Inicio de la grabación

1.  Siga los pasos descritos en ”Preparativos para grabar”, página 

33.

2.  Pulse el botón [Count Start] para activar la función de inicio de 

recuento (el botón parpadea).
Consejo: 

Consejo: Antes de que se inicie la grabación, la función 

de inicio de recuento inserta un recuento de dos compases 

después de pulsar el botón [ 

 ].

3.  Pulse el botón [


] para acceder al estado de grabación-espera.

Los LED situados encima de los botones [ 


] y [ 

 ] 

parpadean.

Summary of Contents for RHYTHM KR-55 Pro

Page 1: ... EFGSJ 2 Quick Start Guide Guide de prise en main Blitzstart Guía de inicio rápido クイ ック スタート ガイ ド ...

Page 2: ...HM PLAY PLAY VOLUME HEADPHONES OUTPUT L MONO R INPUT 2 INPUT 2 GAIN EQ BASS TREBLE MIC IN MIC GAIN PEAK LED RECORDER SD CARD PLAY LEVEL RHYTHM PLAY REC PLAY PLAY RHYTHM LEVEL RHYTHM PLAY RHYTHM METRONOME PLAYER MODE RECORDER MODE RHYTHM MODE ACOUSTAGE METRONOME Metronome METRONOME Metronome Signal Path Flux du Signal Signalfluss Flujo de la señal 信号経路 ...

Page 3: ... or rhythm patterns in real time as needed during your performance You can use the chain function to create the rhythm structure of an entire song so that it will play automatically Acoustage surround function Acoustage technology provides an expansive extra wide sound field Full fledged mixer functionality A mic input two guitar inputs and an AUX input allow multi channel mixing You can apply a r...

Page 4: ...one or more of the following measures Reorient or relocate the receiving antenna Increase the separation between the equipment and receiver Connect the equipment into an outlet on a circuit different from that to which the receiver is connected Consult the dealer or an experienced radio TV technician for help If items such as cables are included with this equipment you must use those included item...

Page 5: ...tart the metronome function These buttons are also used to undo recorded data and to export import audio files 1 Mixer section 2 Select section 3 Control section 3 a Mode buttons 3 b Function buttons 3 c Control buttons VALUE dial Display 3 c Control buttons VALUE dial Display The control buttons are used to control playback and recording Use the VALUE dial to adjust the tempo of the rhythm style ...

Page 6: ...should also format the card in the following cases If the display shows the error message Err Crd at start up If the display shows the error message when playing or recording a song 1 Press the SYSTEM button to enter System mode the button lights 2 Press the M8 button the button blinks The display indicates Init Initialize and the Set OK button blinks 3 To format the card hold down the Set OK butt...

Page 7: ...hile data is being converted or while data is being written to the system Doing so may make the KR 55 Pro malfunction or damage the data on the SD card If the data on the SD card has been damaged format the card 1 If recording or playback is occurring press the button to stop 2 Hold down the power button for one second or longer until the button blinks After a time the power button and display ind...

Page 8: ...ng outputted from the OUTPUT L MONO and R jacks 4 Use the TREBLE knob and BASS knob to adjust the tone 5 As necessary use the REVERB knob to adjust the effect as desired Playing and recording rhythm styles Let s try out rhythm styles of various genres Selecting and playing a rhythm style 1 4 8 3 7 6 2 5 2 1 Press the RHYTHM button to enter Rhythm mode the button lights up 2 Set the VOLUME knob to ...

Page 9: ...t to play back In this example press the F1 button to select the C01 chain Specify the tempo as desired 3 Put the KR 55 Pro in the record standby state and select the recording destination song number Press the button to enter the record standby state the button blinks The display indicates the song number d01 d02 The number of an unrecorded song blinks and the number of an already recorded song i...

Page 10: ...ximum data size time Depends on the memory card used approximately 100 minutes per 1 GB for WAV data Maximum number of data files number of folders Up to 99 songs per folder a total of eight folders M1 M8 inside the PLAYER folder can be used Playlist function 10 banks up to 24 songs can be registered in each Mixer effect section Effects Reverb effect Equalizer BASS TREBLE ACOUSTAGE wide stereo eff...

Page 11: ...les deux entrées guitare et l entrée AUX Appliquez un effet de réverbération aux signaux reçus via les prises MIC IN INPUT 1 et INPUT 2 Concoctez la saveur sonore avec l égaliseur Fonction d accordeur Accordez votre instrument via un large écran garantissant une lecture facile Cette fonction vous permet aussi d accorder votre instrument sur base d un son de référence Fonction d enregistrement Prod...

Page 12: ... dispositions Seulement EU Quand un symbole avec une poubelle barrée d une croix apparait sur le produit le mode d emploi les piles ou le pack de piles cela signifie que ce produit manuel ou piles doit être déposé chez un représentant compétent et non pas dans une poubelle ou toute autre déchetterie conventionnelle Disposer de cette manière de prévenir les dommages pour la santé humaine et les dom...

Page 13: ...Ces boutons permettent d activer et de désactiver les fonctions de chaîne de liste de lecture de boucle et de décompte ainsi que de lancer et d arrêter la fonction métronome Ces boutons servent aussi à annuler un enregistrement et à exporter importer des fichiers audio 3 c Boutons de commande moletteVALUE écran Les boutons de commande servent à contrôler la lecture et l enregistrement La molette V...

Page 14: ...fiche le message d erreur Err Crd au démarrage Si l écran affiche un message d erreur pendant la lecture ou l enregistrement d un morceau 1 Appuyez sur le bouton SYSTEM pour activer le mode système le bouton s allume 2 Appuyez sur le bouton M8 il clignote L écran affiche Init initialisation et le bouton Set OK clignote 3 Pour formater la carte maintenez le bouton Set OK enfoncé pendant environ une...

Page 15: ...dommager le KR 55 Pro ou les données sur la carte SD Si les données de la carte sont corrompues formatez la carte SD 1 Si la lecture ou un enregistrement est en cours appuyez sur le bouton pour l arrêter 2 Maintenez l interrupteur d alimentation enfoncé pendant une seconde ou plus jusqu à ce qu il clignote Au bout d un moment l interrupteur d alimentation et l écran s éteignent et le KR 55 Pro est...

Page 16: ... Réglez le timbre avec les commandes TREBLE et BASS 5 Si nécessaire réglez la quantité de réverbération avec la commande REVERB Jeu et enregistrement de styles rythmiques Écoutons des motifs rythmiques de styles divers Sélectionner et jouer un style rythmique 1 4 8 3 7 6 2 5 2 1 Appuyez sur le bouton RHYTHM pour activer le mode rythmique le bouton s allume 2 Réglez la commande VOLUME sur un niveau...

Page 17: ...ce bouton s allume Sélectionnez la chaîne à lire avec le bouton F1 ou F2 Pour cet exemple appuyez sur le bouton F1 pour sélectionner la chaîne C01 Si nécessaire réglez le tempo comme bon vous semble 3 Activez le mode paré à enregistrer du KR 55 Pro puis sélectionnez le numéro du morceau de destination pour l enregistrement Appuyez sur le bouton pour activer le mode paré à enregistrer le bouton cli...

Page 18: ...duelle de la carte SD utilisée Annulation rétablissement Undo Redo Un niveau Fonction de lecteur Formats de lecture PCM audio WAV portant l extension de fichier wav de 44 1 kHz 16 bits stéréo Taille maximum des données durée Dépend de la carte SD utilisée 1 Go permet d enregistrer environ 100 minutes pour un fichier WAV Nombre maximum de fichiers de données nombre de dossiers Jusqu à 99 morceaux p...

Page 19: ...r zum Einlesen in Ihre Computer DAW Wiedergabefunktion Es können zudem Standardaudiodateien WAV von einer Speicherkarte wiedergegeben werden Die Wiedergabelisten Funktion erlaubt Ihnen die Wiedergabe Ihrer Audiodateien in einer bestimmten Reihenfolge Eine so erzeugte Wiedergabeliste kann für Hintergrundmusik oder zur Begleitung von Live Auftritten verwendet werden Sie können die Wiedergabegeschwin...

Page 20: ...istiert ein separates gesetzlich festgelegtes Entsorgungssystem Gebrauchte elektrische und elektronische Geräte müssen separat entsorgt werden um ein umweltgerechtes Recycling sicherzustellen Diese Produkte müssen bei benannten Sammelstellen abgegeben werden Die Entsorgung ist für den Endverbraucher kostenfrei Bitte erkundigen sie sich bei ihrer zuständigen Behörde wo sie diese Produkte zur fachge...

Page 21: ...erkettungs Playlist Loop und Einzählfunktion sowie zum starten und stoppen der Metronomfunktion Diese Tasten dienen auch zum verwerfen aufgezeichneter Daten und zum exportieren importieren von Audiodateien 3 c Steuertasten VALUE Wählrad Display Die Steuertasten dienen der Steuerung von Wiedergabe und Aufnahme Mit dem VALUE Wählrad stellen Sie das Tempo von Rhythmus und Metronom ein oder ändern die...

Page 22: ...arte formatieren Falls beim Einschalten im Display die Fehlernachricht Err Crd erscheint Falls diese Fehlernachricht bei der Wiedergabe oder Aufnahme eines Songs erscheint 1 Drücken Sie die SYSTEM Taste um den Systemmodus aufzurufen die Taste leuchtet 2 Drücken Sie die M8 Taste die Taste blinkt Im Display erscheint Init Initialize und die Set OK Taste blinkt 3 Halten Sie die Set OK Taste etwa eine...

Page 23: ...nen des KR 55 Pro bzw Beschädigungen der Daten auf der Speicherkarte Falls dies der Fall ist müssen Sie die Speicherkarte erneut formatieren 1 Beenden Sie gegebenenfalls eine Aufnahme oder Wiedergabe indem Sie die Taste drücken 2 Halten Sie die Einschalttaste mindestens eine Sekunde lang gedrückt bis diese blinkt Nach einiger Zeit erlöschen die Einschalttaste und das Display und das System des KR ...

Page 24: ...ngeschlossenen Aktivmonitore 4 Stellen Sie mit dem TREBLE Regler und dem BASS Regler den Klang ein 5 Falls erwünscht regeln Sie mit dem REVERB Regler den Halleffekt Spielen und Aufnehmen mit Rhythmusbegleitung Lernen wir zuerst einige Rhythmen diverser Genres kennen Auswahl undWiedergabe eines Rhythmus 1 4 8 3 7 6 2 5 2 1 Drücken Sie die RHYTHM Taste um den Rhythmusmodus aufzurufen die Taste leuch...

Page 25: ...aktivieren die Taste leuchtet Wählen Sie mit der Taste F1 oder F2 die Kette aus die Sie wiedergeben möchten In diesem Beispiel wählen Sie mit der F1 Taste die Kette C01 Geben sie das gewünschte Tempo vor 3 Versetzen sie den KR 55 Pro in den Aufnahme Standby Status und wählen Sie die Songnummer aus unter der die Aufnahme gespeichert wird Drücken Sie die Taste um den Aufnahme Standby Status aufzuruf...

Page 26: ...endung wav 44 1 kHz 16 Bit Stereo Maximale Wiedergabezeit Je nach verwendeter Speicherkarte etwas 100 Minuten pro 1 GB Bei WAV Dateien Maximale Anzahl der Dateien und Ordner Bis zu 99 Songs pro Ordner insgesamt können acht Unterordner M1 M8 im Ordner PLAYER verwendet werden Wiedergabelisten Funktion 10 Bänke in denen jeweils bis zu 24 Songs registriert werden können Mischpult Effektbereich Effekte...

Page 27: ...ario durante la interpretación Puede utilizar la función de cadena para crear la estructura rítmica de una canción completa y que se reproduzca automáticamente Función Acoustage surround La tecnología Acoustage proporciona un campo sonoro extra amplio y expansivo Auténtica funcionalidad de mezclador Una entrada de micrófono dos entradas de guitarra y una entrada AUX permiten la mezcla de varios ca...

Page 28: ...sura ha de hacerlo en acuerdo con la normativa vigente de la Unión Europea No debe verter dichos artículos junto con la basura de casa Verter este producto de manera adecuada ayudará a evitar daños a su salud pública y posibles daños al medioambiente Cada país tiene una normativa específica acerca de cómo verter productos potencialmente tóxicos por tanto le rogamos que se ponga en contacto con su ...

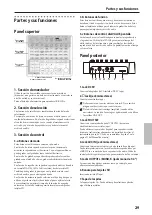
Page 29: ...e formatear o comprobar tarjetas SD 3 b Botones de función Estos botones se utilizan para activar y desactivar las funciones de cadena lista de reproducción bucle e inicio de recuento Estos botones también se utilizan para deshacer la grabación de datos y para exportar importar archivos de audio 3 c Botones de control dialVALUE pantalla Los botones de control se utilizan para controlar la reproduc...

Page 30: ...trumento También debe formatear la tarjeta en los casos siguientes Si la pantalla muestra el mensaje de error Err Crd al iniciar el equipo Si la pantalla muestra el mensaje de error al reproducir o grabar una canción 1 Pulse el botón SYSTEM para acceder al modo de sistema el botón se ilumina 2 Pulse el botón M8 el botón parpadea La pantalla indica Init inicializar y los botones Set OK parpadean 3 ...

Page 31: ...do datos en el sistema Si lo hace puede provocar anomalías de funcionamiento en el KR 55 Pro o daños en los datos de la tarjeta SD Si los datos de la tarjeta SD se han dañado formatee la tarjeta 1 Si está en proceso de grabación o reproducción pulse el botón para detenerlo 2 Mantenga pulsado el botón de alimentación un segundo o más hasta que parpadee Después de unos momentos el botón de alimentac...

Page 32: ...ONO y R 4 Utilice los mandos TREBLE y BASS para ajustar el tono 5 Según sea necesario utilice el mando REVERB para ajustar el efecto deseado Reproducción y grabación de estilos rítmicos Probemos estilos rítmicos de distintos géneros Selección y reproducción de un estilo rítmico 1 4 8 3 7 6 2 5 2 1 Pulse el botón RHYTHM para acceder al modo de ritmo el botón se ilumina 2 Ajuste el mando VOLUME en u...

Page 33: ...eproducir En este ejemplo pulse el botón F1 para seleccionar la cadena C01 Especifique el tempo como desee 3 Ponga el KR 55 Pro en estado de grabación espera y seleccione el número de canción destino de la grabación Pulse el botón para entrar en el estado de grabación espera el botón parpadea La pantalla indica el número de canción d01 d02 Los números de las canciones sin grabar parpadean y los nú...

Page 34: ...archivo wav 44 1 kHz 16 bits estéreo Tamaño de datos máximo tiempo depende de la tarjeta de memoria utilizada aproximadamente 100 minutos por 1 GB para datos WAV Número máximo de archivos de datos número de carpetas un máximo de 99 canciones por carpeta se puede utilizar un total de ocho carpetas M1 M8 en la carpeta PLAYER Función de lista de reproducción 10 bancos se puede registrar un máximo de ...

Page 35: ...ションを持ち それぞれのバ リエーションにはベーシック フィルイン1 フィルイン2の3つのリズ ム パターンが収録されています 演奏構成に合わせてリアルタイ ムにバリエーションやリズム パターンを切り替えることができま す チェイン機能を使用して1曲分のリズム構成を作成して自動演奏さ せることができます ACOUSTAGE ワイ ド 機能 アコーステージ Acoustage 技術による広がりのあるサウンドが 得られるワイド機能を搭載しています 充実したミキサー機能 マイク入力 1 ギター入力 2 AUX入力 1を使用した多チャンネ ルのミキシングが可能です MIC IN端子 INPUT 1端子 INPUT 2端子からの入力にはリバーブ エフェク トをかけることができます イコライザーで音質を調節することができます チューナー機能 大きく見やすいメーター表示を見ながらチューニングすることがで...

Page 36: ...かかる 場所で 使用や保管をしない 本製品の上に 花瓶のような液体が入ったものを置かない 本製品に液体をこぼさない 濡れた手で本製品を使用しない 注意 この注意事項を無視した取り扱いをすると 傷害を負う可能性 または物理的損害が発生する可能性があります 正常な通気が妨げられない所に設置して使用する ラジオ テレビ 電子機器などから十分に離して使用する ラジオやテレビ等に接近して使用すると 本製品が雑音を受け て誤動作する場合があります また ラジオ テレビ等に雑音が 入ることがあります 本製品をテレビ等の横に設置すると 本製品の磁場によってテレ ビ等の故障の原因になることがあります 外装のお手入れは 乾いた柔らかい布を使って軽く拭く ACアダプターをコンセントから抜き差しするときは 必 ずプラグを持つ 長時間使用しないときは 電池の液漏れを防ぐために電池 を抜く 電池は幼児の手の届かないと...

Page 37: ...ンクション ボタン 3 c コントロール ボタン VALUEダイヤル ディスプレイ 3 b ファンクション ボタン チェイン機能 プレイリスト機能 ループ機能 カウント スター ト機能のオン オフを設定したり メ トロノーム機能のスタート ス トップを切り替えたりします 録音したデータのアンドゥ機能や オーディオ ファイルのエクスポート インポートなども行います 3 c コントロール ボタン VALUEダイヤル ディス プレイ コントロール ボタンは再生や録音をコントロールします VALUEダイヤルはリズム スタイル メ トロノームのテンポを変更 したり オーディオ ファイルの再生スピードを変更します ディ スプレイはテンポ 再生スピードなどの設定値などのさまざまな情 報を表示します リア パネル 2 1 4 5 6 7 3 1 DC 9V端子 付属のACアダプター DC 9V を接続しま...

Page 38: ...説明書 をよくお読みください SDカードをフォーマッ トする SDカードを使用する場合は 本機でフォーマッ トをする必要があ ります また 起動時やソングの再生や録音をしているときにディスプレ イにエラー メッセージ Err Crd が表示された場合にも フォーマッ トをしてください 1 SYSTEM ボタンを押してシステム モードに入ります ボタン 点灯 2 M8 ボタンを押します ボタン点滅 ディスプレイに Init Initialize が表示され Set OK ボタン が点滅します 3 フォーマッ トを実行するには Set OK ボタンを約1秒間押し ます フォーマッ ト中はディスプレイの Init と SD Card ボタンが点 滅します フォーマッ トが正常に終了すると ディスプレイに End が表 示されます フォーマッ トを実行すると SDカード内のすべてのデータが消 去さ...

Page 39: ...音やデータの変換時 およびシステムへのデータ書き込み時 には 絶対に電源を切ったり ACアダプターを抜いたりしないで ください 本機が故障したり SDカード内のデータが破損したりする可能 性があります SDカードのデータが破損した場合は SDカー ドをフォーマッ トしてください 1 録音または再生している場合は ボタンを押して停止し ます 2 電源ボタンを1秒以上押して ボタンを点滅させます しばらくすると 電源ボタンやディスプレイ表示が消灯し KR 55 Proの電源が切れます 電源を切るときのご注意 KR 55 Proの電源を切るときは 必ずパネル上の電源ボタンを押 して 終了させてください KR 55 Proはこのときに各種データが 保存されます 電源が入っている状態で ACアダプターや電池を絶対に取り外 さないでください オート パワー オフについて KR 55 Proにはオート ...

Page 40: ...きません 1 2 1 3 4 1 5 1 MICノブとVOLUMEノブを最小の状態にして MIC IN端子に マイクを接続します 2 マイクで声を入力しながら MICノブでマイクの入力レベルを 調節します 声を最も大きく出したときにピークLEDが少し点灯するくらい にノブを調節します 3 VOLUMEノブでOUTPUT L MONO R端子に接続したパ ワード モニター スピーカーから出力される音量を調節しま す 4 TREBLEノブとBASSノブで音質を調節します 5 必要に応じて REVERBノブでエフェクトを調節します リズム スタイルの再生と録音 ここでは さまざまなジャンルのリズム スタイルを再生してみましょ う リズム スタイルを選んで再生する 1 4 8 3 7 6 2 5 2 1 RHYTHM ボタンを押してリズム モードに入ります ボタン 点灯 2 VOLUMEノブを小さ...

Page 41: ...すでに登録されているチェインを使用して録音する例 を説明します 4 1 4 4 2 2 4 3 5 7 3 3 1 録音の準備 録音したデータは SDカード スロッ トに挿入したSDカードに保存 されます 録音するときは 電源を入れる前にSDカード スロッ ト にSDカードを入れてください 38 ページの SDカードを入 れる 取り出す 1 マイクや楽器を接続します 40ページ 楽器などを接続して演奏する Note 録音時にはACOUSTAGE機能は利用できません 2 チェインを選びます Chain Playlist ボタンを押して ボタン点灯 チェイン機能を オンにします 再生するチェインを F1 または F2 ボタンで選びま す ここでは F1 ボタンを押して C01のチェインを選んでください 必要に応じて テンポを設定します 3 録音待機の状態にして 録音先のソング番号を選びます ボ...

Page 42: ...ドゥ 1回 プレーヤー機能 再生フォーマッ ト PCMオーディオ フォーマッ トWAV形式 拡張子 wav 44 1kHz 16bit ステレオ 最大データ サイズ 時間 使用メモリ カードに依存 1GBあたり 約100分 WAV時 最大データ ファイル フォルダー数 最大99ソング 1フォルダー当た り PLAYERフォルダー内のM1 M8の合計8つのフォルダーを利用 可能 プレイリスト機能 10バンク 各最大24曲まで登録可 ミキサー エフェクト部 エフェク ト リバーブ エフェク ト イコライザー BASS TREBLE ACOUSTAGE ステレオワイド効果 チューナー機能 音律 12平均律 クロマチック キャリブレーション 435 445Hz チューニング ガイド音 3タイプ ギター ベース ピアノ ディスプレイ 7セグ4桁LED SDカード 使用可能カード SDHC UHS I...

Page 43: ...uct from warranty protection お客様相談窓口 0570 666 569 PHS等一部の電話ではご利用できません 固定電話または携帯電話から おかけください 受付時間 月曜 金曜 10 00 17 00 祝祭日 窓口休業日を除く サービス センター 168 0073 東京都杉並区下高井戸1 18 16 2F 保証規定 必ずお読みください 本保証書は 保証期間中に本製品を保証するもので 付属品類 ヘッ ドホ ンなど は保証の対象になりません 保証期間内に本製品が故障した場 合は 保証規定によって無償修理いたします 1 本保証書の有効期間はお買い上げ日より1ケ年です 2 次の修理等は保証期間内であっても有償となります 消耗部品 電池 スピーカー 真空管 フェーダーなど の交換 お取扱い方法が不適当のために生じた故障 天災 火災 浸水等 によって生じた故障 故障の原因が...

Page 44: ...ez bien votre récépissé qui est la preuve de votre achat faute de quoi votre produit ne risque de ne plus être couvert par la garantie du fabricant ou du distributeur WICHTIGER HINWEIS FÜR KUNDEN Dieses Produkt wurde unter strenger Beachtung von Spezifikationen und Spannungsanforderungen hergestellt die im Bestimmungsland gelten Wenn Sie dieses Produkt über das Internet per Postversand und oder mi...

Reviews: