background image

14

4. Appendices

4. Appendices

Adjusting the expression pedal
(Calibration)

If you find the expression pedal difficult to use,
perform this procedure so that the pedal will function
optimally. For example if the effect does not reach
maximum when the pedal is advanced all the way
forward, or does not reach minimum when the pedal is
returned all the way back, use the following procedure
to make the appropriate adjustments.

When making adjustments, use your hand to move the
pedal. Accurate calibration may not be possible if you use
your foot to operate the pedal.

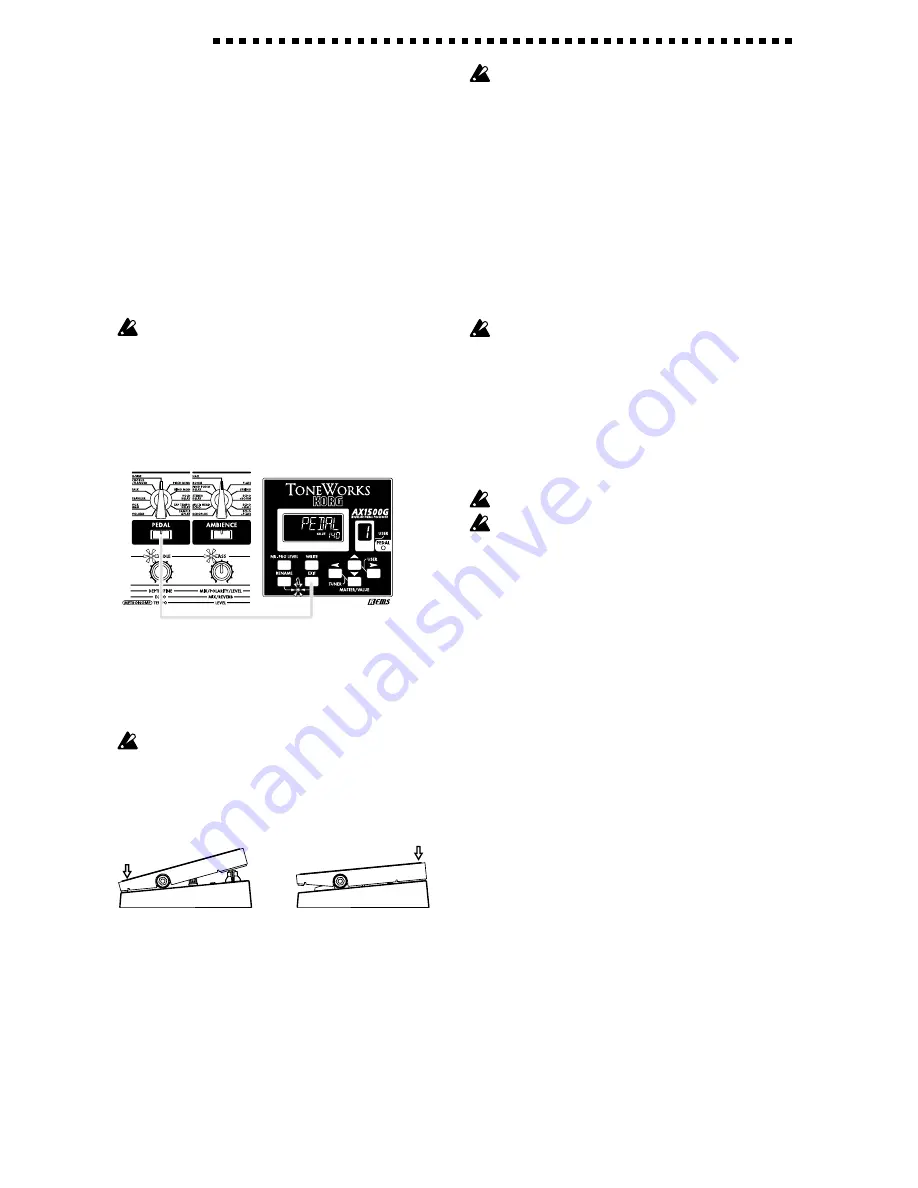
1. Turn on the power while simultaneously holding

down the 

EXIT 

switch and the 

PEDAL 

effect block

select switch.The name display will show “

PEDAL

for approximately one second, and will then
indicate “

MIN

.”

Turn on the power while simultaneously holding down

2. Slowly return the pedal to the full back position.

When it stops, release your hand and press the

WRITE 

switch. The name display will change from

MIN

” to “

MAX

.”

If you decide to halt the adjustment procedure, press the
EXIT switch. The power-on display will appear, and you
will enter Play mode.

3. Slowly advance the pedal. When it stops, release

your hand and press the 

WRITE 

switch.

2. Press slowly

3. Press slowly

The LCD display will indicate “

COMPLT

” for approxi-

mately one second. Then the power-on display will
appear, and you will enter Play mode.
After the adjustment procedure has been completed,
verify the operation of the pedal.
Select an effect that will make it easy to verify the
adjustment. For example, set the pedal effect block to
the 

VOLUME

 effect, set the value to 

0

, and check the

MIN level when the pedal is returned all the way back.

If you make a mistake during the calibration procedure,
the LCD will indicate “ERROR,” and you will return to the
screen before the adjustment (the “MIN” display). If the
ERROR” display appears for repeated attempts, a
malfunction may have occurred. In this case, please
contact your dealer.

Restoring the user programs to
the factory settings (Reload)

1. Turn on the power while simultaneously holding

down the 

EXIT 

switch and the bank switch. The

name display will indicate “

RELOAD?

If you press the EXIT switch, the reload operation will not
occur; the power-on display will appear, and you will enter
Play mode.

2. Press the 

WRITE 

switch. The name display will

change to “

RELOAD

,” and the reload operation

will begin. When the reload operation is completed,
the display will indicate “

COMPLT

” for approxi-

mately one second. Then the power-on display will
appear, and you will enter 

Play mode

.

Never turn off the power during the reload operation.

WARNING: When you perform the reload operation, all
user programs will be rewritten. Master level, metronome,
and input level settings will also be initialized.

Summary of Contents for Toneworks AX1500G

Page 1: ...s and mute 9 Auto tuner 9 Metronome 9 Expression pedal 10 Individual mode 10 Phrase Trainer mode 11 3 Editing 12 Editing effects 12 Setting the noise reduction and program levels 13 Modifying program...

Page 2: ...comply with the limits for a Class B digital device pursuant to Part 15 of the FCC Rules These limits are designed to provide reasonable protection against harmful interfer ence in a residential inst...

Page 3: ...and then operate the pedal to play back the phrase The built in Phrase Trainer function lets you record sound from an audio device or a guitar performance maximum 16 seconds and play it back at a slow...

Page 4: ...editing these knobs control the parameters of the effect that is assigned to the DRIVE AMP effect by the selected program Refer to p 12 Quick editing for the DRIVE AMP effect block 5 Effect channel sw...

Page 5: ...s switch to adjust the amount of noise reduction or the level of each program 7 RENAME switch Use this switch to change the name of a program 8 Metronome LED This LED will blink in time with the metro...

Page 6: ...ect these jacks to your guitar amp or mixer etc For mono connections use the L MONO jack 4 PHONE jack stereo mini Connect a set of headphones to this jack 5 DC 9V Connect the included AC adapter here...

Page 7: ...icult phrases When you enter this mode the MODULATION PEDAL and AMBIENCE effect blocks will automatically be turned off In this mode it is not possible to switch programs or effect channels Hold down...

Page 8: ...nd will be set to the program and master level setting that were last selected when the power was turned off Adjusting the master level The MASTER VALUE display will show the master level immediately...

Page 9: ...nd and off again by repeating this operation It can also be turned off by pressing the EXIT switch Auto tuner When the AX1500G is in bypass or mute the tuner will operate automatically If you mute the...

Page 10: ...Do not apply excessive force to the expression pedal Before operating the expression pedal verify the amount of force that is required to make the pedal LED light and to apply the effect Individual m...

Page 11: ...e selected recording mode Depending on the volume of the connected audio device the sound may be distorted If this occurs adjust the volume on the audio device If the AUX input jack is used the sound...

Page 12: ...ect set noise reduction and program levels and modify the program name During editing the edit icon in the display will blink Edit icon Value of the parameter The parameter assigned to the knob you mo...

Page 13: ...maximum 7 characters Use the cursor switches to select the character that you wish to change the character will blink Then use value knob 5 to select the desired character The available characters ar...

Page 14: ...roxi mately one second Then the power on display will appear and you will enter Play mode After the adjustment procedure has been completed verify the operation of the pedal Select an effect that will...

Page 15: ...the program turned on p 4 8 4 Metronome does not function Are you in Play mode or in Individual mode The metronome will not function in Phrase Trainer mode Is the metronome output level set to 0 p 9...

Page 16: ...istortion Fuzz Amp The effect model offers a wide variety of classic sounds TUBE OD TUBE OD This model simulates the overdriven sound of a popular tube overdrive pedal from the 70 s that responds well...

Page 17: ...AC15 AP 0 3 9 7 Ln 1 10 0 10 2x12 BLACK PANEL AP 0 3 9 7 Ln 1 10 0 10 2x12 AC30 AP 0 3 9 7 Ln 1 10 0 10 2x12 CLASS A AP 0 3 9 7 Ln 1 10 0 10 4x10 TWEED AP 0 3 9 7 Ln 1 10 0 10 4x12 CLASSIC AP 0 3 9 7...

Page 18: ...ob is placed in the 10 position the TIME knob will have no effect MOD DELAY MOD DLY This effect modulates the delay time to produce chorus and flanger like effects Adding a small amount of depth with...

Page 19: ...ob 3 Knob 4 DEPTH Adjusts the sensitivity with which the wah will respond to your picking Knob 5 POLARITY Specifies the direction in which the wah will operate AUTO WAH AUTOWAH This is a band pass fil...

Page 20: ...s fully forward Knob 2 CENTER Select the vowel sound produced when the pedal is in the halfway position Knob 3 BOTTOM Select the vowel sound produced when the pedal is fully backward Vowel sounds A E...

Page 21: ...eats Knob 3 TONE Adjusts the tone of the effect sound Knob 4 Knob 5 MIX Adjusts the mix amount of the effect sound Sample and play If you use this effect in a program where the AMBIENCE effect block i...

Page 22: ...justs the feedback amount delay repeats Knob 3 TONE Adjusts the tonal quality of the delay Knob 4 Knob 5 MIX Adjusts the mix amount of the delay Reverb This effect model simulates the reverberation of...

Page 23: ...AUTO WAH VOX WAH PLATE 7 1 LP NECK CLASSIC COMP 2x12 AC30 US HI GAIN 2x12 AC30 CLASSIC CHORUS VOLUME PING PONG DELEY 2 TRIPPIN CLASSIC COMP 4x10 TWEED TUBE OD 4x10 TWEED ORANGE PHASER VOLUME ECHO PLU...

Page 24: ...cifications and voltages required by each country These products are warranted by the KORG distribu tor only in each country Any KORG product not sold with a warranty card or carrying a serial number...

Reviews: