83
Sequencer
P0
P1
P2
P3
P4
P5
P6
P7
P8
P9
6
To execute the Copy Measure operation, press the OK
button
. To cancel, press the Cancel button.
5–1K: Move Measure
This command moves the specified measures of perfor-
mance data to another measure.
When you execute the Move Measure command, the perfor-
mance data following the move-source measures will move
forward by the corresponding number of measures, and the
performance data following the move-destination will move
backward (i.e., later in the song) by the same number of
measures.
1
Select the move-source song.
2
Select “Move Measure” to access the dialog box.
3
In From: “Track” select the move source track. (By
default, this will be the track you selected in “Track
Select.”)
If you check “All Tracks,” musical data of all tracks
including the master track will be moved.
4
In “From Measure” and “To End of Measure,” specify
the range of measures that will be moved. (By default,
“From Measure” and “To End of Measure” will be the
range that you specified in the Track Edit page.)
5
In “Track” (if “All Tracks” is unchecked) to specify the
move-destination track, and “Measure” to specify the
measure at which the data will be inserted.
6
To execute the Move Measure command, press the OK
button
. To cancel, press the Cancel button.
5–1L: Create Ctrl Data (Create Control Data)
This command creates the specified type of data (control
change, aftertouch, pitch bend, or tempo) in the selected
region of a track.
1
In “Track Select,” select the track on which you wish to
perform the Create Control Data command.
If you wish to modify tempo data, select Master Track as
the track. In this case, the step
4
item “Kind” will be set
to “Tempo.”
2
Select “Create Ctrl Data” to access the dialog box.
3
Specify the range into which the control data will be
inserted.
In “From Measure” and “To End of Measure” specify
the measures, and in “Beat.Tick” specify the beat and
clock. (By default, “From Measure” and “To End of Mea-
sure” will be set to the range you specified in the Track
Edit page.)
4
“Kind” to the type of musical data (event) that you wish
to create.
Control change:
Control change data will be inserted. In
this case, use “#” to specify the control change number.
After Touch:
Aftertouch data will be inserted.
Pitch Bend:
Pitch bend data will be inserted.
5
In “Start Value,” select the starting value of the control
data. In “End Value,” select the ending value of the con-
trol data. By default, the “Start Value” will be set to the
value of the existing data at the start location. If you wish
to create control data that changes smoothly from the
starting location, you can leave the “Start Value”
unchanged, and set only the “End Value.”
6
To execute the Create Control Data command, press the
OK button
. To cancel, press the Cancel button.
When you execute Create Control Data, a large amount
of sequencer memory will be consumed. For this reason
it may not be possible to execute this command if there
is a limited amount of memory remaining. In such
cases, first use “Quantize” (5–1N) to quantize the data
and remove unnecessary control data. Alternatively,
you could quantize the data that was inserted by the
Create Control Data command.
5–1M: Erase Ctrl Data (Erase Control Data)
This command erases data such as control changes, after
touch, pitch bend, or tempo in the specified range.
1
In “Track Select,” select the track from which you wish
to erase control data.
If you wish to erase tempo data, select Master Track. In
this case, the “Kind” item in step
4
will be Tempo.
2
Select “Erase Ctrl Data” to access the dialog box.
3
Specify the range from which you wish to erase control
data.
In “From Measure” to “To End of Measure” specify the
measures, and in “Beat.Tick” specify the beat and clock.
(By default, “From Measure” and “To End of Measure”
will be the range that was specified in the Track Edit
page.)
4
“Kind” to the type of musical data (event) that you wish
to erase.
Control change:
Control change data will be erased. In
this case, use “#” to specify the control change number.
After Touch:
Aftertouch data will be erased.
Pitch Bend:
Pitch bend data will be erased.
5
To execute the Erase Control Data command, press the
OK button
. To cancel, press the Cancel button.
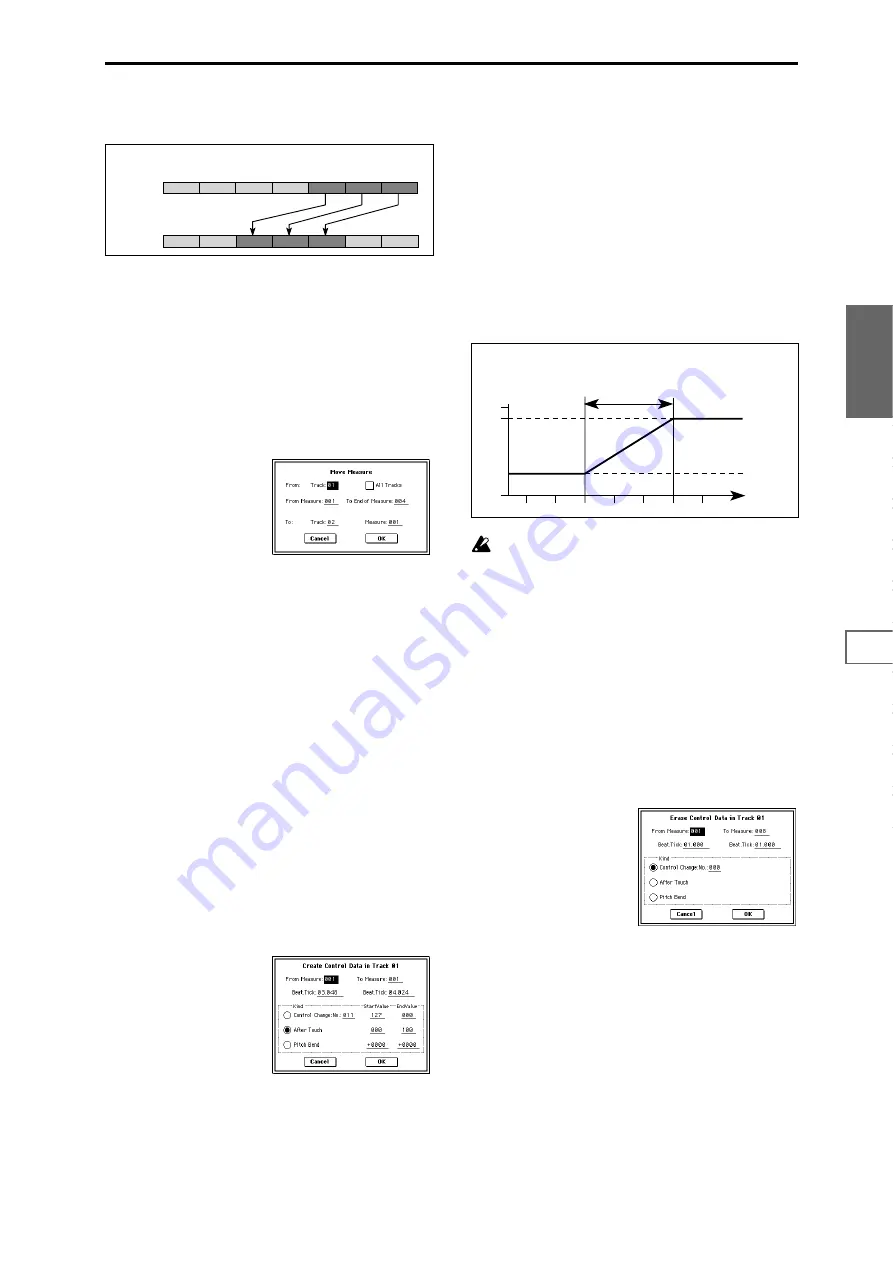
2 (4/4)
1 (4/4)
5 (3/4)
4 (3/4)
3 (4/4)
6 (3/4)
7 (4/4)
2 (4/4)
1 (4/4)
5 (3/4)
4 (3/4)
3 (4/4)
6 (3/4)
7 (4/4)
Track 1
(source)
Track 2
(destination)
Example: When you copy measures 5–7 of track 1 to the third measure of track 2,
measures 3–5 of track 2 will be rewritten.
Location
0
3:00
3:24
3:48
3:72
4:00
4:24
4:48
After touch
127
100
Previous data
Start location
End location
End Value
Start Value
default value
Example: The controller is aftertouch. Starting location is 3:48, ending location is 4:24,
and end value is set to 100. This will cause the aftertouch value to begin
changing from 3:48, and reach a value of 100 at 4:24.
Summary of Contents for TRITON Extreme
Page 1: ...2 E ...
Page 11: ...xii ...
Page 111: ...100 9 5 Page Menu Command 0 1A 0 1I 0 1J Program 9 5A ...
Page 185: ...174 ...
Page 215: ...204 ...
Page 281: ...270 ...
Page 349: ...338 ...
Page 350: ...339 ...
Page 351: ...340 ...
Page 352: ...341 ...
Page 353: ...342 ...


