background image


DECLARATION OF COMPLIANCE 

 
This appliance complies with the following European Directives: 
93/68: General Regulations 
2006/95/CE: “Low voltage” 
2004/108/CE: Electromagnetic compatibility 
CE Regulation 

 1935/2004: this appliance is suitable to come in contact with food products. 

2002/95/CE: RoHS directive 


GENERAL WARNINGS 


Read carefully the instructions manual before starting to use the appliance. This manual contains 
important information for safe installation, use, maintenance, cleaning and handling of the appliance. 
 

This instructions manual is an integral part of the appliance. Keep it in safe and easily reachable place for 
the whole life cycle of the oven. 
Packaging materials (plastic sheets, polystyrene etc.) can be dangerous for children. Keep packaging 
materials out of reach of children. 
This appliance is not intended for use by persons (including children) with reduced physical, sensory or 
mental capabilities, or lack of experience and knowledge, unless they are being supervised by a person 
responsible for their safety. 
Supervise children properly and do not let them play with the appliance. 
The appliance must be used for cooking food only. Any other improper use of the appliance can be 
dangerous.  
Do not use the oven to heat the room. It can be dangerous. 
During use the accessible parts of the oven may become very hot. Do not touch the door and internal parts 
of the oven until the appliance has cooled down. Keep children away from the oven. 
Before closing the oven door, make sure there are no foreign objects or pets inside the oven. 
Do not store flammable materials or temperature-sensitive objects such as cleansers, sprays, vacuum 
packed containers, canned food, etc. in the oven. This presents a fire / explosion risk. 
Hot grease and fat catch fire easily. It is dangerous to heat oil in the oven to cook meat and this should be 
avoided. Never try to put out a grease fire using water (there may be an explosion). Suffocate the flames 
with wet cloths. 
The grill, plates and cooking containers become very hot. When inserting or removing them, use oven gloves 
or pot holders which are completely dry. 
When using or cleaning the oven, be careful not to place your fingers in the door hinges or in the door itself 
in order to avoid crushing or injuries. Be especially careful of this when children are present.  
Leave the oven door open in the supported position only.  
When the door is open, there is a risk of tripping or crushing fingers. 
Do not sit or lean on the oven door, and do not use it as a work surface. 
For maintenance, moving, installation and cleaning of the appliance, use suitable prevention and protection 
equipment (gloves, etc.). 
Never try to remove the plug from the main supply socket by pulling the cable. 
Never touch the appliance if your hands or feet are wet or damp. 
Lifting and moving of appliances weighing more than 25 kg must be carried out using proper equipment, or 
by two persons, in order to avoid risks or injuries. 
Any work on the appliance must be done with the appliance disconnected from the electrical power supply. 
Never clean the appliance with high pressure water or steam cleaning equipment. 
It is not permitted to modify, tamper with or attempt repairs on the appliance, especially with tools 
(screwdrivers and the like), either inside or outside the appliance. 
Repairs must only be carried out by authorized personnel, especially on the electrical parts. Inappropriate 
repair work may cause serious accidents, damage the appliance and equipment and lead to improper 
operation. 
Only original spare-parts must be used for repairs in the authorized service centre. 
The oven must be unplugged as soon as an operating problem is found. 
Make sure the power cable has not been damaged. It must be replaced by the technical service centre in 
order to avoid dangerous situations. 
Appliances repaired in technical service centres must undergo routine testing, especially concerning the 
earth circuit continuity. 
 

22

Summary of Contents for OKB552CFX

Page 1: ...е духовые шкафы OKB552CFX многофункциональный 5 функций OKB752CFX многофункциональный 5 функций OKB752CFN многофункциональный 5 функций OKB752CFW многофункциональный 5 функций OKB592CFX многофункциональный 9 функций OKB792CFX многофункциональный 9 функций ...

Page 2: ......

Page 3: ... воспламененный жир водой это может стать причиной взрыва Потушите пламя при помощи влажной одежды Хромированная решетка противни и посуда используемая для приготовления могут сильно нагреваться Используйте кухонные перчатки либо сухие прихватки не используйте влажные прихватки Во время эксплуатации а также чистки духовки будьте осторожны Избегайте чтобы пальцы попадали в дверь либо в петли двери ...

Page 4: ...ебель должна соответствовать следующим характеристикам панели прилегающие к духовке должны быть выполнены из термостойкого материала если кухонная мебель выполнена из материала с облицовочным покрытием используемый клей должен быть термостойким и должен выдерживать температуру до 100 C Духовку необходимо поместить в стандартный проем шириной 560 мм как показано на рис 1 на странице 4 данного руков...

Page 5: ...Схема встраивания Рис 1 3 ...

Page 6: ...ания Для прямого подключения к сети электропитания необходимо предусмотреть наличие выключателя гарантирующего отключение от элеткросети с расстоянием между контактами которое позволяет полное отключение в условиях напряжения категории III в соответствии с нормами по установке Подсоедините стандартную вилку соответствующую характеристикам указанным в заводской табличке с техническими данными Необх...

Page 7: ...ровод заземления должен быть приблизительно на 2 см длинее других проводов ПЕРВОЕ ВКЛЮЧЕНИЕ ДУХОВКИ Внимание отключите духовку от сети электропитания прежде чем приступать к любому из нижеприведенных действий Прежде чем использовать духовку в первый раз тщательно промойте неабразивным моющим средством рабочую камеру боковые решетки решетку для гриля и противни Поместите решетку для гриля и противн...

Page 8: ...закрытой МАЛЫЙ ГРИЛЬ Жар направляется сверху вниз Данный метод рекомендуется для гриля небольшого количества продуктов тосты горячие бутерброды и т д Дверца должна быть закрытой МАЛЫЙ ГРИЛЬ с вертелом Жар направляется сверху вниз Данный метод рекомендуется для гриля небольшого количества продуктов тосты горячие бутерброды и т д Дверца должна быть закрытой МАЛЫЙ ГРИЛЬ С КОНВЕКЦИЕЙ с вертелом если и...

Page 9: ...го воздуха термостат выключен Дверца духовки должна быть закрытой Рекомендуется для размораживания любых замороженных продуктов Используя данную функцию время размораживания сокращется приблизительно в 3 раза Примечания для функций с грилем Во время использования одной из функций гриля дверца духовки должна быть закрыта а установленная температура не должна превышать 200 C Во время функции гриля р...

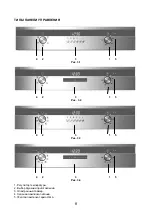
Page 10: ...ПРАВЛЕНИЯ 4 2 3 1 5 Рис 3 1 4 2 3 1 5 Рис 3 2 4 2 3 1 5 Рис 3 3 4 2 3 1 5 Рис 3 4 1 Регулятор температуры 2 Выбор функции приготовления 3 Электронный таймер 4 Зеленая лампочка питания 5 Желтая лампочка термостата 8 ...

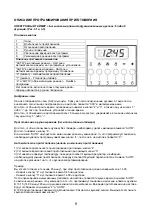
Page 11: ... использования таймера Для того чтобы использовать духовку без таймера необходимо удалить мигающий символ AUTO Для этого нажмите кнопку 4 Если символ AUTO находится во включенном режиме указывая на то что программа установлена необходимо удалить программу нажатием кнопки 4 после чего на дисплее появится 0 Автоматическое приготовление начало и окончание приготовления 1 Установите длительность приго...

Page 12: ...любой момент посредством нажатия кнопки 2 и установки времени на 0 00 Посредстовм нажатия кнопки 4 духовка перейдет в ручной режим Использование таймера Функция таймера заключается в издании звукового сигнала по истечению установленного времени Максимально возможное время составляет 23 часа 59 минут Для того чтобы настроить таймер нажмите кнопку 1 и доновременно одну из кнопок либо до тех пор пока...

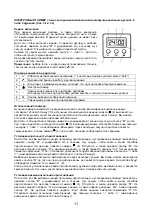
Page 13: ...йте в течение 2 ух секунд сенсор M до тех пор пока на дисплее не загорится символ 4 в мигающем режиме Настройте таймер при помощи сенсоров либо на необходимое Вам время Через несколько секунд на дисплее появится текущее время а также символ 4 после чего начинается обратный отсчет времени Установка длительности приготовления После того как Вы выбрали нужную программу приготовления и установили жела...

Page 14: ...ол 2 и не исчезнет символ A ДРУГИЕ ФУНКЦИИ ПРОГРАММАТОРА Как удалить установленное время программы приготовления Для того чтобы удалить настроенную автоматичскую либо полу автоматическую программу когда на дисплее включен символ A одновременно нажмите сенсоры и и удерживайте их в течение 2 ух секунд до тех пор пока на дисплее не появится символ 2 и не исчезнет символ A Как удалить настройку таймер...

Page 15: ...онвекц 35 45 Бисквитное тесто 200 3 Верх и ниж нагрев конвекц 15 20 5 Лазанья 225 2 Верх и ниж нагрев конвекц 40 50 6 Мясо время приготовления указано для мяса толщиной 1 см Жаркое из телятины 200 2 Верх и ниж нагрев конвекц 120 150 Жаркое из говядины 200 2 Верх и ниж нагрев конвекц 60 90 Мясной рулет 200 2 Верх и ниж нагрев конвекц 30 40 7 Птица Утка 1 2 кг 200 2 Верх и ниж нагрев конвекц 120 180...

Page 16: ...о жира для приготовлния блюд на решетке для гриля Для приготовления жирных блюд рекомендуется налить немного воды на противень для того чтобы избежать воспламенения жира а также появления неприятного запаха либо дыма Основа для выпечки печенье и т д ДОПОЛНИТЕЛЬНЫЕ АКСЕССУАРЫ Глубокий противень Используется в качестве основы для приготавливаемых блюд печенье и т д Телескопические направляющие Телес...

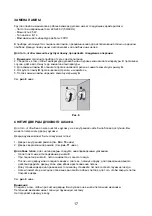
Page 17: ...ли C на боковых стенках духовки и снова установите боковые решетки на прежнее место Поместите аксессуары в духовку См рис 5 ниже Рис 5 КАК ПОЛЬЗОВАТЬСЯ ВЕРТЕЛОМ для моделей у которых он имеется в наличие Наденьте приготавливаемую еду на вертел и закрепите ее двумя вилками Затем установите вертел на подставку в устойчивом положении и закрепите конец вертела в полый вал двигателя Поместите противень...

Page 18: ...помощи влажной салфетки используя при этом специальное моющее средство для духовок затем тщательно ополосните и протрите насухо Для читски дна духовки рекомендуется убрать остатки еды либо жира пока духовка еще не совсем остыла но при этом духовка не должна быть слишком горячей Для чистки внешнего фасада духовки используйте салфетку из мягкой ткани и мыльную воду затем тщательно ополосните и протр...

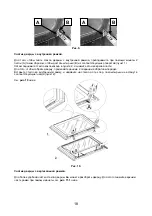
Page 19: ...ышку A См рис 8 ниже Рис 8 СНЯТИЕ ДВЕРЦЫ ДУХОВОГО ШКАФА Для того чтобы было лечге очистить духовку и ее внутренняя часть была более доступной Вы можете легко снять дверцу духовки Дверца духовки может быть следующих типов 1 Дверь с внутренней рамкой См Рис 10 ниже 2 Дверь с вертикальной рамкой См рис 11 ниже Для обоих типов для снятия дверцы следуйте нижеприведенным указаниям На петлях A имеются по...

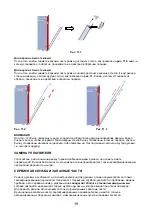
Page 20: ...пункте 2 и снимите его из верхней части Для того чтобы собрать дверцу проделайте данные 2 операции в обратном порядке Вставьте стекло во внутреннюю рамку и надавите на сткело до тех пор пока штырьки не встанут в соответствующие гнезда пункт 2 См рис 10 ниже Рис 10 Снятие дверцы с вертикальной рамкой Для более удобной чистки стекла дверцы Вы можете разобрать дверцу Для этого снимите верхнюю часть р...

Page 21: ...и либо символы на стекле должны читаться изнутри духовки т е смотреть наружу ЗАМЕНА УПЛОТНИТЕЛЯ Уплотнитель расположенный вокруг проема рабочей камеры духовки не должеть иметь повреждений В целях безопасности его замена должна производиться только квалифицированным персоналом Сервисного центра СЕРВИСНАЯ СЛУЖБА И ЗАПАСНЫЕ ЧАСТИ Ремонт духовки в особенности на электрических частях духовки должен осу...

Page 22: ...ия Европейскому регламенту 2002 96 EC регламенту WEEE предусматривающему правила утилизации элекрического и электронного оборудования Проведя правильную утилизацию данного прибора Вы внесете вклад в защиту окружающей среды и охрану здоровья Символ имеющийся на данном приборе либо на его документации указывает на то что данный прибор не является бытовым отходом Данный прибор необходимо сдать в соот...

Page 23: ...OKB552CFX multifunction oven 5 functions OKB752CFX multifunction oven 5 functions OKB752CFN multifunction oven 5 functions OKB752CFW multifunction oven 5 functions OKB592CFX multifunction oven 9 functions OKB792CFX multifunction oven 9 functions ...

Page 24: ...ut a grease fire using water there may be an explosion Suffocate the flames with wet cloths The grill plates and cooking containers become very hot When inserting or removing them use oven gloves or pot holders which are completely dry When using or cleaning the oven be careful not to place your fingers in the door hinges or in the door itself in order to avoid crushing or injuries Be especially c...

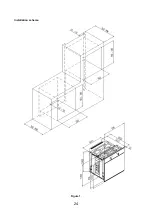
Page 25: ...e the following characteristics the panels adjacent to the oven must be constructed in heat resistant materials in case of veneered wood furniture units the glue must be heat resistant to temperatures up to 100 C The oven must be located in a standard opening of 560 mm as shown in figure 1 on the page 4 of the present instructions manual whether under a counter or in column position When inserting...

Page 26: ...Installation scheme Figure 1 24 ...

Page 27: ...onnected with a distance between the contacts that allows complete disconnection in compliance with surge category III and installation regulations Assemble a standard plug for the capacity indicated on the product plate The power supply cable must be positioned in such a way that it does not exceed the room temperature by 50 C at any point The installer is responsible for correct electricity conn...

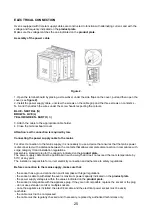
Page 28: ...before proceeding with the following operation the oven must be unplugged from the electrical mains Before using the oven carefully clean the internal cavity the racks the grid and the drip tray with non abrasive soap Insert the grid and the drip tray in their respective runners When this operation is complete plug the oven into the electrical mains and bring it up to maximum temperature for at le...

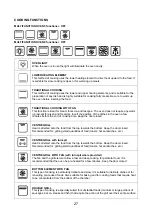
Page 29: ...ENTRE GRILL Heat is directed onto the food from the top towards the bottom Keep the door closed Recommended for grilling small quantities of food toasts hot sandwiches etc CENTRE GRILL with turnspit Heat is directed onto the food from the top towards the bottom Keep the door closed Recommended for grilling small quantities of food toasts hot sandwiches etc CENTRE GRILL WITH FAN with turnspit where...

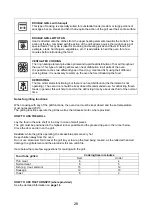
Page 30: ...at distribution the thermostat is not operating The oven door should be kept closed Recommended use for defrosting frozen foods in general this will help to shorten the defrosting time by about one third of the normal time Notes for grilling functions When cooking with any of the grill functions the oven door must be kept closed and the set temperature must not exceed 200 C The grilling functions ...

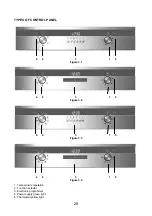
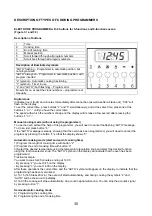
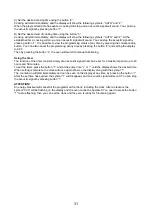
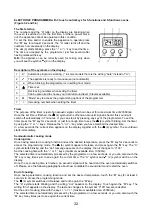
Page 31: ...L PANEL 4 2 3 1 5 Figure 3 1 4 2 3 1 5 Figure 3 2 4 2 3 1 5 Figure 3 3 4 2 3 1 5 Figure 3 4 1 Temperature regulation 2 Function selector 3 Electronic programmer 4 Power supply green light 5 Thermostat yellow light 29 ...

Page 32: ...ven without the help of the programmer you will need to cancel the flashing AUTO message To do so just press button 4 If the AUTO message is steady showing that the oven has been programmed you will need to cancel the program by pressing the button 4 so that the display shows 0 Automatic cooking mode start and end of cooking time 1 Program the length of cooking time with button 2 2 Program the end...

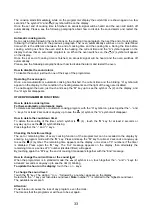
Page 33: ... pressing the button 4 the oven will switch to manual functioning Using the timer The function of the timer consists simply of an acoustic signal that can be set for a maximum period up to 23 hours and 59 minutes To set the timer press the button 1 and at the same time or until the display shows the desired time When setting is complete the clock will once again show on the display along with the ...

Page 34: ...ey for 2 seconds or just for enough time to see the 4 symbol blinking Set the timer by using the or keys Release the or key when you have matched the desired time In a few seconds the current time appears on the display together with the 4 symbol The countdown starts immediately Semi automatic cooking mode Cooking time Once having selected a cooking function and set the desired temperature press t...

Page 35: ...the symbol 2 on the display and the A symbol disappears OTHER PROGRAMMER FUNCTIONS How to delete a cooking time For Semi automatic or Automatic mode To delete a semi automatic or automatic cooking program with the A symbol on press together the and keys for at least 2 seconds or anyway up to see the 2 symbol the A symbol will disappear How to delete the countdown timer To delete the counting of th...

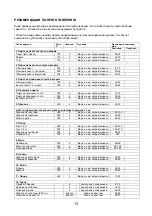
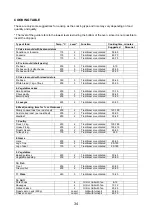
Page 36: ...try 200 3 Traditional or ventilated 15 20 5 Lasagne 225 2 Traditional or ventilated 40 50 6 Meat cooking time for 1 cm thickness Slowly cooked roast ex roast veal 200 2 Traditional or ventilated 120 150 Fast cooked roast ex roast beef 200 2 Traditional or ventilated 60 90 Meatloaf 200 2 Traditional or ventilated 30 40 7 Poultry Duck 1 2 kg 200 2 Traditional or ventilated 120 180 Goose 2 5 kg 200 2...

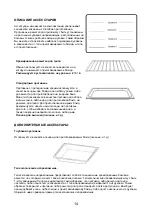
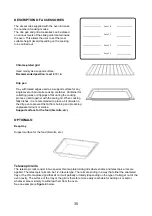
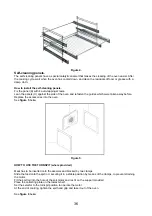
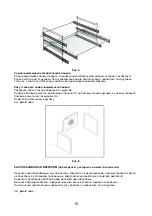
Page 37: ...ng fatty dishes it is recommended to place a bit of water in the drip pan to prevent the fat from burning and producing unpleasant odours or smoke Support surface for the food biscuits etc OPTIONALS Deep tray Support surface for the food biscuits etc Telescopic rails The telescopic rails consist in two special chrome plated side grids where sliders and telescopic arms are applied The telescopic ra...

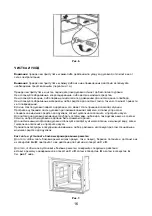
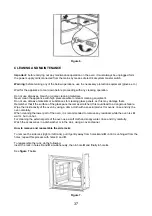
Page 38: ... were taken away before Replace the accessories into the oven See figure 5 below Figure 5 HOW TO USE THE TURNSPIT where provided Meat has to be inserted onto the skewers and blocked by two clamps Slide the food onto the spit rod securing it in a stable position by means of the clamps to prevent straining the motor Fit the spit rod into the hole of the spit motor and rest it on the support provided...

Page 39: ...surface of the glass panel becomes scratched this could lead to a dangerous failure Wipe the inside cavity of the oven by using a damp cloth with a special product for ovens rinse and dry the oven carefully When cleaning the lower part of the oven it is recommended to remove any residuals while the oven is still warm but non hot For cleaning the external parts of the oven use a soft cloth and soap...

Page 40: ...SASSEMBLY To help in cleaning and make access to the oven cavity easier the oven door can be easily removed There may be two different door types 1 The door with internal glass panel Please see figure 10 below 2 The door with vertical frame Please see figure 11 below For both types it is possible to remove the door by operating on the hinges in the following way The hinges A have two moving levers...

Page 41: ...e it out from the top To refit the door repeat the 2 previous operations in reverse Reinsert the glass by resting it on the inner door and pushing it in Press on the glass until the pins slot back into their initial positions point 2 See figure 10 below Figure 10 Removing the door with vertical frame The door can be disassembled to enable the glass to be cleaned it is possible to take off the uppe...

Page 42: ...egible from inside the door thus facing outwards RAPLACEMENT OF THE OVEN GASKET The gasket located around the cooking chamber must be replaced if it has any cracks For safety reasons the gasket must be replaced by a qualified specialist of an Authorized Service Centre TECHNICAL SERVICE AND SPARE PARTS Repairs must only be carried out by authorized personnel especially on the electrical parts It is...

Page 43: ...6 EC Waste Electrical and Electronic Equipment WEEE By making sure that this product is properly disposed of the user contributes to preventing potential environmental and health damage The symbol on the product or on the documentation that goes with it indicates that this product must not be considered as domestic waste It must instead be turned over to suitable collection centres for the recycli...

Page 44: ...12300189430 ...
Reviews: