14
WARNING
The top and the back stand-off brackets must be formed and installed prior to positioning the fireplace into a framed opening, in
order to provide clearances from the appliance to combustible material.
Top stand-offs provide 7-3/4 in. (197 mm) minimum clearance to header. Use only non-combustible material in this area for the entire
width of fireplace. Do not use wood, sheetrock, etc. in this zone. Other clearances apply. All clearances must be maintained.
Top stand-off brackets are not load bearing.
Nailing flanges include a 2-1/2 in. (64 mm) stand-off clearance to the sides of the fireplace.
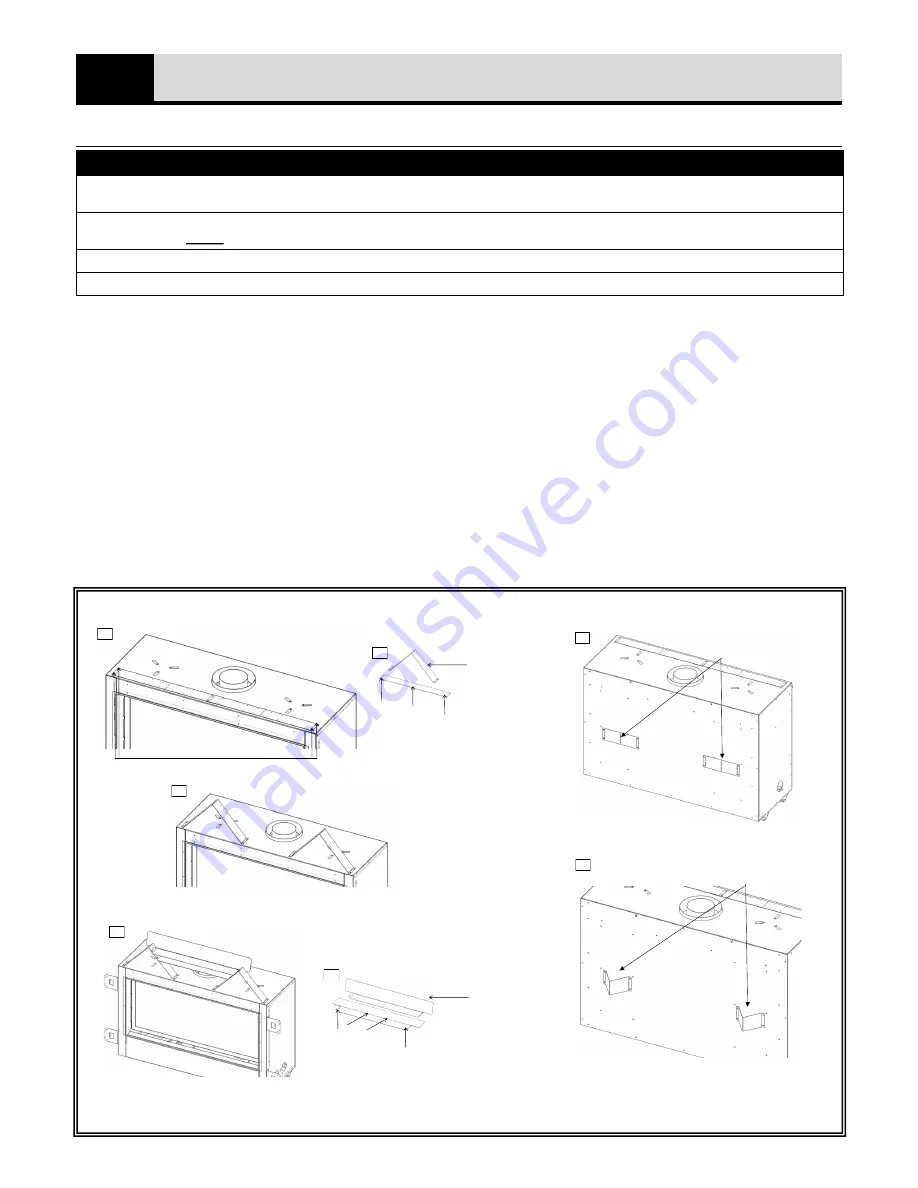
1. Remove and save the (4) screws securing the top stand-off heat shield and the top stand-off brackets. Then form each
stand-off bracket as shown.
2. Re-attach the top stand-off brackets to the fireplace using screws previously removed, along with (4) screws provided in
the fireplace components packet.
3. Bend stand-off heat shield as shown. Attach heat shield to the top stand-off brackets with the (4) screws provided in the
fireplace components packet.
4. Attach top heat shield.
Do not bend until positioned in wall
. Once in position, hand-bend rear flange up to align with angle
on top of stand-offs.
Top stand-off brackets and stand-off heat shields are attached to the top fireplace; the back stand-offs are attached to the back
of the fireplace. All stand-off components are shipped in a flat state.
8.0
FIREPLACE PREPARATION
8.1
Stand-Off Components
8.1.1
Stand-Off Components Locations
8.1.2
Stand-Off Assembly and Installation
Figure 8.1, Stand-Off Assembly and Installation
Remove screws securing stand-off brackets
Top Stand-Off Brackets
As Shipped
1a
Form stand-offs
Top Stand-Off Brackets
Installed
2
Align holes in the formed top stand-offs with the holes
on the fireplace top. Secure with (4) screws.
Back Stand-Off Brackets
As Shipped
4a
Back Stand-Off
Brackets Installed
4b
3a
Stand-Off Heat Shield
as Installed
Align holes in the stand off heat shields with the
holes on the top stand-off brackets. Secure with
(8) screws. Do not form heat shield until secured.
1b
Do not form stand-off heat
shield until after installation.
3b


