


DS Vision® 3000 - Connecting the DS Vision® 3000
11
4.4.1
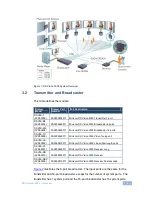
Connecting the Broadcaster/Transmitter
•
Connect CATx cables to the system ports of the broadcaster/transmitter and
the system In ports of receivers/L/DCL or line splitter L.
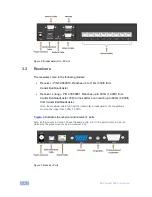
4.4.2
Connecting/Cascading a Line Splitter Long
•
Connect CATx cables to the system out ports of the line splitter long and the
system in ports of receivers/L/DCL or further line splitters Long.
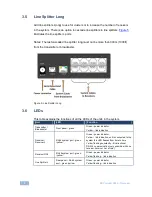
4.4.3
Cascading a Receiver DCL
•
Connect a CATx cable to the system out port of the receiver DCL and the
system in port of a receiver/L/DCL or line splitter long.
4.5
Connecting to the Power Supply
•
Connect the transmitter/broadcaster and all receiver and line splitter long
units to the power supply using the AC/DC adapters provided with the
products.
Once the system is connected the
DS Vision® 3000
system broadcasts to all
remote monitors/speakers.
4.6
Adjusting the Picture Quality
When the broadcasted picture needs adjusting:
•
The receiver (version 3)/ receiver L/ receiver DCL/ line splitter long can be
tuned either via the service utility, or by using the optional tuning unit
Note: Where there are cascaded receivers/ receiver DCL/line splitters long you must tune
them from the unit nearest the broadcaster/transmitter onwards.
4.7
Note on Serial Extension:
The serial connection requires two cables: from player to a transmitter or
broadcaster, use a straight serial cable; from receiver to screen, use a cross cable.


