background image

Kramer Electronics Ltd. 


KN-DSP100 

– Processing Audio Streaming Signals 

17 


Processing Speech 

Select Microphone signal processing when the speakers are used to output speech. The 
Kramer Sound window for speech includes several built-in plugins for processing the audio 
signals. You can adjust the data (where available), mute, or activate plug-ins.  

To process the Microphone signal: 

1.  Click 

. The Kramer Sound window appears (see 

Figure 13

). 

2.  Click 

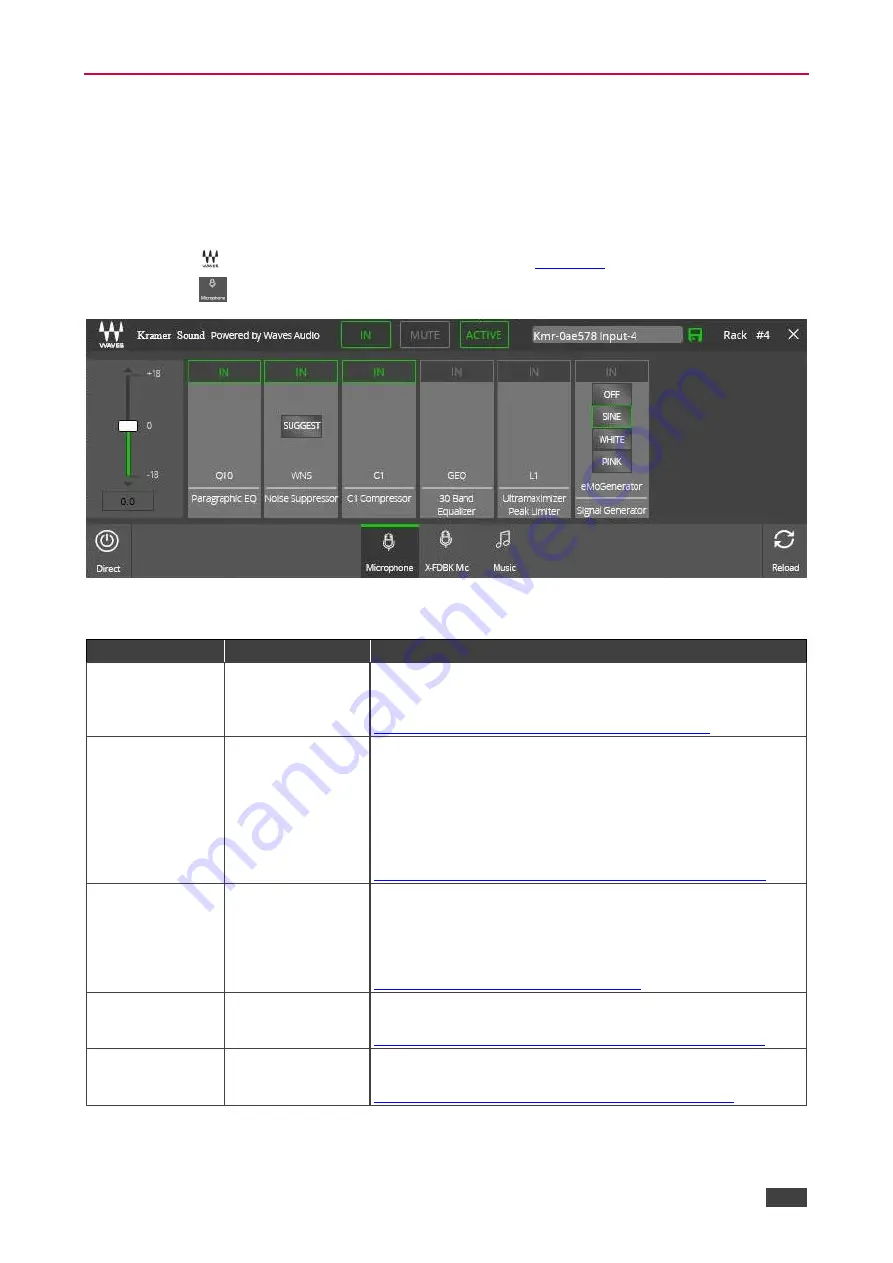
. The Microphone processing window appears: 


Figure 15: Kramer Sound 

– Microphone Preset 

3.  Adjust the plug-ins defined in the following table: 

Plug-in 

Function 

Description 

Q10 

Paragraphic 
Equalizer 

10 bands of precision equalization for mixing and mastering 

– a 

go-to tool for both surgical repair and gentle coloring. For further 
details, see 

www.waves.com/1lib/pdf/plugins/q10-equalizer.pdf 

WNS 

Noise Suppresser 

Real-time noise reduction plugin for cleaning dialog tracks 
(indoor and on-location recordings with constant or modulating 
environment noise). WNS reduces noise from dialog, narration, 
voiceovers and broadcast, with minimal artifacts.  
Click 

SUGGEST

 to automatically adjust the plugin parameters 

to provide an optimized setup. 
For further details, see 

www.waves.com/1lib/pdf/plugins/wns-noise-suppressor.pdf


C1 

C1 Compressor 

Compressor plugin with sidechain, compression, expansion, 
gating, and equalization. C1 is a true production workhorse, 
featuring three independent modules which can be used 
separately or combined for maximum flexibility. For further 
details, see 

www.waves.com/plugins/c1-compressor 

GEQ 

30 Band Equalizer 

30-band graphic equalizer plugin with classic Mono and stereo 
components. For further details, see 

www.waves.com/1lib/pdf/plugins/geq-graphic-equalizer.pdf


L1 

Ultramaximizer 
Peak Limiter 

Advanced level maximizer, look-ahead peak limiter and high-
resolution re-quantizer. For further details, see 

www.waves.com/1lib/pdf/plugins/l1-ultramaximizer.pdf


Summary of Contents for KN-DSP100

Page 1: ...P N 2900 301236 Rev 1 www kramerAV com USER MANUAL MODEL KN DSP100 Kramer Network Powered Server with DSP ...

Page 2: ...100 6 Connecting KN DSP100 via the Ethernet Port 7 Connecting the Ethernet Port Directly to a PC 7 Connecting the Ethernet Port via a Network Hub or Switch 9 Control Configuration via the Ethernet Port 9 Preparing KN DSP100 for Operation 10 Using Kramer Network 13 Processing Audio Streaming Signals 14 Processing Music 15 Processing Speech 17 Processing Microphone Feedback 18 Creating Custom Preset...

Page 3: ...ramer high performance high resolution cables to avoid interference deterioration in signal quality due to poor matching and elevated noise levels often associated with low quality cables Do not secure the cables in tight bundles or roll the slack into tight coils Avoid interference from neighboring electrical appliances that may adversely influence signal quality Position your Kramer KN DSP100 aw...

Page 4: ...h any Dante audio signal and provides auto detection of all Kramer devices and their functionality KN DSP100 seamlessly integrates with standard IT infrastructures and simplifies the user experience with a single point of contact for both management and support of all audio devices The device s processing capability is powered by Waves Audio the world leading developers of audio DSP technologies K...

Page 5: ...ific network site building or room to start managing AV devices System connection status at a glance Quickly identify critical issues in the network and see logical video link status at a glance Typical Applications KN DSP100 is ideal for the following typical applications Airports Hotels Court rooms Hospitals ...

Page 6: ...he device is powered Reset Button Use to reboot the system Power Button Use to toggle setting the device to standby mode turning the device on To turn the power off disconnect the power connector from the mains Power Socket Connect to the power cord and to the mains electricity RS 232 9 pin D sub Connector Connect to a system controller USB 2 0 Ports 2 Connect to a keyboard and mouse if required I...

Page 7: ...he supply circuit overloading the circuits may have a detrimental effect on overcurrent protection and supply wiring Refer to the appropriate nameplate ratings for information For example for fuse replacement see the value printed on the product label The KN DSP100 is earthed grounded and connected only to an electricity socket with grounding Pay particular attention when electricity is supplied i...

Page 8: ...igure 2 1 Connect a laptop for system control to the RS 232 9 pin D sub connector 2 Connect a keyboard and mouse to the USB ports 3 Connect the following ports to the Ethernet LAN 1 RJ 45 port to audio streaming via the Ethernet LAN 2 RJ 45 port to a network To operate KN DSP100 you need at least 1 Dante device connected to the system 4 Connect the VGA 15 pin HD connector to a display 5 Connect th...

Page 9: ...y to a PC You can connect the Ethernet port of the KN DSP100 directly to the Ethernet port on your PC using a crossover cable with RJ 45 connectors This type of connection is recommended for identifying the KN DSP100 with the factory configured default IP address After connecting the KN DSP100 to the Ethernet port configure your PC as follows 1 Click Start Control Panel Network and Sharing Center ...

Page 10: ...Protocol Properties window relevant to your IT system appears as shown in Figure 4 or Figure 5 Figure 4 Internet Protocol Version 4 Properties Window Figure 5 Internet Protocol Version 6 Properties Window 6 Select Use the following IP Address for static IP addressing and fill in the details as shown in Figure 6 For TCP IPv4 you can use any IP address in the range 192 168 1 1 to 192 168 1 255 exclu...

Page 11: ...l devices that are connected to KN DSP100 via HDBT ports and have Ethernet ports as well should not be connected to the network and can be used for Ethernet IP clients Connecting the Ethernet port of the HDBT transmitters receivers to the network switch port in conjunction with Ethernet port network connection on the KN DSP100 will cause network loops that may cause Ethernet switch network breakdo...

Page 12: ...ration This section describes how to verify that KN DSP100 is ready for operation To prepare KN DSP100 1 Connect power to the device and press the power button The following window appears Figure 7 Desktop View 2 Wait for the system to initialize You must wait 5 minutes for the system to initialize ...

Page 13: ...ion 11 3 Check that the Dante virtual Soundcard DVS card is defined as follows Figure 8 Dante Virtual Soundcard Window 4 Click Options and verify that the settings are as follows Figure 9 ASIO Options Window 5 Click OK 6 Minimize the Dante Virtual Soundcard window ...

Page 14: ...s Figure 10 Waves MultiRack Main Window 8 Verify that all the channels appear empty 9 Minimize the MultiRack Window 10 Open Internet Explorer Kramer Network access window opens Figure 11 Kramer Network Welcome Page 11 Enter Username and Password Super and 12345 by default 12 Click LOGIN Kramer Network is ready to use ...

Page 15: ...es 1 Enter Kramer Network Username and Password Super and 12345 by default The system automatically discovers the FC 404NET inputs and outputs 2 Set the system parameters 3 Create a streaming group and add the inputs transmitters to that streaming group my streaming group 4 Create a location Sound Room and associate the outputs receivers to that room To manage audio streaming 1 In the navigation p...

Page 16: ...ing Process and define the signal as music see Processing Music on page 15 microphone see Processing Speech on page 17 or X FDBK Mic see Processing Microphone Feedback on page 18 5 For each plug in preset you can perform the following Click IN to enable or disable plugins When enabled all the individually enabled plugins are active When disabled the signal passes directly from the input to the out...

Page 17: ...indow for music includes several built in plug ins for processing the audio signals You can adjust the data where available mute or activate plug ins Note that if you change any plug in parameter via Waves MultiRack the Music preset changes and the following message appears The preconfigured preset has been changed Save these changes as a new preset in MultiRack or choose another preset to ignore ...

Page 18: ...engineers and musicians For further details see www waves com 1lib pdf plugins renaissance compressor pdf MaxxVolume Volume Leveler Performs four different dynamics processing functions gating low level compression leveling and compression For further details see www waves com 1lib pdf plugins maxxvolume pdf OneKnobPhatter Bass Booster Provides a generous analog style low shelf filter to fatten up...

Page 19: ... noise reduction plugin for cleaning dialog tracks indoor and on location recordings with constant or modulating environment noise WNS reduces noise from dialog narration voiceovers and broadcast with minimal artifacts Click SUGGEST to automatically adjust the plugin parameters to provide an optimized setup For further details see www waves com 1lib pdf plugins wns noise suppressor pdf C1 C1 Compr...

Page 20: ...signals You can adjust the data mute or add plugins To test the microphone feedback 1 Click The Kramer Sound window appears see Figure 13 2 Click The Microphone Feedback processing window appears Figure 16 Kramer Sound Microphone Feedback Preset 3 Adjust the plug ins defined in the following table Plug in Function Description Q10 Paragraphic Equalizer 10 bands of precision equalization for mixing ...

Page 21: ... plugins x fdbk pdf C1 C1 Compressor Compressor plugin with sidechain compression expansion gating and equalization C1 is a true production workhorse featuring three independent modules which can be used separately or combined for maximum flexibility For further details see www waves com plugins c1 compressor GEQ 30 Band Equalizer 30 band graphic equalizer plugin with classic Mono and stereo compo...

Page 22: ...nformation regarding MultiRack operation see www waves com 1lib pdf live multirack manual pdf For details regarding Waves MultiRack toolbar see www waves com 1lib pdf plugins waves system guide pdf To create a new custom preset 1 Select Waves MultiRack from the Task Bar Figure 17 Selecting Waves 2 Select a rack You can select a rack that is not assigned to a streaming input and is empty Figure 18 ...

Page 23: ...base your new preset on an existing one Figure 20 Adding Plug Ins to the Rack 4 Repeat step 3 as required Figure 21 Plug Ins in the Rack 5 Within the rack click Save The following window appears Figure 22 Saving the Preset 6 Select Put into Preset Menu As to have the preset appear in the presets lists when loading a preset For other saving options go to www waves com 1lib pdf plugins waves system ...

Page 24: ... 22 7 Type the Preset name Figure 23 Preset Name 8 Click Ok The preset appears in the preset list when loading a preset Figure 24 Loading User Presets List 9 The custom preset appears in Kramer Sound window within Kramer Network Figure 25 Custom Preset Added ...

Page 25: ...en using a custom preset you can adjust the plug in parameters only via Waves To delete a preset 1 press Ctrl on your keyboard while clicking Load The list of presets appears Figure 27 Deleting a Preset 2 Select a preset to delete and in the confirmation window click OK The preset is removed from the reset list Be careful not to delete any of the Kramer Network presets ...

Page 26: ...erature 0 to 40 C 32 to 104 F Storage Temperature 40 to 70 C 40 to 158 F Humidity 10 to 90 RHL non condensing Regulatory Compliance Safety CE Environmental RoHs WEEE Enclosure Size 1U Type Aluminum Cooling Fans General Net Dimensions W D H 44cm x 37 2cm x 4 5cm 17 3 x 14 6 x 1 8 Shipping Dimensions W D H 52 6cm x 47 5cm x 18 4cm 20 7 x 18 7 x 7 2 Net Weight 5 7kg 12 6lbs Shipping Weight 7 7kg 17lb...

Page 27: ...be insured during shipment with the insurance and shipping charges prepaid by you If this product is returned uninsured you assume all risks of loss or damage during shipment Kramer Electronics will not be responsible for any costs related to the removal or re installation of this product from or into any installation Kramer Electronics will not be responsible for any costs related to any setting ...

Page 28: ...ARNING Disconnect the unit from the power supply before opening andservicing For the latest information on our products and a list of Kramer distributors visit our Web site where updates to this user manual may be found We welcome your questions comments and feedback ...

Reviews: