background image


Kramer Electronics, Ltd. 


USER MANUAL 


Models:


TP-107AVR

XGA/Audio Line Transmitter


RC-108

Presentation Controller


RC-116

Presentation Controller


BoardView™ Kits: 

Kit 2AVR:

  TP-107AVR (2 units) and TP-122


Kit 4AVR:

  TP-107AVR (4 units) and TP-122


Kit 8AVR:

  TP-107AVR (8 units) and TP-122


Summary of Contents for RC-108

Page 1: ... Models TP 107AVR XGA Audio Line Transmitter RC 108 Presentation Controller RC 116 Presentation Controller BoardView Kits Kit 2AVR TP 107AVR 2 units and TP 122 Kit 4AVR TP 107AVR 4 units and TP 122 Kit 8AVR TP 107AVR 8 units and TP 122 ...

Page 2: ...rdView Kit 15 5 3 Configuring the TP 107AVR TP 122 Kit with the RC 108 16 5 4 Wiring the CAT 5 LINE IN LINE OUT RJ 45 Connectors 17 5 5 Connecting via the K NET 17 5 6 Setting the Address Number of the TP 107AVR 18 6 Controlling the TP 107AVR 19 6 1 Controlling the TP 107AVR TP 122 Kit via the RC 108 19 6 2 Controlling the TP 107AVR TP 122 Kit via an RS 485 Controller 19 6 2 1 RS 485 Communication...

Page 3: ...25 Figure 21 Loading the Hex 25 Figure 22 RS 232 Window 26 Figure 23 Atmel Flip Window Connected 26 Figure 24 Atmel Flip Window Operation Completed 27 Tables Table 1 Single Units 1 Table 2 BoardView Kit Options 1 Table 3 Connecting a Power Adapter to a System 2 Table 4 TP 107AVR XGA Audio Line Transmitter Features 8 Table 5 TP 122 XGA Audio Line Receiver Features 9 Table 6 TP 122 XGA Audio Line Re...

Page 4: ...ded Cables TP 107AVR One K NET4 and one CAT 5 cable RC 108 One K NET cable RC 116 One K NET cable Table 2 BoardView Kit Options BoardView Kit Name Machines Included Recommended Cables Recommended5 Power Adapter 12V DC 6 Recommended Controller STP CAT 5 K NET7 2AVR Two TP 107AVR One TP 122 2 1 1 25A N A 4AVR Four TP 107AVR One TP 122 4 3 2 1A RC 108 8AVR Eight TP 107AVR One TP 122 8 7 5A RC 108 RC ...

Page 5: ...nd that you Unpack the equipment carefully and save the original box and packaging materials for possible future shipment Review the contents of this user manual Use Kramer high performance high resolution cables3 2 1 Quick Start This quick start chart summarizes the basic setup and operation steps 1 If more than eight units are used it is recommended to connect two 5A power adapters to the system...

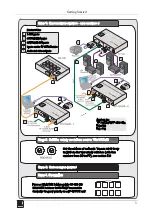
Page 6: ...Getting Started 3 ...

Page 7: ...ht3 TP 107AVR units that can be interconnected via CAT 5 and K NET cables and each assigned an address number4 Pressing an ONLINE button on any of the interconnected machines transmits the signal from that machine to the TP 122 receiver which is also connected to the system see Figure 1 The signal is then decoded on the TP 122 and converted to an XGA output and audio outputs If the ONLINE button i...

Page 8: ...nsmitter in the chain A pair of rotary selector switches for setting the ADDRESS see section 5 6 In addition the TP 107AVR Must be controlled via KNET Has a resolution of up to UXGA Is 12V DC fed The TP 122 Can power or be powered by the transmitter over the same CAT 5 cable see section 3 4 Can change the polarity of decoding H and V Sync for video Includes EQ and level controls Allows an operatio...

Page 9: ...e installed far away from electric cables motors and so on which are prone to create electrical interference However since the use of UTP cable might cause inconformity to electromagnetic standards Kramer does not commit to meeting the standard with UTP cable 3 4 About the Power Connect Feature The Power Connect feature applies as long as the cable can carry power This feature is available when us...

Page 10: ...ty cables Avoid interference from neighboring electrical appliances that may adversely influence signal quality and position your Kramer product away from moisture excessive sunlight and dust 4 Your Line Transmitter Receiver and Presentation Controllers This section defines the TP 107AVR XGA Audio Line Transmitter see section 4 1 TP 122 XGA Audio Line Receiver see section 4 2 RC 108 and RC 116 Pre...

Page 11: ...cts to2 the LINE OUT RJ 45 connector on the previous line transmitter 7 K NET Terminal Block Connector Connect to the previous or next line transmitter or to a control device GND is for the ground connection B and A are for RS 485 and 12V is for powering the unit1 8 XGA IN 15 pin HD Connector Connects to the XGA source 9 Audio IN 3 5mm Mini Jack Connects to the audio source 10 Remote 3 5mm Mini Ja...

Page 12: ... to1 LINE OUT RJ 45 connector on the TP 107AVR 5 XGA OUT 15 pin HD Connector Connects to the XGA acceptor 6 LINK LED Illuminates when receiving the correct input signal 7 LEVEL Trimmer Adjusts3 the output signal level 8 EQ 2 Trimmer Adjusts3 the cable compensation equalization level 9 ON LED Illuminates when receiving power 1 Using an STP CAT 5 cable with RJ 45 connectors at both ends the PINOUT i...

Page 13: ...de Table 6 TP 122 XGA Audio Line Receiver Underside Features Feature Function 1 VS Switch Slide the switch down to set the V SYNC to negative polarity slide the switch up1 to set the V SYNC to positive polarity 2 HS Switch Slide the switch down to set the H SYNC to negative polarity slide the switch up1 to set the H SYNC to positive polarity 1 By default both switches are set down for a negative V...

Page 14: ...etween releasing control3 over the TP 107AVR and regaining control 2 RS 232 9 pin D sub Connector Connects to a PC for upgrading the firmware 3 RS 485 and 12V DC PINs GND is for the ground connection B and A are for RS 485 and 12V is for powering the unit 1 From 1 to 8 for the RC 108 and from 1 to 16 for the RC 116 2 For about 2 seconds 3 For example to let unit 6 gain control press the selector b...

Page 15: ...ide Panel Table 8 RC 108 RC 116 Underside Panel Features Feature Function 1 PROGRAM Switch Slide downwards for normal operation slide upwards to PROGRAM to upgrade to the latest Kramer firmware seesection 8 2 RS 485 TERM Switch Slide the switch downwards to terminate the RS 485 Line with 120Ω 3 NULL MODEM MODE Switch To connect a PC to the unit using a null modem adapter slide the NULL MODEM MODE ...

Page 16: ...n HD M audio jack to VGA 15 pin HD M audio jack 1 2 On the TP 122 connect the XGA OUT 15 pin HD F connector to the XGA acceptor for example a display and connect the AUDIO OUT S PDIF RCA connector to the digital audio acceptor for example an AV receiver and the ANALOG 3 5mm mini jack to the analog audio acceptor for example a stereo audio recorder 3 Connect the LINE OUTPUT RJ 45 connector on the T...

Page 17: ...mpensation equalization level if required If necessary set the H SYNC and V SYNC switches2 on the underside Figure 9 Connecting the XGA Audio Line Transmitter Receiver System 1 Use a screwdriver to carefully rotate the trimmer adjusting the appropriate level 2 By default both switches are set down for negative V SYNC and H SYNC polarity ...

Page 18: ...RJ 45 connector of the previous TP 107AVR unit to the LINE IN RJ 45 connector on the TP 107AVR 4 Connect the K NET4 port to the previous and the next TP 107AVR unit or to the RC 108 Presentation Controller5 5 Set an address number for each TP 107AVR unit via the two potentiometers see section 5 6 6 Connect the 12V DC power supply see Table 3 to the power socket and connect the power supply to the ...

Page 19: ...troller to the chain via the K NET port2 4 Connect the last TP 107AVR unit to a receiver for example the Kramer TP 1223 which is connected to an acceptor for example a projector and an AV receiver with speakers 5 Set the RS 485 TERM switch on the first and the last unit to ON 6 Set an address number for each TP 107AVR unit via the two rotary switches see section 5 6 Figure 11 Configuring the TP 10...

Page 20: ...ite 1 Orange White 2 Green 2 Orange 3 Orange White 3 Green White 4 Blue 4 Blue 5 Blue White 5 Blue White 6 Orange 6 Green 7 Brown White 7 Brown White 8 Brown 8 Brown Pair 1 4 and 5 Pair 1 4 and 5 Pair 2 3 and 6 Pair 2 1 and 2 Pair 3 1 and 2 Pair 3 3 and 6 Pair 4 7 and 8 Pair 4 7 and 8 5 5 Connecting via the K NET The TP 107AVR units connect to the RC 108 RC 116 controller via the K NET ports as il...

Page 21: ... many TP 107AVR units for example 32 units preset each to a different address number any number from 1 to 256 The preset addresses make it easy to setup a BoardView system For example to setup a 16 unit system take any of the available machines and connect them as described in section 5 5 in any order without having to worry about a duplicate address number Such a system can be used without connec...

Page 22: ...he projector and overriding the individual ONLINE buttons on the TP 107AVR units If a SELECTOR button on the RC 108 is pressed and held for about two seconds the RC 108 loses control over the TP 107AVR units in the chain To regain control press and hold once again 6 2 Controlling the TP 107AVR TP 122 Kit via an RS 485 Controller To control a BoardView via an RS 485 controller see to section 6 2 1 ...

Page 23: ... 485 Communication Protocol Use the communication protocol to control the TP 107AVR units via an RS 485 controller The communication settings are 9600 bps 8 data bits no parity 1 stop bit and no flow control Table 11 defines the communication protocol for address numbers 0 to 127 K NET PINOUT GND Green Black Red White 12V B A Power Supply Power Supply For the RC 8IR For the BoardView System see Ta...

Page 24: ...H80 Addr H81 Reply sent from the specific TP 107AVR to the controller Table 12 defines the Communication protocol for address numbers 0 to 127 Table 12 RS 485 Communication Protocol Address Number 128 256 Command Command 1 Command 2 Command 3 Command 4 Description Select a TP 107AVR machine according to its address number H02 H81 Address1 HC1 The VGA input of the selected TP 107AVR device is activ...

Page 25: ...et You can download the up to date file3 from the Internet To do so 1 Go to our Web site at www kramerelectronics com and download the file FLIP_RC108 zip from the Technical Support section 2 Extract the file FLIP_ RC108 zip to a folder for example C Program Files Kramer Flash 3 Create a shortcut on your desktop to the file FLIP EXE 8 2 Connecting the PC to the RS 232 Port Before installing the la...

Page 26: ... using a null modem adapter Connect the RS 232 9 pin D sub port on your PC to the RS 232 9 pin D sub rear panel port on the master RC 108 RC 116 unit as Figure 16 illustrates Figure 16 Connecting a PC without using a Null Modem Adapter 8 3 Upgrading the Firmware Follow these steps to upgrade the firmware 1 Double click the desktop icon Shortcut to FLIP EXE The Splash screen appears as follows Figu...

Page 27: ...e 18 Atmel Flip Window 3 Press the keyboard shortcut key F2 or select the Select command from the Device menu or press the integrated circuit icon in the upper right corner of the window The Device Selection window appears Figure 19 Device Selection Window 4 Click the button next to the name of the device and select from the list AT89C51RD2 ...

Page 28: ...Flash Memory Upgrade 25 Figure 20 Device Selection Window 5 Click OK and select Load Hex from the File menu Figure 21 Loading the Hex AT89C51RD2 T89C51RD2 ...

Page 29: ...nd from the Settings menu or press the keys Alt SCR The RS232 window appears Change the COM port according to the configuration of your computer and select the 9600 baud rate Figure 22 RS 232 Window 8 Click Connect In the Atmel Flip window in the Operations Flow column the Run button is active and the name of the chip appears as the name of the third column AT89C51RD2 Verify that in the Buffer Inf...

Page 30: ...ss appears2 RC108 hex Figure 24 Atmel Flip Window Operation Completed 10 Close the Atmel Flip window 11 Disconnect the power on the RC 108 12 If required disconnect the RS 232 rear panel port on the RC 108 unit from the null modem adapter 13 Slide the underside PROGRAM switch to the normal position 14 Connect the power to the RC 108 1 See also the blue progress indicator on the status bar 2 If an ...

Page 31: ... 6MHz video into audio CONTROLS KNET RS 485 RS 485 TERM slide switch remote button COUPLING AC AUDIO THD NOISE 0 152 1MHz AUDIO 2nd HARMONIC 0 009 POWER SOURCE 12V DC 180mA for BoardView kits see Table 3 DIMENSIONS 12cm x 6 95cm x 2 44cm 4 7 x 2 74 x 0 96 W D H WEIGHT 0 3kg 0 66lbs approx ACCESSORIES Mounting bracket 19 rack adapter OPTIONS Power supply K NET and CAT 5 cables see Table 2 Table 15 ...

Page 32: ...tsofnature ii Product modification orfailureto followinstructions supplied with theproduct iii Repairorattemptedrepairby anyonenot authorized byKramer iv Anyshipment oftheproduct claims must bepresentedtothe carrier v Removalorinstallationoftheproduct vi Anyothercause whichdoes not relateto aproduct defect vii Cartons equipment enclosures cables or accessoriesusedinconjunctionwiththeproduct 1 Remo...

Page 33: ...For the latest information on our products and a list of Kramer distributors visit our Web site www kramerelectronics com where updates to this user manual may be found We welcome your questions comments and feedback Caution Safety Warning Disconnect the unit from the power supply before opening servicing ...

Reviews: