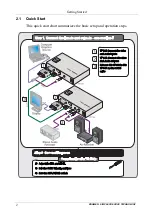
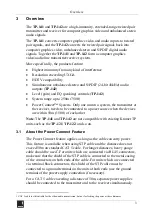
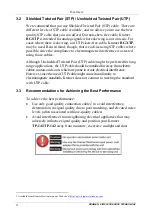
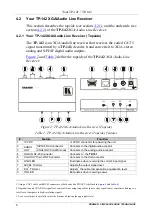
background image

Kramer Electronics, Ltd. 


USER MANUAL 


Models: 

TP-141 

XGA/Audio Line Transmitter 

TP-142

 XGA/Audio Line Receiver 


Summary of Contents for TP-141

Page 1: ...Kramer Electronics Ltd USER MANUAL Models TP 141 XGA Audio Line Transmitter TP 142 XGA Audio Line Receiver ...

Page 2: ...XGA Audio Line Receiver Underside 7 5 Connecting the XGA Audio Line Transmitter Receiver 7 5 1 Wiring the CAT 5 LINE IN LINE OUT RJ 45 Connectors 10 6 Technical Specifications 11 Figures Figure 1 TP 141 XGA Audio Line Transmitter 5 Figure 2 TP 142 XGA Audio Line Receiver Topside 6 Figure 3 TP 142 XGA Audio Line Receiver Underside 7 Figure 4 Connecting the XGA Audio Line Transmitter Receiver System...

Page 3: ...ty and stores The package includes the following items The TP 141 TP 142 Power adapter 12V DC input This user manual2 2 Getting Started We recommend that you Unpack the equipment carefully and save the original box and packaging materials for possible future shipment Review the contents of this user manual Use Kramer high performance high resolution cables3 1 GROUP 1 Distribution Amplifiers GROUP ...

Page 4: ...KRAMER SIMPLE CREATIVE TECHNOLOGY Getting Started 2 2 1 Quick Start This quick start chart summarizes the basic setup and operation steps ...

Page 5: ...r source when the devices are within 50m 150ft of each other Note The TP 141 and TP 142 are not compatible with existing Kramer TP units such as the TP 121 TP 122 and so on 3 1 About the Power Connect Feature The Power Connect feature applies as long as the cable can carry power This feature is available when using STP cable and the distance does not exceed 50m on standard CAT 5 cable For longer d...

Page 6: ...be preferred for long range applications the UTP cable should be installed far away from electric cables motors and so on which are prone to create electrical interference However since the use of UTP cable might cause inconformity to electromagnetic standards Kramer does not commit to meeting the standard with UTP cable 3 3 Recommendations for Achieving the Best Performance To achieve the best pe...

Page 7: ... stereo analog audio signal codes them and transmits them over CAT 5 cable to a TP 142 receiver Figure 1 and Table 1 define the TP 141 Figure 1 TP 141 XGA Audio Line Transmitter Table 1 TP 141 XGA Audio Line Transmitter Features Feature Function 1 12V DC 12V DC connector for powering the unit 2 AUDIO IN 3 5mm Mini Jack Connects to the audio source 3 LINE OUT RJ 45 Connector Connects to1 the LINE I...

Page 8: ...C 12V DC connector for powering the unit 2 AUDIO OUT S PDIF RCA connector Connects to the digital audio acceptor 3 ANALOG 3 5mm Mini Jack Connects to the analog audio acceptor 4 LINE IN RJ 45 Connector Connects to1 the TP 141 5 XGA OUT 15 pin HD F Connector Connects to the XGA acceptor 6 LINK LED Illuminates when receiving the correct input signal 7 LEVEL Trimmer Adjusts the output signal level 8 ...

Page 9: ...de the switch to XGA 5 Connecting the XGA Audio Line Transmitter Receiver You can use the TP 141 and TP 142 to configure an XGA Audio Line to Twisted Pair Transmitter and Receiver system To connect the TP 141 XGA Audio Line Transmitter with the TP 142 XGA Audio Line Receiver as illustrated in Figure 4 do the following 1 On the TP 141 connect the XGA source for example the graphics card of a laptop...

Page 10: ...g see connector pinouts in section 5 1 7 Connect the 12V DC power adapter to the power socket of either the TP 141 or the TP 142 and connect the adapter to the mains electricity The Power Connect feature feeds power to the second device If the second device does not power on due to a long line connect a 12V DC power adapter to the second device as well 8 If required On the TP 142 Set the XGA VIDEO...

Page 11: ...Connecting the XGA Audio Line Transmitter Receiver 9 Figure 4 Connecting the XGA Audio Line Transmitter Receiver System ...

Page 12: ...ble with RJ 45 connectors Table 4 CAT 5 PINOUT Figure 5 CAT 5 PINOUT EIA TIA 568A EIA TIA 568B PIN Wire Color PIN Wire Color 1 Green White 1 Orange White 2 Green 2 Orange 3 Orange White 3 Green White 4 Blue 4 Blue 5 Blue White 5 Blue White 6 Orange 6 Green 7 Brown White 7 Brown White 8 Brown 8 Brown Pair 1 4 and 5 Pair 1 4 and 5 Pair 2 3 and 6 Pair 2 1 and 2 Pair 3 1 and 2 Pair 3 3 and 6 Pair 4 7 ...

Page 13: ...HD connector Audio 1 audio S PDIF RCA connector 1 audio analog 3 5mm mini jack MAX OUTPUT LEVEL Video 1V Audio 2 5V CONTROLS Level 7 5dB to 4 4dB EQ 0dB to 33dBm 130m 50MHz BANDWIDTH 3dB 2 Audio 20Hz 20kHz 0 5dB RESOLUTION Exceeding UXGA S N RATIO Audio 80dB TOTAL GAIN Audio Analog analog 0dB Analog SPDIF 12dBFS COUPLING AC TND N Audio 0 01 POWER SOURCE 12V DC 60mA DIMENSIONS 12 1cm x 7 18cm x 2 4...

Page 14: ...ofnature ii Product modification orfailureto followinstructions supplied withtheproduct iii Repairorattemptedrepairby anyonenot authorized byKramer iv Anyshipment oftheproduct claims must bepresentedtothe carrier v Removalorinstallationoftheproduct vi Anyothercause whichdoes not relateto aproduct defect vii Cartons equipment enclosures cables or accessoriesusedinconjunctionwiththeproduct 1 Removal...

Page 15: ...For the latest information on our products and a list of Kramer distributors visit our Web site www kramerelectronics com where updates to this user manual may be found We welcome your questions comments and feedback Caution Safety Warning Disconnect the unit from the power supply before opening servicing ...

Reviews: