

TP-590RXR Quick Start (P/N: 2900-300860QS REV 2)
P/N:
2 9 0 0 - 3 0 0 8 6 0 QS
Rev:
2
Scan for full manual
TP-590RXR Quick Start Guide
This guide helps you install and use your
TP-590RXR
for the first time.
www.kramerav.com/downloads/TP-590RXR
to download the latest user manual and check if firmware
upgrades are available.
Step 1: Check w
hat’s in the box
TP-590RXR
HDMI Line Receiver
4 Rubber feet
1 Bracket set
1 Power supply (12V DC)
1 Quick start guide
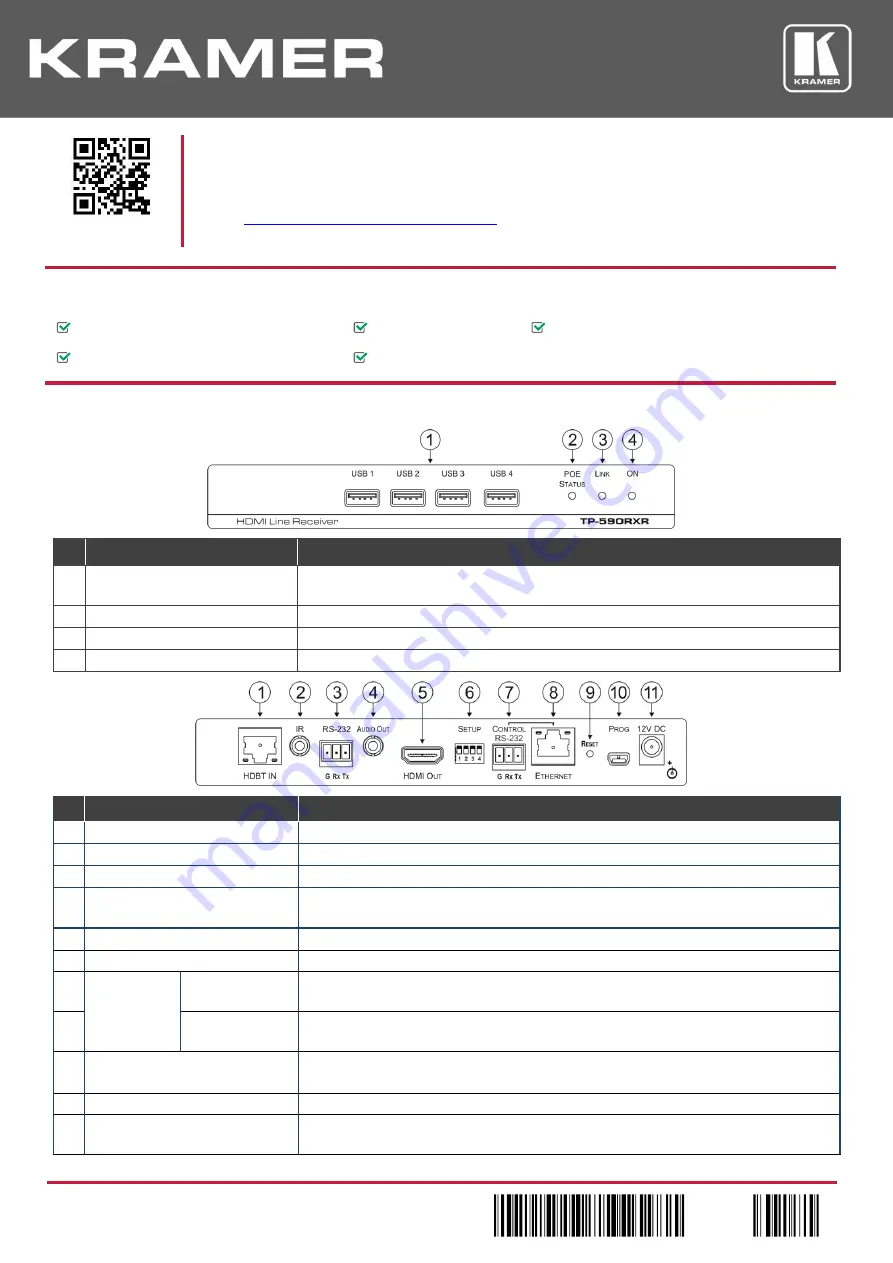
Step 2: Get to know your TP-590RXR
#
Feature
Function
1
USB 1
– 4
Connectors
Connect to the USB peripheral devices, (for example, USB camera, computer mouse, or
keyboard).
2
POE STATUS
LED
Lights green when power is received over the TP connection.
3
LINK
LED
Lights green when the HDBT link is valid.
4
ON
LED
Lights green when the device receives power.
#
Feature
Function
1
HDBT IN
RJ-45
Connector
Connect to the HDBT OUT RJ-45 connector on the HDBT transmitter.
2
IR
3.5mm Mini Jack Connector
Connect to an external infrared transmitter or sensor.
3
RS-232
3-pin Terminal Block
Connect to an RS-232 device to be controlled, for example, a projector.
4
AUDIO OUT
3.5mm Mini Jack
Connector
Connect to the stereo, analog audio acceptor.
5
HDMI OUT
Connector
Connect to the HDMI acceptor.
6
SETUP
4-way DIP-switch
Set the device behavior (see Step 4).
7
CONTROL
RS-232
3-pin
Terminal Block
Connect to the serial controller for this device.
8
ETHERNET
RJ-45 Connector
Connect to the Ethernet controller to control this device or to a LAN to pass network traffic.
9
RESET
Switch
Press and hold for 5 seconds to reset the device to factory default settings.
Press and immediately release to power-cycle the device (Reset).
10
PROG
Mini USB Connector
Connect to a PC to perform firmware upgrades.
11
12V DC
Power Connector
Connect to the supplier power adapter if power is not supplied from a PoE device via the TP
cable.


