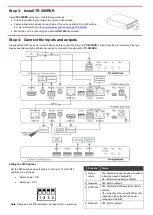


Step 5: Connect the power
Connect the 12V DC power supply to
TP-590RXR
and plug it into the mains electricity.
Safety Instructions
Caution:
There are no operator serviceable parts inside the unit.
Warning:
Use only the Kramer Electronics power supply that is provided with the unit.
Warning:
Disconnect the power and unplug the unit from the wall before installing.
See
for updated safety information.
Step 6: Operate TP-590RXR
Operate
TP-590RXR
via:
•
Remotely, using Protocol 3000
commands via RS-232 or Ethernet
•
Embedded web pages via the
Ethernet
•
Remotely, using an IR remote
control transmitter
Default Parameters
Parameter
Value
Name
KRAMER_
Model
TP-590RXR
IP Address
192.168.1.39
UDP Port
50000
TCP Port
5000
Network Mask
255.255.0.0
Gateway Address
192.168.0.1
RS-232 Baud Rate
115200
HDCP Mode
Follow output
Audio Selection Mode
Auto
Video Signal Loss Timeout (no 5V)
0 seconds
Video Signal Loss Timeout (5V present)
10 seconds
Protocol 3000 Commands
Command
Description
Command
Description
#
Protocol handshaking
LOGIN
Set/get protocol permission
AV-SW-TIMEOUT
Set/get video auto-switch timeout
LOGOUT
Cancel current permission level
BUILD-DATE?
Read device build date
MODEL?
Read device model
CPEDID
Copy EDID data from the output to the input
NAME
Set/get machine (DNS) name
DIR
List files in device
NAME-RST
Reset machine name to factory default
(DNS)
DISPLAY?
Valid / Invalid output
NET-DHCP
Set/get DHCP mode
ETH-PORT
Set/get Ethernet port protocol
NET-GATE
Set/get gateway IP
FACTORY
Resets the device to factory default
NET-IP
Set/get IP address
FS-FREE?
Get file system free space
NET-MAC?
Get MAC address
GEDID
Read EDID data
NET-MASK
Set/get subnet mask
GET
Get file
PASS
Set/get Password
HDCP-MOD
Set/get HDCP mode
PROT-VER?
Get device protocol version
HDCP-STAT?
Get HDCP signal status
RESET
Reset device
HELP
Get command list or help for specific
command
SECUR
Start / Stop Security
LDEDID
Write EDID data to input
SIGNAL?
Get input signal lock status
LDFW
Load new firmware
SN?
Read device serial number
LOAD
Load new firmware
UPGRADE
Perform firmware upgrade
LOCK-EDID?
Get EDID lock status
VERSION?
Read device firmware version


